
Tus neeg siv phau ntawv


- 90 -
8. Application examples
Example 1: Measuring a simple signal
You can observe an unknown signal and quickly display and measure the frequency and peak-to-peak value
of that signal.
For a quick display of this signal, proceed as follows:
1. Set the probe attenuation to 10X in the menu and also to 10X with the switch on the probe.
2. Connect the probe of CH 1 to the desired measuring point.
3. Press the AUTOSET button.
The oscilloscope automatically optimises the waveform and you can adjust the vertical and horizontal
divisions on this basis according to your requirements.
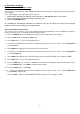
Perform automatic measurement
The oscilloscope can measure most of the displayed signals automatically. Use the following procedure to
measure frequency, period, average and peak-to-peak values:
1. Press the Measure button to display the function menu for automatic measurement.
2. Press the H1 button to display the Add menu.
3. Select CH1 as the source in the right-hand menu.
4. A selection of available measurements is displayed on the left side of the screen. Turn the multi knob
to select Period.
5. Select Add in the right menu to add the period measurement.
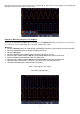
6. A selection of available measurements is displayed on the left side of the screen. Turn the multi knob
to select Frequency.
7. Select Add in the right menu to add the frequency measurement and finalise the settings for CH1.
8. Select CH2 as the source in the right-hand menu.
9. Press the Add button. A selection of available measurements is displayed on the left side of the screen.
Turn the Multi knob to select Main (average measurement).
10. Press the Add button to add funds.
11.A selection of available measurements is displayed on the left side of the screen. Turn the M knob to
select Pk-Pk (peak-to-peak).
Press the Add button to add the Pk-Pk (Tip-Tip) and finalise the settings for CH2.