
Tus neeg siv phau ntawv

- 88 -
9. Start the data connection via "Get Data now!" or "Keep Getting now!".
Connect to WiFi Station:
You can also connect the oscilloscope via an existing W-LAN to a PC that is connected to the same W-LAN.
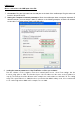
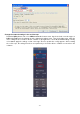
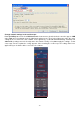
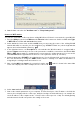
1. Press the Utility key and select LAN Set under Function in the lower menu. Set this for WiFi under Type
to WIFI-STA and confirm with Set in the lower menu.
2. Select Set in the lower menu and then SSID. Now you must enter the name of the existing W-LAN
network with which a connection is to be established (e.g. "HEIMNETZ1234" etc.) via the keyboard that
appears and confirm it with the Enter key .
3. In the right-hand menu, use Enscription to select whether the W-LAN network is encrypted with a
password. Open means that you do not need a password to establish a connection to the W-LAN. With
WPA or WEP, the encryption is activated and you must enter the existing password. You can set this
under Password in the right-hand menu and use a soft keyboard to enter it (8 - 32 letters).
4. Select the port under IP:PORT in the right-hand menu. Use the M-rotary knob or the touch screen for
this. Turn the M knob to change the PORT number, which is currently set to 3000. The IP address is
assigned by the existing network and cannot be set.
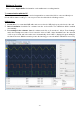
5. After selecting ON under Status, the connection is active and a symbol is shown in the upper right
corner of the display. Here in the example, the IP is 10.1.1.126.
6. Select Save Set in the lower menu to save the settings you have made.
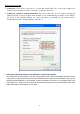
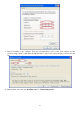
7. Now set the network parameters of your computer. The first three bytes of the IP address should be the
same as those displayed in the oscilloscope, while the last byte should be different. In our example, we
set the IP address of the computer to 10.1.1.123 (IP of the oscilloscope 10.1.1.126). The default gateway
and subnet mask should correspond to the settings of the router.