
Tus neeg siv phau ntawv


- 66 -
Cursor measurements in FFT mode:
In FFT mode, press the cursor key to open the cursor menu.
A description of the cursor menu in FFT mode is given below:
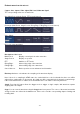
Menu
Setting
Description
Type
Vamp
Freq
Freq&Vamp
Auto Cursor
Displays the vamp cursor measurement
Displays the frequency measurement cursor of the
Displays cursor of frequency and vamp measurement
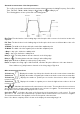
Horizontal cursors are displayed as the intersections
of the vertical cursors with the waveform
Line Type
(time and voltage type)
Freq
Vamp
Activates vertical cursor
Activates horizontal cursors
Window
(Wave Zoom Mode)
Main
Extension
Activates cursor in main window
Activates cursor in FFT zoom window
Line
a
b
from
Move M-rotary knob to move line a
Move M-rotary knob to move line b
Move M-rotary knob to move line a and b at the same
time, as they are connected
Source
Math FFT
Select the channel as source which is used for the
cursor measurement.
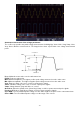
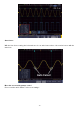
Perform the following steps for amplitude and frequency measurement via cursor in FFT mode as follows:
1. Press the Math button and select FFT.
2. Press the cursor key to open the menu.
3. Select Window as extension in the lower menu.
4. Press the first menu field in the lower screen menu (H1) to change the setting to Freq&Vamp. Two blue
dash lines for the horizontal voltage range and two blue dash lines for the vertical time range are now
displayed.
5. In the lower menu, please select LineType as Freq to activate the vertical cursors. If the line is selected
as "a" in the lower menu, turn the M-rotary knob to move the line to the right or left in the display. If "b"
was selected, move this line to the right or left with the M-rotary knob.
6. In the lower menu, please select LineType as Vamp to activate the horizontal cursors. If the line is
selected as "a" in the lower menu, turn the M-rotary knob to move the line up or down in the display. If
"b" was selected, move this line up or down with the M-rotary knob.
7. In the lower menu under Window, select the setting Main for the cursor control in the main window.
Autoscale function
This is a very useful function for first-time users who want to perform a simple and quick check of the input
signal. This function is used to automatically track signals even if the signals change at any time. Using the
Autoscale function, the instrument can automatically set up the trigger mode, voltage division and time scale
according to the type, amplitude and frequency of the signals.