
Tus neeg siv phau ntawv


- 34 -
Set trigger system
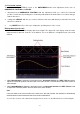
The trigger determines when the oscilloscope starts acquiring data and displaying the waveform. Once set
correctly, the trigger can convert a fluctuating display into a meaningful waveform.
When the oscilloscope starts acquiring data, it records enough data to display the waveform to the left of the
trigger point. The oscilloscope continues to record data while waiting for a trigger condition. When a trigger
is detected, the unit continuously records enough data to display the waveform to the right of the trigger point.
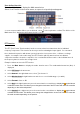
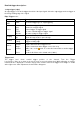
The trigger control area consists of a 1 rotary knob and 2 menu buttons.
TRIG LEVEL: This knob sets the trigger level. When you press the knob, the level is reset to zero.
Force: Press this button to create a trigger signal. This function is primarily used with the trigger
modes "Normal" and "Single".
Trigger Menu: The button calls up the trigger control menu.
Single trigger
Trigger control
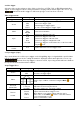
The unit provides four types of triggers: single trigger, alt trigger, logic trigger and bus trigger. Each trigger
type has different submenus.
There are two ways to get into trigger mode:
Key operation: Press Menu in the trigger field to open the trigger menu. With H1 you can then select the
extended trigger menu, which you can scroll (turn) and select (press) with the multipurpose knob.
Touch screen operation: Press the house icon to open the touch menu. Select Trig Menu and then the
trigger (Single, Alt, Logic, Bus) in the lower menu. The trigger type can then be selected in the right-hand
screen menu under Type.
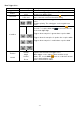
Single: Uses a single trigger to display a stable waveform on both channels.
Logic Trigger: Triggers a signal according to the conditions of the logic ratio
Bus Trigger: Sets bus timing trigger