
Tus neeg siv phau ntawv
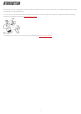
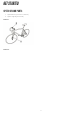
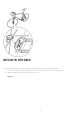
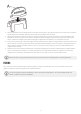
Table Of Contents

6
3. Pass the cable ties over the speed sensor and rubber part (picture 2 A). Adjust the sensor to the front fork so that the
POLAR logo faces outwards. Adjust the ties loosely. Do not tighten them fully yet.
4. Attach the magnet to a spoke at the same level as the speed sensor (picture 2). There is a small caved dot on the
backside of the sensor (picture 3 A), which indicates the spot the magnet should be pointing at when passing the
sensor. Fasten the magnet to the spoke and tighten it lightly with a screwdriver. Do not tighten it fully yet.
5. Fine-tune the positioning of both the magnet and the speed sensor so that the magnet passes close to the sensor but
does not touch it (picture 2). Move the sensor towards the wheel/spokes as close as possible. The gap between the
sensor and the magnet should be under 4 mm/0.16’’. The gap is correct when you can fit a cable tie between the
magnet and the sensor.
6. Rotate the front tire to test the speed sensor. The flashing red light on the sensor indicates that the magnet and the
sensor are positioned correctly. If you keep rotating the tire, the light will stop flashing. Tighten the screw to the
magnet with a screwdriver. Also tighten the cable ties securely and cut off any excess cable tie ends.
Before you start cycling, set the wheel size of your bicycle into the receiving device or mobile application.
PAIRING
Your new sensor must be paired with the receiving device in order to receive data. For more information, see the user
guidance material of the receiving device or mobile application.
To ensure a good connection between the sensor and the receiving device, it is recommended to keep the
device in a bike mount on the handlebar.