
User's Manual

4. OPERATING THE UNIT
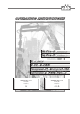
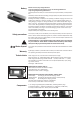
ON/HORN
FREQUENCY
CHANGE
FREQUENCY CHANGE
Safety equipment in the NBB-radio remote control:
In the transmitter, this comprises mainly:
%STOP resp. EMERGENCY STOP, with automatic disconnection of the power supply.
%Automatic zero positioning.
In the receiver:
%Automatic zero setting when switching back on after radio interruption.
%Locking of the radio commands at relay level in the event of a defective STOP, circuit.
To ensure fault-free operation, please follow precisely the following rules for operation:
The unit to be controlled can only be switched on - it is assumed that the transmitter is
ready to operate - when no command unit is actuated. The command necessary to do so
is triggered by the key "ON/HORN". This triggers a horn signal in the unit to be controlled.
After switch-on of the facility to be controlled, this key is used for repeated emission of the
horn signal in accordance with working regulations.
If the NBB radio remote control is not used for a long period, it is urgently recom-
mended - if you use rechargeable batteries - that they should be charged now
and again (about every 4 weeks). This prevents deep discharges of the batteries
and prolongs their useful life. If you turn off the NBB radio remote control for a
long period, we recommend you to take the batteries out of the transmitter.
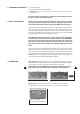
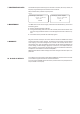
Frequency change:
To change the frequency, keep the "ON/HORN" key pressed down. Then press/ push the
"FREQUENCY CHANGE" key. If the receiver locks into the new frequency, a horn signal
is given (if present) and the unit to be controlled is ready for operation.
Please observe the particular postal approval regulations of the concerned country.
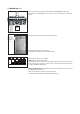
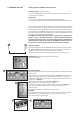
Channel number: The actual channel is shown in the display.
(see example on the left)
+
1
2
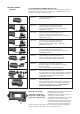
Joystick-Teachmode:
After replacing a joystick it is necessary to re-teach all joysticks. Use following steps to en-
ter teach mode:
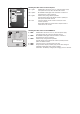
- Enter the teach mode using the push buttons displayed in image 1. Press and hold both
Buttons on the right side and the left side above for seven seconds. Display will
indicate “JOY TEACH” when teach mode is successfully entered and the instruction
for the joystick. (Image 2)
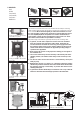
- Go full stroke in both directions of all joysticks. (Image 3)
- Bring all joysticks to zero position by releasing them.
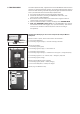
- To store joystick settings press the lower left button on switch board.(Image 4)
“JOY STORE” will appear briefly on display. Then transmitter will go into
operation mode.
- To delete displayed errors turn transmitter off and back on.
Warning!!!
The TEACH MODE, for adjusting and memory of max. and min. - values of the valves
when proportional control, one activates by a seperat combination of keys.
This is descriptive on a seperate sheet.
+
3
4