English Smart V3 ™ for Palm OS® 5 User Manual
Smart V 3.0 | User Manual for Palm OS® 5 Contents 1. Introduction ..............................................................5 2. Installing Smart ....................................................6 3. Smart Desktop.....................................................7 4. Installing Maps Using Smart Desktop ..................8 5. Starting Smart ......................................................9 6. Controlling Smart ...............................................10 7.
Smart V 3.
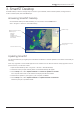
Smart V 3.0 | User Manual for Palm OS® 5 1. Introduction Whether you travel in your own country, or overseas, Smart™ will direct you to your destination without the need for map books and second-hand instructions. The Global Positioning System is available free of charge, at any time, and depending on your GPS receiver, may be accurate to within 5 m (15 ft).
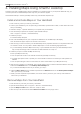
Smart V 3.0 | User Manual for Palm OS® 5 2. Installing Smart Begin by installing Smart Desktop on your computer. Then install and register Smart on your handheld, activate and download the maps you require from Smart Desktop. You will need an Internet connection to complete activation. Note: Windows® XP® users, ensure XP® Service Pack 1 or higher is installed before you install Smart Desktop. 1. Close all open programs on your computer. 2.
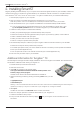
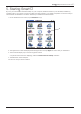
Smart V 3.0 | User Manual for Palm OS® 5 3. Smart Desktop Smart Desktop is used to manage maps to and from your handheld, obtain software updates, manage Custom Points of Interest (POIs) and install Basemaps.
Smart V 3.0 | User Manual for Palm OS® 5 4. Installing Maps Using Smart Desktop Smart comes with one Map Product Key that will allow you to install one map. If you require an additional map, you must first purchase an additional Map Product Key from your Navman supplier. Use Smart Desktop to activate your Map Product Key and install the required map. Install and Activate Maps on Your Handheld 1. Insert a memory card in your memory card reader. 2.
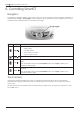
Smart V 3.0 | User Manual for Palm OS® 5 5. Starting Smart By now, you have installed Smart Desktop on your computer, installed Smart on your handheld, installed any required maps to your memory card and mounted your GPS receiver in your vehicle, if required. You are now ready to start Smart and establish a connection between your handheld and GPS receiver. 1. On the handheld Home screen, tap the SmartST icon (a). a 2. The Legal Notice screen will display.
Smart V 3.0 | User Manual for Palm OS® 5 6. Controlling Smart Navigation Icons display on the Map, 3D Map, Next Instruction and Turn List View screens for screen navigation. Additionally, on handhelds with a 2-way or 5-way toggle, screen navigation may be undertaken using the toggle buttons. See your handheld manual to identify whether your handheld has a toggle.
Smart V 3.0 | User Manual for Palm OS® 5 7. Main Menu Screen The Main Menu screen gives you access to all of Smart’s functions, including navigating to a destination. 1. From the Map screen, tap 2. Tap to open the Main Menu screen. , to display more Main Menu options. 8. GPS Status Signals are transmitted by Global Positioning System (GPS) satellites orbiting the Earth. This screen provides a visual representation of the information being received.
Smart V 3.0 | User Manual for Palm OS® 5 Getting a GPS Fix For Serial GPS Receivers 1. From the Main Menu, tap Setup. in the upper right-hand corner, then select GPS from the drop-down box. The GPS Setup screen will open. 2. Tap 3. Tap Serial in the Port section. 4. Refer to the instructions supplied with your GPS receiver to select the Baud rate. to return to the Main Menu. 5. Tap 6. Tap , then GPS Status to open the GPS Status screen. 7. Tap the GPS On checkbox to open the COM port.
Smart V 3.0 | User Manual for Palm OS® 5 9. Setting your Destination Before you travel, you must specify a destination for Smart to plan your route. Note: Depending on the country of destination, one or more fields may not be available when selecting your destination. To a Street Address 1. From the Main Menu, tap Destination, then Address. The Destination Address screen will open. 2. Select a country from the Country drop-down box. 3.
Smart V 3.0 | User Manual for Palm OS® 5 To the Intersection of Two Streets 1. From the Main Menu, tap Destination, then Intersection. The Destination Intersection screen will open. 2. Select a country from the Country drop-down box. 3. Type and select the destination address: • To select an area, type the name of a geographical location such as a town, city, state or county in the Area box. Select the area from the list that displays. • Type the name of one of the intersecting roads in the Int. of box.
Smart V 3.0 | User Manual for Palm OS® 5 2. Type and select the POI search criteria: • Select a category of POI from the Category drop-down box. • Select a type of POI from the Type drop-down box. • Select a country from the Country drop-down box. • Type the name of a geographical location such as a town, city, state or county in the Area box. Select the area from the list that displays. 3. Tap to open the Points of Interest Results screen displaying your search results. 4.
Smart V 3.0 | User Manual for Palm OS® 5 To a Recent Destination The last 20 routes are stored as recent destinations. 1. From the Main Menu, tap Destination, then Recent. The Recent Destinations screen will open. 2. Select a destination from the list. 3. Complete one of the following: • To calculate and display the route to the Recent Destination, tap . The 3D Map screen will open. • To display the address without calculating the route, tap . The Map screen will open.
Smart V 3.0 | User Manual for Palm OS® 5 3. Tap Address. The Destination Address screen will open. Note: You can also add destination points using Intersections, Points of Interest, Favourites, your Palm Contacts database and recent destinations. 4. Select a country from the Country drop-down box. 5. Type and select the destination address: • To select a postcode or zip code, type up to five characters of the postcode in the Postcode box, or the zip code in the Zip Code box.
Smart V 3.0 | User Manual for Palm OS® 5 10. Avoiding an Area Smart enables a route to be calculated that avoids a specified area on the map. Up to 10 Avoid Areas can be added. Avoid Areas are displayed as shaded areas. Adding an Avoid Area 1. From the Main Menu, tap Map. 2. Tap and hold the area that you want to avoid. 3. Select Add Avoid Area from the pop-up Map menu. An Avoid Area is displayed. 4. Set the Avoid Area to the correct size and position.
Smart V 3.0 | User Manual for Palm OS® 5 11. Viewing your Route Once a route has been calculated, there are several ways to view it. Cycle through the screens by tapping . Map Screen The Map screen is always oriented North, and shows your current position and surrounding street names. If the route has been calculated, the route and all turns are highlighted. • To view the Map screen, either tap on the Main Menu.
Smart V 3.0 | User Manual for Palm OS® 5 3D Map Screen The 3D Map screen displays when a route is calculated, oriented to the travelling direction with an adjustable horizon. • To view the 3D Map screen, either tap tap Map on the Main Menu. • Zoom in and out by tapping to cycle through the screens until the 3D Map screen is displayed, or to zoom in and to zoom out.
Smart V 3.0 | User Manual for Palm OS® 5 Next Instruction Screen The Next Instruction screen displays information that you need for the next turn, the direction of the turn and the distance to the turn. • To view the Next Instruction screen, either tap displayed, or tap Map on the Main Menu.
Smart V 3.0 | User Manual for Palm OS® 5 Turn List Screen The Turn List screen displays a list of the remaining turns to your destination with the direction of the turn, the street name and the distance to the turn. Each distance shown in the right-hand column represents the distance from your current location to that turn. The next turn is highlighted. • To view the Turn List screen tap Turn List on the Main Menu.
Smart V 3.0 | User Manual for Palm OS® 5 Viewing the Location Summary A summary of a location can be displayed on the Map or 3D Map screen. The location summary includes: • Name of street, POI, Favourite or Quick Nav • Description of location. • Latitude and Longitude of location. To display the location summary: 1. Tap and hold the Map or 3D Map screen. 2. Select the location name from the top of the Map pop-up menu. The location summary will display.
Smart V 3.0 | User Manual for Palm OS® 5 12. Map Screen Pop-up Menu The pop-up Map menu is displayed from the Map or 3D Map screens by tapping and holding a point on the screen. Note: Available options depend Menu Option Description Location The name of the road, POI, Favourite or Quick Nav. Select to display the location summary. Set as departure Sets the selected point as your departure point. Navigate to Sets the selected point as your destination point.
Smart V 3.0 | User Manual for Palm OS® 5 13. Route Demonstrator The Route Demonstrator allows you to: • Preview a route. • Plan and view a route without a GPS fix, such as when you are inside a building. Step 1. Select Departure Point If you have a GPS fix, you do not need to select a departure point unless the demonstrated route is to start elsewhere. 1. Find your departure point by scrolling the map with the stylus. 2. Tap and hold the road or POI icon that represents your location. 3.
Smart V 3.0 | User Manual for Palm OS® 5 14. Trip Meter The Trip Meter - Current Route screen is used to view the distance travelled, average speed, maximum speed, time taken and stationary time for your current trip. • From the Main Menu, Trip Meter. The Trip Meter - Current Route screen will open. The Trip Meter - Totals screen is used to view the distance travelled, average speed, maximum speed, time taken and stationary time for all of your trips to date, or since the trip meter was last reset.
Smart V 3.0 | User Manual for Palm OS® 5 15. Favourites and Quick Navs Favourites are used to access frequently used destinations without having to re-enter information. Favourites are accessed from the Favourite List screen. You are able to save your three most frequently used Favourites as Quick Navs. Using a Quick Nav is the quickest and easiest way to set your destination. Quick Navs are accessed from the Quick Nav screen, or from the pop-up Map menu on the Map or 3D Map screens.
Smart V 3.0 | User Manual for Palm OS® 5 4. In the Name box, type a name for the Quick Nav. 5. To change the icon displayed on the Map and 3D Map screen: a. Tap the Icon icon. A list of icons will display. b. Tap the icon you want for the Favourite. 6. Tap to save the Quick Nav. The Favourite List screen will display. Using Quick Navs 1. From the Main Menu, tap Quick Nav. 2. Tap your previously saved Quick Nav destination. The 3D Map screen will open.
Smart V 3.0 | User Manual for Palm OS® 5 16. Settings You can modify the following settings to suit your preferences: General Settings 1. From the Main Menu, tap Setup. The Setup screen will display. Tap in the upper right-hand corner, then select General from the drop-down box. The General Setup screen will open. 2. Modify the settings as required: • To enable the automatic rerouting function when you take a wrong turn, select the Automatic Rerouting check box.
Smart V 3.0 | User Manual for Palm OS® 5 GPS Settings For Serial GPS Receivers 1. From the Main Menu, tap Setup. The Setup screen will display. 2. Tap in the upper right-hand corner, then select GPS from the drop-down box. The GPS Setup screen will open. 3. Tap Serial in the Port section. 4. Refer to the instructions supplied with your GPS receiver to select the Baud rate. 5. Tap to return to the Main Menu. For Bluetooth GPS Receivers 1. From the Main Menu, tap Setup. The Setup screen will display.
Smart V 3.0 | User Manual for Palm OS® 5 Display Settings 1. From the Main Menu, tap Setup. The Setup screen will display. Tap in the upper right-hand corner, then select Display from the drop-down box. The Display Setup screen will open. 2. Modify the settings as required: • To improve colour contrast in light or dark conditions, select either Day or Night in the Map Colour Scheme section. • To change the colour scheme of the Map screen, tap preferred colour scheme from the drop-down box .
Smart V 3.0 | User Manual for Palm OS® 5 Guidance Settings 1. From the Main Menu, tap Setup. The Setup screen will display. Tap in the upper right-hand corner, then select Guidance from the drop-down box. The Guidance Setup screen will open. 2. Modify the settings as required: • To enable voice guidance during navigation, select the Voice Instructions check box.
Smart V 3.0 | User Manual for Palm OS® 5 Points of Interest (POI) Settings Points of Interest (POIs) in a region are grouped into Categories. This function allows you to select the categories you need. For example, you may be interested in entertainment venues only, and want to disable other POI categories such as financial services. 1. From the Main Menu, tap Setup. The Setup screen will display. Tap select POI from the drop-down box. The POI Setup screen will open.
Smart V 3.0 | User Manual for Palm OS® 5 Routing Settings 1. From the Main Menu, tap Setup. The Setup screen will display. Tap in the upper right-hand corner, then select Routing from the drop-down box. The Routing Setup screen will open. Tap to reset the settings on this screen to their default values. 2. Modify the settings as required: • Move the Route slider towards Shorter for Smart to give more weighting to the shortest distance when calculating a route.
Smart V 3.0 | User Manual for Palm OS® 5 17. Smart Desktop Advanced Features Find a City or Town To search for a City or Town to verify the map region to be installed: 1. From the Map menu, click Find City. The Find City window will open. 2. Type the name of the City or Town in the City Name box. The list of available Cities will reduce to match your search. 3. Double-click the name of the City or Town. The Desktop Map will rotate to centre on the selected City or Town.
Smart V 3.0 | User Manual for Palm OS® 5 Points of Interest (POI) Editor You can add custom Points of Interest (POIs) using the POI Editor. Custom POIs can be set to announce when in close proximity at the Active POI Settings screen. Step 1. Create a Custom POI File 1. Create a New POI File. • On the Map menu, click POIs. The POI Editor window will open. • On the File menu of the POI Editor, click New Text File. The POI File Name window will open.
Smart V 3.0 | User Manual for Palm OS® 5 18. Continuous Continental Navigation* You can seamlessly navigate between installed maps without the need for installing all maps en route. This is achieved by using a Basemap. A Basemap is a map of a large area, such as West Europe or the United States, containing main roads that connect cities and towns. You can select a road or POI on the Basemap as your start point or destination.
Smart V 3.0 | User Manual for Palm OS® 5 19. Improving Performance Reducing Number of Active Maps Smart uses program memory to store maps, so it is recommended that you only specify the map or maps that you currently require. The Active Map Selection Settings screen allows you to specify which of the available maps are to be used. See page 32 for more information. 20.
Smart V 3.0 | User Manual for Palm OS® 5 Software Product License IMPORTANT - Please read carefully NAVMAN (THE LICENSOR) IS WILLING TO LICENSE THE SMART SOFTWARE (THE SOFTWARE) TO YOU (THE CUSTOMER) ONLY IF YOU ACCEPT ALL THE TERMS OF THIS LICENCE. PLEASE READ THE TERMS CAREFULLY, BECAUSE USING THIS SOFTWARE WILL BE DEEMED TO BE YOUR ACCEPTANCE THAT YOU ARE USING IT ON THE FOLLOWING TERMS.
Smart V 3.0 | User Manual for Palm OS® 5 Support Information Support for New Zealand: Support for US and Canada: Navman NZ Ltd 13-17 Kawana Street Northcote Auckland New Zealand Navman USA Limited 27142 Burbank Foothill Ranch CA 92610 United States of America Phone: 0800 GONAVMAN pcnsupport.nz@navman.com www.navman.com Phone: 866-9-NAVMAN support@navmanusa.com www.navmanusa.
English Edition Bluetooth GPS Receiver ™ 4100 / 4420 / 4470 User Manual
Bluetooth GPS Receiver | User Manual Contents 1. Introduction ................................................................................ 3 2. Bluetooth GPS Receiver Features .............................................. 4 3. Connecting the Bluetooth GPS Receiver to your PDA ............... 6 4. Positioning the Bluetooth GPS Receiver in a Vehicle ................. 7 5 Batteries ................................................................................... 10 6 Optional Accessories ...
Bluetooth GPS Receiver | User Manual 1. Introduction Whether you travel in your own country, or overseas, the Bluetooth™ GPS Receiver will provide you with a Global Positioning System (GPS) based location accurate to within 5 m (15 ft) for 95% of the time.
Bluetooth GPS Receiver | User Manual 2. Bluetooth GPS Receiver Features It is recommended that you familiarise yourself with the basic operations of your Bluetooth GPS Receiver: Top Components 3 1 Component 1 On/Off Button 2 Description To turn on: Press for two seconds and release. To turn off: Press for two seconds and release. The Bluetooth GPS receiver will automatically turn off three minutes after the Bluetooth connection is closed or lost. The indicator light is built into the On/Off button.
Bluetooth GPS Receiver | User Manual Side Components 4 2 1 3 Component Description Forms the base of the Bluetooth GPS Receiver and protects the internal batteries. 1 Battery Cover 2 Side Clip Holds the battery cover in place. 3 Non-Slip Pad Prevents the receiver from slipping when it is not in the receiver cradle. 4 External GPS Antenna MCX Socket If an external GPS antenna is plugged in, the Bluetooth GPS Receiver will use the external antenna instead of the internal antenna.
Bluetooth GPS Receiver | User Manual 3. Connecting the Bluetooth GPS Receiver to your PDA To establish a Bluetooth connection between your PDA and the Bluetooth GPS Receiver, complete the following steps: 1. Turn on the Bluetooth GPS Receiver. • Press the On/Off button for two seconds. • The On/Off button will flash blue twice every 1.5 seconds to indicate it is not connected to another Bluetooth device. On/Off Button 2. Turn on your PDA. 3.
Bluetooth GPS Receiver | User Manual 4. Positioning the Bluetooth GPS Receiver in a Vehicle Use the following guides to choose a suitable position for the Bluetooth GPS Receiver: • The receiver must have a good view of the sky and horizon. • The receiver must not obstruct your view, or interfere with the operation of the vehicle or the vehicle safety equipment. • The receiver must be accessible so that you can operate the On/Off button and replace the batteries.
Bluetooth GPS Receiver | User Manual Option Two: Mounting Pad on Dashboard (Permanent) You can attach the Bluetooth GPS Receiver to the dashboard using the receiver cradle and mounting pad: Warning: This is a permanent solution – the mounting pad cannot be removed once fixed and will mark the dashboard if forcibly removed. 1. Remove one of the backing layers from the receiver mounting pad. 2. Attach the sticky side of the mounting pad to the under-side of the receiver cradle. 3.
Bluetooth GPS Receiver | User Manual Option Two: Mounting Disc on Dashboard (Permanent) You can position your PDA on the dashboard using the PDA windscreen suction mount (see figure one), PDA cradle (see figure two) and PDA mounting disc (see figure three). Warning: This is a permanent solution – the mounting disc cannot be removed once fixed and will mark the dashboard if forcibly removed. 1.
Bluetooth GPS Receiver | User Manual 5. Batteries When using the vehicle power-adapter, you need not remove the batteries. For minimum time to obtain a GPS fix, ensure that the three AAA batteries are always in the Bluetooth GPS Receiver. Battery life is up to 30 hours of active use; however, results vary with battery type. Replacing the Batteries When the light in the On/Off button turns red, replace the batteries in the Bluetooth GPS Receiver. To replace the batteries: 1.
Bluetooth GPS Receiver | User Manual 6. Optional Accessories External Antenna If your vehicle is fitted with an athermic (heat reflecting) or a heated windscreen, GPS signals to the Bluetooth GPS Receiver are greatly reduced or blocked. An external antenna is available to ensure that sufficient GPS signal is available. The antenna is attached by a magnet to the outside of your vehicle, usually on the roof. The antenna cable is plugged in to the External GPS Antenna MCX Socket.
Bluetooth GPS Receiver | User Manual Warranty Agreement IMPORTANT: The following terms and conditions may vary from country to country. Please check with Your Navman dealer from where You purchased the product. Hardware Product: Navman warrants its products to be free from defects in materials or workmanship under normal use for one year from the date of purchase (the Warranty Period) to the original owner (You).
Bluetooth GPS Receiver | User Manual Support Information Support for New Zealand: Support for US and Canada: Navman NZ Ltd 13-17 Kawana Street Northcote Auckland New Zealand Navman USA Limited 27142 Burbank Foothill Ranch, CA 92610 United States of America Phone: 0800 GONAVMAN pcnsupport.nz@navman.com www.navman.com Phone: 866-9-NAVMAN support@navmanusa.com www.navmanusa.