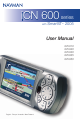
iCN 600 series with Smart 2005 TM User Manual iCN 610 iCN 620 iCN 630 iCN 635 iCN 650 English - Europe / Australia / New Zealand
iCN 600 series | User Manual Contents Box Contents ............................................................................ 5 1. Introduction ........................................................................... 7 2. iCN Features ........................................................................ 8 3. Positioning the iCN in a Vehicle........................................... 10 4. Getting Started.................................................................... 13 5. Memory Card .........
iCN 600 series | User Manual 4
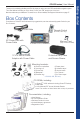
iCN 600 series | User Manual Navman welcomes your feedback. To contact us or visit our website, see Support Information on page 87. Box Contents Purchasers of Smart 2005 software-only upgrade kits, see the enclosed Upgrade Guide for your Box Contents.
Getting started iCN 600 series | User Manual 6
iCN 600 series | User Manual Whether you travel in your own country or elsewhere, the iCN will direct you to your destination without the need for map-books and second-hand instructions. The Global Positioning System (GPS) is available free of charge, at any time, and is accurate to within 5 m (15 ft). Your iCN map provides street-level detail for door-to-door navigation, including Points of Interest (POIs) such as accommodation, petrol stations, railway stations and airports.
Getting started iCN 600 series | User Manual 2. iCN Features We recommend that you familiarize yourself with the iCN’s basic operations, such as using the 8-way toggle and Volume button. Some buttons have two functions, and specific features vary between iCN models.
iCN 600 series | User Manual 2 3 4 1 5 6 Component Description 1 Speaker Broadcasts voice commands and warnings; Use Volume button to adjust 2 Memory Card Slot* Memory card may be inserted into slot with label facing the front of the iCN.
Getting started iCN 600 series | User Manual 3. Positioning the iCN in a Vehicle The iCN can be mounted in a vehicle two ways: 1. By suction on the windscreen; 2. By suction, adhesive tape and screws drilled directly into the dashboard. Note: This is a permanent solution and will mark your dashboard. Follow the safety guidelines on page 7 to ensure that the iCN does not obstruct the driver’s view, or interfere with the operation of vehicle airbags and safety devices.
iCN 600 series | User Manual 3. Open the GPS antenna outwards, so that it has a clear view of the sky. 4. iCN 650 users, United States, Canada and New Zealand users go to step 5, otherwise continue: Gently insert the card in the Memory Card slot with the label facing the front of the iCN. (see page 15 for how to insert the memory card).
Getting started iCN 600 series | User Manual Adhesive Tape and Screw-Mount* You can use the baseplate, adhesive tape and screws supplied to permanently mount the iCN directly into the vehicle dashboard. Note: This is a permanent solution. Once fixed, the adhesive tape cannot be removed. *iCN 630, 635, 650 only Assembling the iCN Screw-Mount 1. Choose a position on the dashboard where the iCN will be clearly visible to the driver, and ensure that the mounting surface is clean and dry. 2.
iCN 600 series | User Manual The Main Menu screen provides access to all of the iCN’s functions, including navigating to a destination. Step One: Turn iCN On 1. Plug the power adapter into the socket on the left of the iCN and the other end into the 12 V vehicle power-socket. 2. Gently pull the bottom of the GPS receiver away from the iCN. The receiver will lift out to a horizontal position to allow it to obtain a GPS fix. 3. Press for one second. The iCN will turn on and display the Language screen.
Getting started iCN 600 series | User Manual Step Three: Warning Screen 1. Read the warning message. 2. Select Accept, then press OK to confirm that you understand. The first Tutorial screen will display. Step Four: Tutorial Screens 1. Read the Tutorial screen. • To prevent the Tutorial from displaying on startup, use the 8-way toggle to select the Do not show Tutorial on startup check box, then press OK. 2. Press to move through each Tutorial screen. The Main Menu screen will display.
iCN 600 series | User Manual iCN 610, 620, 630 and 635 Your iCN comes with a memory card contaning a preactivated map*. To navigate to your destination you must first insert the memory card into your iCN. To navigate in an area outside of the preactivated map, you must first purchase a Map Product Key from your Navman supplier. Install Smart Desktop, then use it to activate your Map Product Key and install the required map. For more information on installing maps, see page 73.
Getting started iCN 600 series | User Manual 6. GPS Status Signals are transmitted by Global Positioning System (GPS) satellites orbiting the Earth. You can view your GPS status at any time from the 2D Map, 3D Map*, Next Turn and Next 4 Turns screens. The GPS Strength Indicator will display green when there is a valid fix (2D or 3D), and between one and three bars will display to indicate the strength of the signal; the GPS Strength Indicator will display red when no fix is available.
iCN 600 series | User Manual For your safety, enter destination information before you start a journey. Do not operate the iCN while driving. Select a destination using the Destination, Keyboard and Preview screens, which used together form a destination wizard. This section describes how to use each of these screens and provides two case studies to help guide you through setting your destination.
Getting started iCN 600 series | User Manual Figure 3. Number/Symbol Keyboard As you select each character, the first two results will display. Press to see more search results. • Use the 8-way toggle to move around the Keyboard screen. • To select a character or a search result, press OK. • To delete a character, press ESC or select <<, then press OK.; hold ESC to delete the line.
iCN 600 series | User Manual The following rules apply when searching for a destination in Europe: Street Names with Dates If a street name contains a date or a number, search by the first number: Example 1: If searching for “Faubourg du 13 Juillet 1920”, search by “13”. Example 2: If searching for “Avenue du 14 Avril 1914”, search by “14”. Example 3: If searching for “Rue de la 1 ere Armée”, search by “1”.
Getting started iCN 600 series | User Manual Setting Your Destination by Address Case Study One: Europe and New Zealand This case study will show you how to set your destination by selecting your country, then area, then street, then house number. Note: This case study applies to Europe and New Zealand only. For navigating in Australia, Canada and USA, see page 24. Step One: Open the Destination screen a. From the Main Menu, select Go To, then press OK. b.
iCN 600 series | User Manual a. From the Destination screen, select Find area, then press OK. The Keyboard screen will display. b. Use the Keyboard screen to find the area of your destination. For information on using the Keyboard screen, see pages 17-18. The Destination screen will display. Step Four: Find the Street of Destination a. From the Destination screen, select Find street, then press OK. The Keyboard screen will display.
Getting started iCN 600 series | User Manual b. Use the Keyboard screen to find the street of your destination. For information on using the Keyboard screen, see pages 17-18. The Destination screen will display. Step Five: Find the House Number of Destination a. From the Destination screen, select Enter house number, then press OK. The Keyboard screen will display. Note: If Enter house number option is not displayed, house numbers are not available for your selected street.
iCN 600 series | User Manual c. Complete one of the following: • To calculate the route and open the 3D Map screen*, select Go, then press OK. The 3D Map screen* will display. • To display the destination on the 2D Map screen, select the preview map, then press OK. The 2D Map screen will display. • To save the destination as a Favourite, select Save, then press OK. The New Favourite screen will display. See Favourites & My Home on page 36. • To change your destination, press ESC.
Getting started iCN 600 series | User Manual Setting Your Destination by Address Case Study Two: Australia, Canada & USA This case study will show you how to set your destination by selecting your country, then state, then town or city, then street, then house number. Note: This case study applies to Australia, Canada and USA only. For navigating in Europe and New Zealand, see page 20. Step One: Open the Destination screen a. From the Main Menu, select Go To, then press OK. b.
iCN 600 series | User Manual If you only have the map of one state installed and selected, that state is selected for your destination by default and cannot be changed. Go to Step Four: Find the Town or City of Destination. a. Select a state using the 8-way toggle. Press OK to select from the list. The Destination screen will display. Step Four: Find the Town or City of Destination a. From the Destination screen, select Find town/city, then press OK. The Keyboard screen will display. b.
Getting started iCN 600 series | User Manual Step Five: Find the Street of Destination a. From the Destination screen, select Find street, then press OK. The Keyboard screen will display. b. Use the Keyboard screen to find the street of your destination. For information on using the Keyboard screen, see pages17-18. The Destination screen will display. Step Six: Find the House Number of Destination a. From the Destination screen, select Enter house number, then press OK. The Keyboard screen will display.
iCN 600 series | User Manual c. Complete one of the following: • To calculate the route and open the 3D Map screen*, select Go, then press OK. The 3D Map screen* will display. • To display the destination on the 2D Map screen, select the preview map, then press OK. The 2D Map screen will display. • To save the destination as a Favourite, select Save, then press OK. The New Favourite screen will display. See Favourites & My Home on page 36. • To change your destination, press ESC.
Getting started iCN 600 series | User Manual Setting Your Destination by POI Case Study One: Europe and New Zealand This case study will show you how to set your destination by selecting a Point of Interest (POI). A POI is a named site, feature, landmark or public venue which can be displayed as an icon on the map. POIs are grouped by type, such as parks and museums. Note: This case study applies to Europe and New Zealand only. For navigating in Australia, Canada and USA, see page 31.
iCN 600 series | User Manual Note: To narrow the search for a type of POI, you can first search by Area. a. From the Destination screen, select Find Point of Interest, then press OK. The Select POI screen will display. b. Select a POI type using the 8-way toggle. Press OK to select from the list. The Keyboard screen will display. c. Use the Keyboard screen to find the POI. For information on using the Keyboard screen, see pages 17-18. The Preview screen will display.
Getting started iCN 600 series | User Manual d. Complete one of the following: • To calculate the route and open the 3D Map screen*, select Go, then press OK. The 3D Map screen* will display. • To display the destination on the 2D Map screen, select the preview map, then press OK. The 2D Map screen will display. • To save the destination as a Favourite, select Save, then press OK. The New Favourite screen will display. See Favourites & My Home on page 36. • To change your destination, press ESC.
iCN 600 series | User Manual This case study will show you how to set your destination by selecting a Point of Interest (POI). A POI is a named site, feature, landmark or public venue which can be displayed as an icon on the map. POIs are grouped by type, such as parks and museums. Note: This case study applies to Australia, Canada and USA only. For navigating in Europe and New Zealand, see page 28. Step One: Open the Destination screen a. From the Main Menu, select Go To, then press OK. b.
Getting started iCN 600 series | User Manual Step Three: Select the State of Destination If you only have the map of one state installed and selected, that state is selected for your destination by default and cannot be changed. Go to Step Four: Select the Type of POI. a. Select a state using the 8-way toggle. Press OK to select from the list. The Destination screen will display. Step Four: Select the Type of POI Note: To narrow the search for a type of POI, you can first search by Town or City. a.
iCN 600 series | User Manual d. Complete one of the following: • To calculate the route and open the 3D Map screen*, select Go, then press OK. The 3D Map screen* will display. • To display the destination on the 2D Map screen, select the preview map, then press OK. The 2D Map screen will display. • To save the destination as a Favourite, select Save, then press OK. The New Favourite screen will display. See Favourites & My Home on page 36. • To change your destination, press ESC.
Getting started iCN 600 series | User Manual 8. Using the 2D Map screen to Plan a Route You can plan a route directly from the 2D Map screen using the Pop-up menu. 1. From the Main Menu, select Map, then press OK. The 2D Map screen will display. • Move around the 2D Map screen using the 8-way toggle. • To display a smaller area in greater detail, press • To display a larger area in less detail, press . . 2. Press OK to display cross-hair on the 2D Map screen. • To remove the cross-hair press ESC 3.
iCN 600 series | User Manual 9. Multi-stop Trips You can use the Multi-stop Trip screen to set multiple destination points for your trip. Your route will be calculated to go via each of these points in the specified order. Destination points can be added via the Multi-stop Trip screen or by selecting Show Details from the pop-up menu on the 2D Map screen, then Add to Trip. You can save up to 200* multi-stop trips, each with up to 14 destination points. * 50 multi-stop trips for iCN 610, 620.
iCN 600 series | User Manual c. Select Address or POI, then press OK. The Destination screen will open. Note: You can also add destination points using Favourites, recent destinations and nearest Point of Interest. Step Two: Select the Country of Your Destination Point If you only have the map of one country installed and selected, that country is selected for your destination point by default and cannot be changed. Go to Step Three: Find the Area of Your Destination Point. a.
iCN 600 series | User Manual Step Three: Find the Area of Your Destination Point a. From the Destination screen, select Find area, then press OK. The Keyboard screen will display. b. Use the Keyboard screen to find the area of your destination point. For information on using the Keyboard screen, see pages 17-18. The Destination screen will display. Step Four: Find the Street of Your Destination Point a. From the Destination screen, select Find street, then press OK. The Keyboard screen will display.
iCN 600 series | User Manual b. Use the Keyboard screen to find the street of your destination point. For information on using the Keyboard screen, see pages 17-18. The Destination screen will display. Step Five: Find the House Number of Your Destination Point a. From the Destination screen, select Enter house number, then press OK. The Keyboard screen will display. Note: If Enter house number option is not displayed, house numbers are not available for your selected street.
iCN 600 series | User Manual c. Select Add to Trip, then press OK. The Multi-stop Trip screen will display, listing your destination point. d. Complete one of the following: Note: Destination points added, updated or deleted after a multi-stop trip has commenced will not affect the current route. If you want to ... Then ... add another destination point Note: Destination points added after a multi-stop trip has commenced will not be included in the current route. • select Add, then press OK.
iCN 600 series | User Manual Case Study Two: Australia, Canada & USA This case study will show you how to set a multi-stop trip by selecting your country, then area, then street, then house number for each destination point. Note: This case study applies to Australia, Canada and USA only. For navigating in Europe and New Zealand, see page 35. Step One: Start Your Multi-stop Trip a. From the Main Menu, select the Multi-stop Trip option. The Multi-stop Trip screen will display. b.
iCN 600 series | User Manual Step Two: Select the Country of Your Destination Point If you only have the map of one country installed and selected, that country is selected for your destination point by default and cannot be changed. Go to Step Three: Select the State of Your Destination Point. a. From the Destination screen, select Change country or Change country or state, then press OK. The Select Country screen will display. b. Select a country using the 8-way toggle. Press OK to select from the list.
iCN 600 series | User Manual Step Four: Find the Town or City of Your Destination Point a. From the Destination screen, select Find town/city, then press OK. The Keyboard screen will display. b. Use the Keyboard screen to find the town or city of your destination. For information on using the Keyboard screen, see pages 17-18. The Destination screen will display. Step Five: Find the Street of Your Destination Point a. From the Destination screen, select Find street, then press OK.
iCN 600 series | User Manual b. Use the Keyboard screen to find the street of your destination point. For information on using the Keyboard screen, see pages 17-18. The Destination screen will display. Step Six: Find the House Number of Your Destination Point a. From the Destination screen, select Enter house number, then press OK. The Keyboard screen will display. Note: If Enter house number option is not displayed, house numbers are not available for your selected street.
iCN 600 series | User Manual c. Select Add to Trip, then press OK. The Multi-stop Trip screen will display, listing your destination point. d. Complete one of the following: Note: Destination points added, updated or deleted after a multi-stop trip has commenced will not affect the current route. If you want to ... Then ... add another destination point Note: Destination points added after a multi-stop trip has commenced will not be included in the current route. • select Add, then press OK.
iCN 600 series | User Manual Skipping a Destination Point You can modify a multi-stop trip at any time from the Multi-stop Trip screen, however if you have already commenced a trip, changes will not affect the current route: Main Menu > Multi-stop Trip To skip a destination point during a multi-stop trip, complete the following: 1. Press to return to the Main Menu screen. The Main Menu screen will display. 2. Select Route Information, then press OK. The Route Information screen will display. 3.
iCN 600 series | User Manual 10. Viewing your Route Once a route has been calculated, you can view it in several ways. Press to cycle through the screens 2D Map Screen The 2D Map screen is always oriented North and shows your current position (if a GPS fix is active) and surrounding street names. If a route has been calculated, the route and turns are highlighted. To view the 2D Map screen, either select Map on the Main Menu screen then press OK, or when a to cycle through the screens.
iCN 600 series | User Manual 3D Map Screen — iCN 630, 635, 650 only The 3D Map screen displays when a route is calculated, oriented to the travelling direction with an adjustable horizon. To view the 3D Map screen when a route has been calculated, press to cycle through the screens. • To adjust the viewing angle, press the 8-way toggle up or down. • To display a smaller area in greater detail, press • To display a larger area in less detail, press . . • To display the Go To Pop-up summary, press OK.
iCN 600 series | User Manual Next Turn Screen The Next Turn screen displays information that you need for the next turn, the direction of the turn and the distance to the turn. A route must have been calculated for this screen to be able to display. Access to this screen is controlled by the Settings - Display screen. To view the Next Turn screen when a route has been calculated, press Map of the next turn The next instruction Additional information can display here.
iCN 600 series | User Manual Route Information Screen The Route Information screen provides information about your current route and lets you skip a trip destination point or cancel a route. The screen is only available from the Main Menu when you are navigating a route: Main Menu > Route Information Show Route Select Show Route, then press OK to display your entire route on the 2D Map screen. Instruction List Select Instruction list, then press OK to display the Instruction List screen.
iCN 600 series | User Manual Summary Select Summary, then press OK to display the Route Summary screen containing your From and To addresses, Estimated Time to arrival and the Distance remaining to your destination. If you are navigating a multiple destination trip, the information displayed will relate to your next destination point. Skip Next Destination Select Skip Next Dest., then press OK to skip the next destination point of your trip. Only available when navigating a multi-stop trip.
iCN 600 series | User Manual 11. The 2D Map Screen Pop-up Menu The Pop-up menu allows you to access navigational functions from the 2D Map screen. To display the Pop-up menu complete the following: 1. From the Main Menu, select Map, then press OK. The 2D Map screen will display. 2. Use the 8-way toggle to move around the 2D Map screen. • To display a smaller area in greater detail, press • To display a larger area in less detail, press . . 3. Press OK to display the cross-hair on the 2D Map screen.
iCN 600 series | User Manual 12. Avoiding an Area* You can calculate a route that avoids a specified area on the map. Up to ten Avoid Areas can be added. Avoid Areas are displayed as shaded areas. If no alternative route around an Avoid Area exists, you will be routed through an Avoid Area. *iCN 630, 635, 650 only Adding an Avoid Area 1. From the Main Menu screen, select Map, then press OK. The 2D Map screen will display. 2.
iCN 600 series | User Manual 13. Route Demonstrator The Route Demonstrator allows you to: • Preview a route. • Plan and view a route without a GPS fix, such as when you are inside a building. Step One: Activate Route Demonstrator 1. From the Main Menu screen, select Preferences, then press OK. 2. From the Preferences screen, select Routing, then press OK. The Routing screen will display. 3. Press twice. 4. Select the Demonstrate Route check box, then press OK. 5. Select Save, then press OK.
iCN 600 series | User Manual To Disable Route Demonstrator 1. Press to display the Main Menu screen. 2. From the Main Menu screen, select Preferences, then press OK. 3. From the Preferences screen, select Routing, then press OK. The Routing screen will display. 4. Press twice. 5. Clear the Demonstrate Route check box, then press OK. 6. Select Save, then press OK. Route Demonstrator will be disabled. The Main Menu screen will display.
iCN 600 series | User Manual 14. Favourites & My Home You can save up to 200* destinations as Favourites, one of which can be saved as My Home. My Home can be any designated Favourite, but we recommend that it is your home or other common destination. You can save a Favourite from the Preview screen after searching for an address, or from the Pop-up Menu on the 2D Map screen. *50 destinations as Favourites for iCN 610, 620 Saving a Favourite 1.
iCN 600 series | User Manual 4. Complete one of the following: • To save as a favourite, select Save as Favourite, then press OK. The Favourite is saved. The Go To screen will display. • To save as My Home, select Save as My Home, then press OK. The Favourite is saved as My Home. The Go To screen will display. Saving a Favourite from the 2D Map Screen 1. From the Main Menu, select Map, then press OK. The 2D Map screen will display. 2. Press OK to display the cross-hair. 3.
iCN 600 series | User Manual 6. To change the name of the Favourite, select the Name box, then press OK. The Enter text screen will display. • Use the 8-way toggle to move around the Enter text screen. • To select a character, press OK. • To delete a character, press ESC; hold ESC to delete the line. • To display the number/symbol Enter text screen, select 123, then press OK • To display the alternate Enter text screen, press , or select Alt, then press OK.
iCN 600 series | User Manual 4. Select the Name box, then press OK. The Enter text screen will display. • Use the 8-way toggle to move around the Enter text screen. • To select a character, press OK. • To delete a character, press ESC; hold ESC to delete the line. • To display the number/symbol Enter text screen, select 123, then press OK • To display the alternate Enter text screen, press , or select Alt, then press OK. • To display the alphabet Enter text screen, press , or select ABC, then press OK.
iCN 600 series | User Manual 4. Select Delete, then press OK. A Warning dialogue box will display asking for confirmation to delete the Favourite. 5. Select Yes, then press OK. The Favourite is deleted. The Favourite screen will display. Navigating to a Favourite 1. From the Main Menu, select Go To, then press OK. 2. From the Go To screen, select Favourites, then press OK. The Favourite screen will display. 3. Select a Favourite using the 8-way toggle, then press OK.
iCN 600 series | User Manual 15. Preferences You can modify the following preferences to suit your needs. Screen Brightness 1. Press and hold the Zoom/Brightness button to display the Brightness scale. 2. To increase screen brightness, press +. To decrease screen brightness, press -. The Brightness scale comprises ten rectangular boxes in a row. As screen brightness is increased, the first seven boxes progressively turn from gray to green; the last three turn red.
iCN 600 series | User Manual If you want to... Then... change the Preference for motorways move the Preference for motorways slider towards Less often to use roads other than motorways where possible when calculating a route. move the slider towards More often to use motorways where possible when calculating a route. change the Preference for urban roads move the Preference for urban roads slider towards Less often to use roads other than urban roads where possible when calculating a route.
iCN 600 series | User Manual If you want to... Then... enable Track Recording (only to be used if required by Navman Customer Support) contact Navman Customer Support, as we recommend this feature be used only under the supervision of a Navman technician. 4. Select Save, then press OK. The Main Menu screen will display. Language Preferences 1. From the Main Menu, select Preferences, then press OK. 2. From the Preferences screen, select Language, then press OK. The Language screen will display. 3.
iCN 600 series | User Manual Map Preferences — Display Settings 1. From the Main Menu, select Preferences, then press OK. 2. From the Preferences screen, select Maps, then press OK. 3. From the Maps screen, select the Display option. The first of two Display screens will display. Press to move through the Display screens. 4. Complete the following: If you want to... Then... enable Auto Zoom during navigation select the Auto Zoom check box.
iCN 600 series | User Manual Map Preferences — Internal Memory 1. From the Main Menu, select Preferences, then press OK. 2. From the Preferences screen, select Maps, then press OK. 3. From the Maps screen, select Internal memory. The Maps - Internal memory screen will display. 4. To activate a map, use the 8-way toggle to select the desired map, then press OK to select the map check box Note: There may be more than one page of map listings, depending on the number of maps installed.
iCN 600 series | User Manual Map Preferences — Points of Interest (POIs) Points of Interest in a region are grouped into types. This function allows you to select the types you need. For example, you may be only interested in entertainment venues and want to disable other POI types such as schools. 1. From the Main Menu, select Preferences, then press OK. 2. From the Preferences screen, select Maps, then press OK. 3. From the Maps screen, select Points of Interest.
iCN 600 series | User Manual Alerts Preferences — Active POIs The Active POI settings allow you to set warning chimes and visual warnings for custom POIs that will activate within a chosen distance-radius of your location. For example, a warning chime will sound or a visual warning will display when an active POI is within 150 ft, but not necessarily on your route. Note: Custom POIs must first be installed on your iCN using Smart Desktop before they can be set as active POIs.
iCN 600 series | User Manual Alerts Preferences - Speed and GPS Signals The Safety settings allow you to set safety-related warnings. 1. From the Preferences menu, select Safety Alerts, then press OK. The Safety Alerts screen will display. 2. On the Safety Alerts screen, select Safety, then press OK. The Safety screen will display. 3. Complete the following: If you want to... Then...
iCN 600 series | User Manual My Data Preferences - My Points of Interest (My POI) Custom Points of Interest (POIs) are installed from the Smart Desktop POI Editor (see pages 7779), and listed on the My POIs screen. 1. From the Main Menu, select Preferences. Press OK. 2. From the Preferences screen, select My Data. Press OK. 3. From the My Data screen, select My POI. Press OK. The My POI screen will display. 4. Use the 8-way toggle to select the POI file or files you require.
iCN 600 series | User Manual GPS Status Signals are transmitted by Global Positioning System (GPS) satellites orbiting the Earth. The Satellite Signal Strengths screen provides a visual representation of the information being received. Latitude and longitude are displayed, along with a north-pointing compass, the heading in degrees and ground speed. The strength of each satellite is displayed on a bar chart. From the Main Menu screen, select Preferences > More Preferences > GPS status.
iCN 600 series | User Manual 4. Complete the following: If you want to... Then... change the Position format select either the Decimal degrees or the Degrees, minutes, seconds option. change the local time offset select the offset from the Coordinated Universal Time (UTC) for your location from the Local time offset box using the lefthand and righthand buttons of the 8-way toggle. Next, select either the 12 Hour or 24 Hour option for timeformat.
iCN 600 series | User Manual 16. Smart Desktop Smart Desktop is used to manage maps to and from your iCN, obtain software updates, manage Custom Points of Interest (POIs) and install Basemaps. Note: For Windows XP, install XP Service Pack 1 before you install Smart Desktop. Install Smart Desktop on your Computer 1. Close all open programs on your computer. 2. Insert the Smart Application CD into your computer CD-ROM drive. The Smart Desktop installer will start.
iCN 600 series | User Manual Uninstalling Smart Desktop from your Computer We recommend that you use the Add or Remove Programs feature in your Windows Control Panel: Start > Control Panel > Add or Remove Programs Uninstall: “Smart Desktop 2005 for iCN600 Series”. 17. Updating your iCN Updating your Version of Smart Update your iCN software to the most recent version of Smart by accessing the Navman website through Smart Desktop. To update your iCN, complete the following: 1.
iCN 600 series | User Manual 18. Installing Maps Using Smart Desktop Your iCN comes with a pre-activated map. If you require additional maps, you must first purchase a Map Product Key. Use Smart Desktop to activate your Map Product Key and install the required map. Install and Activate Maps on your iCN 1. Open Smart Desktop: Start > Programs > Navman > Smart Desktop 2005 for iCN600 series 2. Insert a Smart Map CD into your computer CD-ROM drive. The available maps will display.
iCN 600 series | User Manual 19. Continuous Continental Navigation* Basemaps allow you to seamlessly navigate between installed maps without installing maps of all regions along your route. Each Basemap covers a large area, such as Western Europe or continental United States and contains main roads that connect cities and towns. On the Basemap, you can select a road or POI as your departure point or destination.
iCN 600 series | User Manual Activate Basemap 1. Disconnect the USB cable from the iCN. The iCN will turn on. • If the iCN does not turn on, press for one second. 2. From the iCN Main Menu screen, select Preferences, then press OK. 3. From the Preferences screen, select Maps, then press OK. 4. Complete one of the following: • If the Basemap is on the iCN, from the Maps screen, select Internal Memory, then press OK. The Maps - Internal Memory screen will display.
iCN 600 series | User Manual 20. Smart Desktop Advanced Features This section details advanced features of Smart Desktop. If you have not installed Smart Desktop, see page 71. To Find a City or Town 1. From the Map menu, click Find City. The Find City window will open. 2. Type the name of the city or town in the City Name field. The list of available cities will reduce to match your search. 3. Double-click the name of the city or town.
iCN 600 series | User Manual Map Layers To conserve space on your iCN and memory card, you can choose map layers to install. The layers you can choose from are: • Points of Interest (POIs) • Bodies of water and parks • Land contours (topography). To access the Map Layers section: Desktop tab > Settings > Layers. Select or clear each checkbox to indicate the layers to install for each map.
iCN 600 series | User Manual 2. Add a POI to the POI File. • On the POI Editor window Edit menu, click New. The POI Details window will open. • Type a description for the POI in the Description box. • On the Degrees, Minutes, Seconds tab, type or select the degree, minute and second of the POI latitude in the Latitude boxes. • On the Degrees, Minutes, Seconds tab, type or select the degree, minute and second of the POI longitude in the Longitude boxes. • To save the POI, click OK. 3.
iCN 600 series | User Manual 3. Modify the POI settings as required: If you want to... Then... activate the POI select the Active check box. Note: If you do not activate the POI, you will be able to configure only the POI Visibility Level and Icon File settings. enable a visual warning when the POI is in close proximity select the Visual Alert check box. enable a warning chime when the POI is in close proximity select the Audio Alert check box.
iCN 600 series | User Manual Backups You can save backups of all iCN Preferences and Favourites to your computer. To Back up your Preferences, Favourites and My Home 1. On the Smart Desktop File menu, click Backup. The Backup window will display. 2. Click New Backup. The New Backup window will display. 3. Click OK. The New Backup window will close. The backup will be listed on the Backup window. 4. Close the Backup window. To Delete a Backup 1. On the Smart Desktop File menu, click Backup.
iCN 600 series | User Manual 21. Accessories You can purchase almost all items that came with your iCN separately, including additional mountingkits and in-vehicle power adaptors. The following accessories are also available for your iCN: MCX External Antenna Required for vehicles with heated windscreens or to boost GPS performance in weak signal areas and in areas with poor or limited visibility of the open sky. 12V/24V Installer Power Cable Powers your iCN through a permanently wired, concealed cable.
iCN 600 series | User Manual Appendix: Street Types Note: Belgium and Switzerland each list street types and their abbreviations in three languages. Country Street Type Abbreviation Austria BOULEVARD CHAUSSEE PLATZ STRASSE BVD CH PL STR Belgium (Dutch) BAAN BERG DREEF LAAN MARKT PARK PLEIN SQUARE STEENWEG STRAAT BN BG DR LN MKT PK PL SQ STWG STR Belgium (French) AVENUE BOULEVARD CHAUSSÉE IMPASSE MONT MONTAGNE PLACE ROUTE ROUTE NATIONAL RUE SQUARE AVE BVD CH IMP MT MT PL RTE RN R.
iCN 600 series | User Manual Country Street Type Abbreviation Germany BOULEVARD CHAUSSEE PLATZ STRASSE BVD CH PL STR Ireland AVENUE BOULEVARD CENTRE CRESCENT PLACE ROAD ROUTE SQUARE STREET YARD AVE BVD CTR CR PL RD RTE SQ ST YD Italy CONTRADA CORSO FRAZIONE LARGO PIAZZA PIAZZALE STRADA STATALE SUPERSTRADA VIA VIALE C.DA C.SO FR LGO P.ZA P.LE SS SS V.
iCN 600 series | User Manual Country Street Type Abbreviation Norway GATA GATE PLASSEN VEGEN VEI GT GT PL V. V. Portugal AVENIDA BAIRRO CALÇADA CAMINHO ESTRADA LARGO LARGUINHO PRAÇA QUARTO QUARTA QUINTA RUA SÃO SANTA SANTO AVE BA CC CAM EST LGO LARG PR QT QT QU R. S. S. S. Spain AVENIDA CALLE CALLEJÓN CAMINO CARRETERA GLORIETA PASEO PLAZA RAMBLA RONDA AVE C/ CJ CM CR G P.O P.
iCN 600 series | User Manual Support Information Support for Australia: Support for Europe: Navman Australia Pty. Ltd PO Box 479 Gladesville NSW 2111 Australia Navman Europe Limited 4G Gatwick House Peeks Brook Lane Horley, Surrey RH6 9ST United Kingdom pcnsupport.aus@navman.com www.navman.com Support: www.navman-europe.com/support.php www.navman-europe.com Support for New Zealand: Support for US and Canada: Navman NZ Ltd PO Box.
iCN 600 series | User Manual Notes 86
MN000330A