Europe / Australia / New Zealand Edition iCN 600 series Smart Version 3.
iCN 600 series | User Manual Contents 1. Introduction ................................................................. 3 2. iCN Features ............................................................... 4 3. Memory Card .............................................................. 6 4. Turning your iCN On and Off....................................... 7 5. Position in a Vehicle .................................................... 8 6. Main Menu Screen....................................................
iCN 600 series | User Manual 1. Introduction Whether you travel in your own country, or overseas, the iCN will direct you to your destination without the need for map books and second-hand instructions. The Global Positioning System is available free of charge, at any time, and is accurate to within 5 m (15 ft). Your iCN map provides street level detail for door-to-door navigation, including Points Of Interest (POIs) such as accomodation, railway stations and airports.
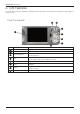
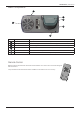
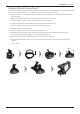
iCN 600 series | User Manual 2. iCN Features It is recommended that you familiarize yourself with the basic operations of your iCN such as using the 8-way toggle and volume control. Front Components 2 3 4 1 5 6 7 8 Component Description 1 Screen Displays maps and menu options. 2 OK Select the highlighted menu option, text or command. 3 Zoom/Brightness Change the amount of map area shown, or press and hold to adjust the screen brightness.
iCN 600 series | User Manual Back Components 2 3 4 1 5 6 Component Description 1 Speaker Outputs voice commands and warnings. Use Volume button to adjust. 2 Memory Card Slot Slot for memory card. Insert card with label facing the front of the iCN. 3 GPS Receiver Receives signals from GPS satellites when lifted out to the horizontal position. 4 Car Antenna Socket Connection socket for GPS car antenna (not included). 5 Power Socket Connection socket for power cable.
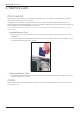
iCN 600 series | User Manual 3. Memory Card iCN 610 and 635 Your iCN comes with a memory card contaning a preactivated map*. To navigate to your destination you will first need to insert the memory card into your iCN. To navigate in an area outside of the preactivated map, you must first purchase a Map Product Key from your Navman supplier. Install Smart Desktop, then use it to activate your Map Product Key and install the required map. See Installing Maps Using Smart Desktop on page 30.
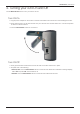
iCN 600 series | User Manual 4. Turning your iCN On and Off Use the Menu/Power button to turn your iCN on and off. Turn iCN On 1. Plug the power adapter into the socket on the left of the iCN and the other end into the vehicle lighter socket. 2. Gently pull the bottom of the GPS receiver away from the iCN. The receiver will lift out to a horizontal position to allow it to obtain a GPS fix. 3. Press the Menu/Power button for one second. Turn iCN Off 1. Gently push the GPS receiver back towards the iCN.
iCN 600 series | User Manual 5. Position in a Vehicle Before you begin, check if your vehicle is fitted with a heat reflecting or heated windshield. If so, you will need to purchase an external antenna for your iCN to receive GPS signals. There are a number of ways to position an iCN in a vehicle. Follow these instructions carefully. • For security and to avoid overheating, do not leave your iCN in an unattended vehicle, especially in strong sunlight.
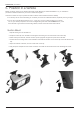
iCN 600 series | User Manual Adhesive Tape and Screw Mount* You can use the base plate, adhesive tape and screws supplied to mount the iCN directly into the vehicle dashboard. Note: This is a permanent solution — the adhesive tape cannot be removed once fixed. 1. Choose a position on the dashboard where the iCN will be clearly visible by the driver and ensure all surfaces are clean and dry. 2. Remove the protective layer from the tape and press down firmly for 30 seconds. 3.
iCN 600 series | User Manual 6. Main Menu Screen The Main Menu screen gives you access to all of the iCN’s functions, including navigating to a destination. 1. Press the MENU/Power button for about one second. 2. The Language screen will display. Use the 8-way toggle to highlight your language choice and press OK. • You can stop the Language screen displaying on startup by selecting the Do not show on startup check box. Press OK to confirm. 3. Press the Page button. 4. The Warning screen will display.
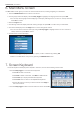
iCN 600 series | User Manual 8. GPS Status Signals are transmitted by Global Positioning System (GPS) satellites orbiting the Earth. This screen provides a visual representation of the information being received. Latitude and longitude are displayed, along with a North-pointing compass, the heading in degrees and ground speed. Satellites available are shown as segments. From the Main Menu, select Settings > More Settings > GPS Status. The GPS Status screen will display.
iCN 600 series | User Manual 9. Setting your Destination Before you travel, you must select a destination. To a Street Address 1. From the Main Menu, select the Destination option. 2. From the Destination screen, select the Address option. The Destination-Address screen will display. 3. Select a Country using the 8-way toggle, press OK. 4. To select a Region or State press OK. Select a region. Press OK. 5. To select a Postcode or ZIP Code press OK. Select a postcode or ZIP code. Press OK. 6.
iCN 600 series | User Manual 5. To select a Postcode or ZIP Code press OK. Select a postcode or ZIP code. Press OK. 6. To select a City/Town press OK. Select a city or town. Press OK. 7. To select the first intersecting street, press OK. A list of intersecting streets will display. Select a street. Press OK. 8. Select And. A list of intersecting streets will display. Select a street. Press OK. 9. Press the Page button, the Intersection-Details screen will display. 10.
iCN 600 series | User Manual To a Point-Of-Interest (POI) A POI is a named site, feature, landmark or public venue. POI's are stored in Categories, such as parks and museums. POI's can be displayed as icons on a map. 1. From the Main Menu, select the Destination option.The Destination screen will display. 2. From the Destination screen, select the Points of Interest option. The Destination-POI screen will display. 3. Select a Category using the 8-way toggle, press OK 4.
iCN 600 series | User Manual Multiple Destination Points with the Trip Planner You can use the Trip Planner to set multiple destination points for your trip. Your route will be calculated to go via each of these points in the specified order. Destination points can be added via the Trip Planner screen or by selecting Show Details from the pop-up menu on the Map screen, then Add to Trip. 1. From the Main Menu, select the Trip Planner option. The Trip Planner screen will display. 2. Select Add and press OK.
iCN 600 series | User Manual Using the Map screen to Plan a Route You can plan a route directly from the Map screen using the Popup menu. 1. From the Main Menu, select the Map option. The Map screen will display. • Move round the Map screen using the 8-way toggle • Zoom using + and - on the Zoom/Brightness button. 2. Press OK to display cross-hair on the Map screen • To remove the cross-hair press ESC 3.
iCN 600 series | User Manual 10. Avoiding an Area* You can calculate a route that avoids a specified area on the map. Up to ten Avoid Areas can be added. Avoid Areas are displayed as shaded areas. If no alternative route exists, you will be routed through an Avoid Area. * iCN 635, 650 only Adding an Avoid Area 1. From the Main Menu, select the Map option. The Map screen will display. 2. Press OK and place the intersection of the cross-hair over the area that you want to avoid using the 8-way toggle. 3.
iCN 600 series | User Manual 11. Viewing Your Route Once a route has been calculated, there are a number of ways to view it. Cycle through the screens by pressing the Page button. To cancel a route or stop the Route Demonstrator, return to the Main Menu, select the Route Information option, then the Cancel Route option. Back-On-Track™ Automatic Rerouting Your route is re-directed if you make a wrong turn.
iCN 600 series | User Manual Next Turn Screen Displays the turn direction, street name and the distance to the next turn. A route must have been calculated for this screen to display. Access to this screen is set on the Settings - Display screen. 1. From the Main Menu, select the Map option The Map screen will display. 2. Press the Page button until the Next Turn screen displays. The next instruction Map of the next turn Direction of the next turn Additional information can be displayed here.
iCN 600 series | User Manual Route Information The Route Information screen provides information about your current route, and let's you skip a trip destination point or cancel a route. The screen is only available from the Main Menu when you are navigating a route. Show Route Select to display your entire route on the Map screen. Instruction List Select to display the Instruction List screen. The Instruction List screen is similar to the Next Four Turns screen except that it displays your entire route.
iCN 600 series | User Manual 12. The Map Screen Pop-up Menu The Pop-up menu allows you to access navigational functions from the Map screen. 1. Move round the Map screen using the 8-way toggle; Zoom using + and - on the Zoom/Brightness button. 2. Press OK to display the cross-hair on the Map screen. • To remove the cross-hair press ESC. 3. Position the intersection of the cross-hair on a destination using the 8-way toggle.
iCN 600 series | User Manual 13. Route Demonstrator The Route Demonstrator allows you to: • Preview a route, or • Plan and view a route without a GPS fix, such as when you are inside a building. Step 1. Activate Route Demonstrator 1. From the Main Menu, select the Settings option. 2. From the Settings screen, select the Routes option. The Routing screen will display. 3. Press the Page button twice. 4. Select the Demonstrate Route check box, press OK. 5. Press ESC repeatedly until the Map screen displays.
iCN 600 series | User Manual 14. Favorites & Shortcuts You can save up to 200* destinations as Favorites, 10 of which can be Shortcuts. *50 Favorites for iCN 610, 620 Saving Favorites and Shortcuts 1. From the Main Menu, select the Destination option. 2. From the Destination screen, select the Address option. The Destination-Address screen will display. Note: You can also add a Favorite or Shortcut using intersections, Cities/Towns, Points of Interest and recent destinations. 4.
iCN 600 series | User Manual Editing Favorites and Shortcuts Edit the name of the Favorite or Shortcut, or save a Favorite as a Shortcut. 1. From the Main Menu screen, select the Favorites option. • If you have saved a Shortcut, the Shortcuts screen will display. To edit a Favorite, press the Page button to display the Favorite screen. 2. Select from the list, press OK. The Edit Shortcut or Edit Favorite screen will display. 3. Select the Name box and press OK.
iCN 600 series | User Manual 15. Settings You can modify the following settings to suit your preferences. Screen Brightness 1. Press and hold the Zoom/Brightness button to display the brightness indicator bar. 2. Press + or - on the Zoom/Brightness button to adjust the brightness. The iCN can heat up when display brightness is set at over 70%. Use low screen brightness when possible. Volume 1. Press and hold the Volume button to display the Volume bar. 2.
iCN 600 series | User Manual • Press and hold the ESC button to clear the text box if required. • Enter a name for the log file. • Select Enter and press OK. The Data Logging Enabled screen will display. • Select Yes and press OK. The Routing screen will display. 15. Press ESC repeatedly until the Map screen displays. • If you have made changes to the settings, press OK to accept the Warning dialog box. Language Settings 1. From the Main Menu, select the Settings option. 2.
iCN 600 series | User Manual Internal Map Settings 1. From the Main Menu, select the Settings option. 2. From the Settings screen, select the Maps option. 3. From the Settings - Maps screen, select the Internal Maps option. The Maps (Internal) screen will display. 4. To activate a map, use the 8-way toggle to scroll to the map or maps you require. Press OK. 5. Press ESC repeatedly until the Map screen displays. • If you have made changes to maps, select Yes and press OK to accept the Warning dialog box.
iCN 600 series | User Manual • Press the Page button to view additional files. 5. Press ESC repeatedly until the Map screen displays. • If you have made changes to the settings, press OK to accept the Warning dialog box. Active Points Of Interest (POIs) Settings Active POIs are custom POIs that are announced when in close proximity. Custom POIs are added from the Smart Desktop POI Editor. 1. From the Main Menu, select the Settings option. 2. From the Settings screen, select the Alerts option. 3.
iCN 600 series | User Manual 6. Press ESC repeatedly until the Map screen displays. • If you have made changes to the settings, press OK to accept the Warning dialog box. Clear Data Settings 1. From the Main Menu, select the Settings option. 2. From the Settings screen, select the My Data option. 3. From the My Data screen, select the Clear Data option. The Settings - Clear Data screen will display. 4.
iCN 600 series | User Manual 16. Smart Desktop Smart Desktop is used to download maps to your iCn, obtain software updates, manage Custom Points of Interest (POIs) and install Basemaps. Note: For Windows XP, install XP Service Pack 1 before you install Smart Desktop. Install Smart Desktop on your Computer 1. Close all open programs on your Computer. 2. Insert the Smart CD into your computer CD-ROM drive. The Smart Desktop installer will start.
iCN 600 series | User Manual 17. Updating your iCN Updating from Previous Version of Smart If a software update is available for your iCN, you will be prompted when you open Smart Desktop: 1. Open Smart Desktop: Start > Programs > Navman > Smart Desktop 2. Follow the prompts to update your iCN software to the latest version of Smart. Updating your Version of Smart It is recommended that you regularly check the Navman website for software updates to the version of Smart you are using: 1.
iCN 600 series | User Manual 18. Installing Maps Using Smart Desktop Your iCN comes with a pre-activated map. If you require an additional map, you must first purchase a Map Product Key from your Navman supplier. Use Smart Desktop to activate your Map Product Key and install the required map. Install and Activate Maps on your iCN 1. Open Smart Desktop: Start > Programs > Navman > Smart Desktop 2. Insert a Smart Map CD into your Computer CD-ROM drive, the available maps will display. 3.
iCN 600 series | User Manual 19. Continuous Continental Navigation* You can seamlessly navigate between installed maps without the need for installing all maps en route. This is achieved by using a Basemap. A Basemap is a map of a large area, such as West Europe or the United States, containing main roads that connect cities and towns. You can select a road or POI on the Basemap as your start point or destination.
iCN 600 series | User Manual Remove Basemap 1. Connect the iCN to your computer. • Connect the iCN to mains power supply using the adapter provided. • Connect the USB cable to the iCN and to your computer USB port. • Turn on the iCN by pressing the Menu/Power button. The iCN USB Connection screen will display when you are connected. 2. Open Smart Desktop if it is not already open: Start > Programs > Navman > Smart Desktop. 3. On the Map menu, click Basemaps. The Navman Basemap Utility window will open.
iCN 600 series | User Manual 20. Smart Desktop Advanced Features Find a City or Town To search for a City or Town to verify the map to be installed: 1. From the Map menu, click Find City. The Find City window will open. 2. Type the name of the City or Town in the City Name field. The list of available Cities will reduce to match your search. 3. Double-click the name of the City or Town. The Desktop Map will rotate to center on the selected City or Town.
iCN 600 series | User Manual Points of Interest (POI) Editor You can add custom Points of Interest (POIs) using the POI Editor. A maximum of 25 Custom POIs can be saved on your iCN. The Custom POI files are listed on the My POI screen. Custom POIs can be set to announce when in close proximity at the Select Active POI screen. Step 1. Create a Custom POI File 1. Create a New POI File. • On the Map menu, click POIs. The POI Editor window will open. • On the File menu of the POI Editor, click New Text File.
iCN 600 series | User Manual Backups You can save backups of your settings, Shortcuts and Favorites to your computer. To Back up your Settings, Shortcuts and Favorites 1. From the File menu, click Backup. The Backup window will display. 2. Click New Backup. The New Backup window will display. 3. Click OK. To Delete a Backup 1. From the File menu, click Backup. The Backup window will display. 2. Select the backup from the list 3. Click Delete. To Restore a Backup 1. From the File menu, click Restore.
iCN 600 series | User Manual 21. Accessories The following accessories are available for your iCN: External Antenna Required for vehicles with heated windshields, and to boost GPS performance in weak signal areas. Memory Card Writer Connects to your computer and allows you to download maps to SD or MMC memory cards. Remote Control* Button functions are the same as the iCN control buttons. You cannot turn on the iCN using the Remote Control. * Only included with the iCN 635 and 650.
iCN 600 series | User Manual Software Product License NAVMAN (THE LICENSOR) IS WILLING TO LICENSE THE iCN Smart SOFTWARE (THE SOFTWARE) TO YOU (THE CUSTOMER) ONLY IF YOU ACCEPT ALL THE TERMS OF THIS LICENCE. PLEASE READ THE TERMS CAREFULLY, BECAUSE USING THIS SOFTWARE WILL BE DEEMED TO BE YOUR ACCEPTANCE THAT YOU ARE USING IT ON THE FOLLOWING TERMS.
iCN 600 series | User Manual Compliance Operation is subject to the following two conditions: (1) this device may not cause interference, and (2) this device must accept any interference, including interference that may cause undesired operation of the device.
iCN 600 series | User Manual Contact Us Support for New Zealand: Support for the US and Canada: Navman NZ Ltd 13-17 Kawana Street Northcote Auckland New Zealand Navman USA Limited 27142 Burbank Foothill Ranch CA 92610 United States of America Phone: 0800 GONAVMAN pcnsupport.nz@navman.com www.navman.com Phone: 866-9-NAVMAN support@navmanusa.com www.navmanusa.