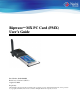
RipwaveTM MX PC Card (PMX) User’s Guide Part Number 40-00460-00R Revision A, Version 1.0, PV1.3 August 25, 2006 Proprietary All information disclosed by this document is the proprietary property of Navini Networks, Inc. and is protected by copyright, trademark, and/or trade secret laws. All rights therein are expressly reserved.
Navini Networks, Inc. PMX User’s Guide TABLE OF CONTENTS Permissions, Trademarks & Distribution ............................................................................................................................................. 3 Safety .................................................................................................................................................................................................... 4 Regulatory Information..........................................
Navini Networks, Inc. PMX User’s Guide Permissions, Trademarks & Distribution Copyright© 2006, Navini Networks, Inc. All information contained herein and disclosed by this document is confidential and the proprietary property of Navini Networks, Inc. and all rights therein are expressly reserved. Acceptance of this material signifies agreement by the recipient that the information contained in this document is confidential and that it will be used solely for the purposes set forth herein.
Navini Networks, Inc. PMX User’s Guide Safety To optimize safety and expedite installation and service, read this document thoroughly. Follow all warnings, cautions, and instructions marked on the equipment and included in this document. To aid in the prevention of injury and damage to property, cautionary symbols have been placed in this document to alert the reader to known potentially hazardous situations, or hazards to equipment or procedures.
Navini Networks, Inc. PMX User’s Guide Regulatory Information This Ripwave MX PC Card (PMX) has been tested with a typical laptop computer with a side loading PCMCIA bay. This PMX must not be co-located or operated in conjunction with any antenna (other than the one furnished by Navini and included in the package) or transmitter. Use of this device in any other configuration may exceed the FCC, ETSI, or other regulatory bodies RF Exposure compliance limit.
Navini Networks, Inc. Introduction PMX User’s Guide Congratulations! Your Ripwave MX PC Card (PMX) is a userfriendly, easy-to-install device that helps you connect wirelessly to the Internet using the PCMCIA port on your laptop computer. The PMX can work with today’s MC-SCDMA technology and the OFDM-based 802.16e technology that Navini will trial late 2006.
Navini Networks, Inc. PMX User’s Guide NOTE: If you are going to upgrade your Operating System after loading the Navini Diagnostics software, you must first uninstall Navini Diagnostics prior to upgrading the OS. Otherwise, the PMX will continue to operate, but the Navini Diagnostics will not work. See Uninstall instructions in this Guide. Physical Characteristics The PMX fits into a standard Type II PCMCIA slot. A 68-pin connector on the end of the card connects it to the laptop.
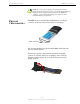
Navini Networks, Inc. Installing Your PMX PMX User’s Guide The following instructions explain how to install the PMX and its driver software on your computer. Please read all instructions before attempting the installation. NOTE: The laptop should be used preferably on a desk when the PMX is installed. Using the laptop with the PMX close to the body, such as on the lap, is undesirable. NOTE: The screenshots shown in these instructions were taken from a laptop operating with Windows 2000.
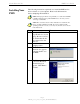
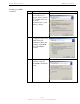
Navini Networks, Inc. Installing Your PMX, continued PMX User’s Guide Step Action 5. The Install Hardware Device Drivers box appears. Select ‘Search for a suitable driver for my device (recommended).’ Click Next to continue. Illustration Windows 2000 Screen 6. The Locate Driver Files box appears. Select ‘CD ROM.’ Insert the Installation CD into the computer’s CD-ROM drive. Click Next to continue. Windows 2000 Screen 7. The Driver Files Search Results box appears. Click Next to install the driver.
Navini Networks, Inc. Installing Your PMX, continued PMX User’s Guide Step Action Illustration 8. The Hardware Install Windows 2000 Screen box appears, along with a Digital Signature Not Found box. Click Yes on the Digital Signature Not Found box, and then click Yes on the Hardware Install box. If the sound is turned up on your computer, two beeps are heard. 9.
Navini Networks, Inc. Removing Your PMX PMX User’s Guide Before you store your PC in a computer case, you should remove the PMX from the PC. Also, turn the antenna to its original down position. Leaving the PMX in the PC or the antenna in the upright position while storing the PC in a computer case may damage the PMX or the antenna. To properly remove the PMX from your computer, you must first stop the driver software.
Navini Networks, Inc. Removing Your PMX, continued PMX User’s Guide Select Stop Navini Networks PCMCIA Adapter. Next, the Stop a Hardware Device dialog box appears. Click OK. You can now pull the PMX out of your computer. If the sound on your computer is turned on, you may hear a beep indicating the PMX was unplugged. Indicator Light An indicator light on the top of the PMX’s black encasement provides information about the PMX’s operation.
Navini Networks, Inc. PMX User’s Guide Troubleshooting If you experience difficulties with your Internet connection after you have installed the PMX driver software, please review the Minimum Computing Requirements and Addendum 1. Ensure your computer meets those requirements. Also, review the installation procedures and ensure all steps were completed properly.
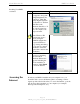
Navini Networks, Inc. Installing NavDiag, continued PMX User’s Guide Step Action Illustration 4. Double-click on the icon for the file navdiag_windows.exe*. Example Doubleclick this file. This will automatically start the installation of NavDiag. 5. The InstallAnywhere window appears. The progress bar indicates that InstallAnywhere has initialized. Windows 2000 Screen 6. The Navini Diagnostics Language screen appears* (see Note above). Select a language, and click OK to continue.
Navini Networks, Inc. Installing NavDiag, continued PMX User’s Guide Step Action 7. The progress bar indicates the files are being installed. Illustration Windows 2000 Screen 8. The NavDiag Introduction screen appears. Click Next to continue. Windows 2000 Screen 9. The License Agreement screen appears. Read the Licensing Agreement. Select the I Accept option, and click Next to continue. Windows 2000 Screen If the License Agreement is not accepted, you cannot install the software.
Navini Networks, Inc. Installing NavDiag, continued PMX User’s Guide Step Action Illustration Windows 2000 Screen 10. The Choose Install Folder screen appears. Enter the name of the folder where you wish to install the software. Click Next to continue. 11. 12. The default installation folder provided by the software is shown in the illustration. The Choose Shortcut Folder screen appears. Accept the default and click Next to continue. The Pre-Installation Summary screen appears.
Navini Networks, Inc. Installing NavDiag, continued PMX User’s Guide Step Action 13. The Installing screen will change as the application files are loaded. 14. Troubleshooting Using Navini Diagnostics At the Install Complete screen, click Done to close the window. Illustration Windows 2000 Screen Windows 2000 Screen To open the Navini Diagnostics software application, double-click on the Navini Diagnostics icon on your desktop.
Navini Networks, Inc. PMX User’s Guide Connection Status The pictures that appear on the top right side of the screen represent the PC, the connection between the PC and the PMX (Modem), the PMX, the connection between the PMX and the Base Station, and the Base Station to which the PMX is communicating. Check marks over the connections indicate working connections.
Navini Networks, Inc. Signal Strength & Signal Quality Bars PMX User’s Guide Signal Strength and Signal Quality are dynamic bar displays that indicate how well your PMX is receiving signals from the Base Station. In particular, the Signal Strength bars graphically represent the strength of the synchronization signal your Modem is receiving from a Base Station. The higher the pile of bars goes, the stronger the signal is. The color of the bars also gives an indication of the strength of the signal.
Navini Networks, Inc. PMX User’s Guide History Graphs The History graphs plot the change in signal strength and signal quality over time. The graphs cover the last minute and are updated every second. Read the graphs from right to left. The right side of the graph represents the most recent status of your PMX. Parameters At the bottom of the Connection Status screen are four parameters. These parameters are BTS ID, Network ID, Active SW Version, and Standby SW Version.
Navini Networks, Inc. Configuration PMX User’s Guide The Configuration screen enables you to update your PMX’s software if directed to do so by your Service Provider. If you must update your PMX’s software, your Service Provider will provide you with instructions regarding what to do. At the bottom of the screen is an Allow Customer Satisfaction Reporting box. This box currently is not supported on the PMX. Trend Analysis The Trend Analysis lets you view PMX parameters that evolve over time.
Navini Networks, Inc. PMX User’s Guide Trend Analysis, continued By pressing the Plot Graph button, the following screen appears. This screen displays the value of the selected parameters over the last five minutes, and is updated once every second. The graphic scrolls from right to left. Statistics The Statistics screen lets you view the current value of selected parameters. These values are updated as they change over time. To view the Statistics screen, press the Statistics button.
Navini Networks, Inc. PMX User’s Guide About The About screen provides vital information such as the version of the Navini Diagnostics software currently installed on your computer. It also provides a website address and telephone number where you can contact your Service Provider. To view the About screen, press the About button. Help A Help button appears on the top right corner of all the NavDiag windows. The Help button gives you two options.
Navini Networks, Inc. Uninstalling NavDiag Software, continued PMX User’s Guide Step Action 1. On your computer screen lower left corner, click on Start > Programs > NavDiag > Uninstall. Illustration 2. The Install-Anywhere Uninstaller screen appears. Click Uninstall. Windows 2000 Screen 3. The screen indicates the application files are uninstalled. Windows 2000 Screen 4. The Uninstall Complete screen appears when finished. Click on Quit to close the Uninstall screen. Windows 2000 Screen 5.
Navini Networks, Inc. Optional Desktop Antenna PMX User’s Guide An optional desktop antenna is available for the PMX. This antenna connects to the PMX and then sits on a surface next to the laptop. This antenna should be used if optimal reception cannot be obtained through the original PMX antenna. To connect the desktop antenna to the PMX, you must first remove the original antenna attached to the PMX. To remove the antenna, turn the antenna down so that it is lying parallel with the PMX.
Navini Networks, Inc. Care and Maintenance PMX User’s Guide The PMX is designed to give you years of trouble-free service. To ensure operation, read the following care and maintenance instructions. Keep the PMX free of dust and moisture. If the PMX gets wet, use a towel to dry it immediately. Handle the PMX gently. Dropping it or mishandling it can cause damage to the metal/plastic shell or the electronic circuitry. Keep the PMX away from high temperatures.
Navini Networks, Inc. Upgrading the PMX Software PMX User’s Guide There are two different ways to upgrade the software that makes the PMX work. Your Service Provider may perform an over-the-air (OTA) upgrade, where the up-to-date software files are transferred wirelessly from a Base Station to your PMX. This method will normally be transparent to you; in other words, you should not experience any noticeable service interruption.
Navini Networks, Inc. PMX User’s Guide ADDENDUM 1: PMX - PC Troubleshooting - For Use With the Ripwave MX PC Card (PMX) & Navini Diagnostics Software - PC Operating Systems Prior to installing the Navini Diagnostics (NavDiag) software, please check to ensure that the PC Operating System meets the criteria given in the table below. If these criteria are not met, unpredictable problems may occur as a result of installation.
Navini Networks, Inc.
Navini Networks, Inc. PMX User’s Guide Make Registry Entry: Key: HKEY_LOCAL_MACHINE\SOFTWARE\Microsoft\Windows\CurrentVersion\Uninstall\Navini Diagnostics, Value Name: UninstallString, Value Data: "C:\Program Files\NavDiag\Uninstall\Uninstall NavDiag.exe" Status: SUCCESSFUL Install Uninstaller: Navini Diagnostics (Install All Uninstaller Components) Status: SUCCESSFUL Create LaunchAnywhere: Navini Diagnostics.
Navini Networks, Inc. PMX User’s Guide Status: SUCCESSFUL Install File: C:\Program Files\NavDiag\data\lib\navDiag.jar Status: SUCCESSFUL Install File: C:\Program Files\NavDiag\data\lib\jfreechart-0.9.13.jar Status: SUCCESSFUL Install File: C:\Program Files\NavDiag\data\lib\jcommon-0.8.8.jar Status: SUCCESSFUL Install File: C:\Program Files\NavDiag\data\lib\log4j.
Navini Networks, Inc. PMX User’s Guide ADDENDUM 2: End User Software License Agreement between Navini Networks, Inc. and Buyer ARTICLE 1 IMPORTANT MESSAGE 1.1 Act of Assent. Installing the Software indicates that you have read, understand and accept this License Agreement. ARTICLE 2 LICENSES 2.1 2.2 2.3 2.4 Grant of License. The Software and related Documentation, are the intellectual property of Navini Networks, Inc. and are protected by law. Navini Networks, Inc.
Navini Networks, Inc. PMX User’s Guide 2.5 Suitability. a. Buyer alone is responsible for determining which software best suits Buyer’s needs, for installing and operating the Software, and for the results obtained. Accordingly, each Buyer should determine its needs, and evaluate the Software’s capabilities before making a final decision about licensing the software. b. Navini Networks, Inc. makes no representation that the Software conforms to or satisfies any federal, state, or local laws.
Navini Networks, Inc. PMX User’s Guide ARTICLE 4 INDEMNIFICATIONS AND WARRANTY 4.1 4.2 Intellectual Property Indemnification; Entire Liability. ARTICLE 15 OF THE SUPPLY AGREEMENT TO WHICH THIS AGREEMENT IS ATTACHED STATES THE ENTIRE LIABILITY OF NAVINI NETWORKS, INC. WITH RESPECT TO INFRINGEMENT OF COPYRIGHTS, TRADE SECRETS, TRADEMARKS, PATENTS, AND OTHER INTELLECTUAL PROPERTY RIGHTS BY THE LICENSED SOFTWARE, DOCUMENTATION, OR ANY PARTS THEREOF, AND NAVINI NETWORKS, INC.
Navini Networks, Inc. PMX User’s Guide ARTICLE 6 OBJECT CODE ONLY-NO MODIFICATIONS 6.1 6.2 6.3 Modifications. In order to maintain the “trade secret” status of the information contained in the Licensed Software, Navini Networks, Inc. provides the Software in object-code form only. Buyer shall not modify, enhance, adapt, disassemble, translate, decompile or otherwise decode any portion of the object code of the Software module.