User's manual NAVIGON 2100 | 2110 English (UK) August 2007
This symbol showing a crossed-through refuse container signifies that, within the European Union, the product must be disposed of as sorted waste. This applies both to the product itself, as well as to all accessories that carry this symbol. This product may not be disposed of with unsorted household waste. Imprint NAVIGON AG Schottmüllerstraße 20A D-20251 Hamburg The information contained herein may be changed at any time without prior notification.
User's manual NAVIGON 2100 | 2110 Table of Contents 1 Introduction .......................................................................................6 1.1 1.2 1.3 2 3 4 About this manual ..................................................................................6 1.1.1 Conventions.............................................................................6 1.1.2 Symbols ...................................................................................6 Legal notice ................
User's manual NAVIGON 2100 | 2110 4.4 Switching on NAVIGON 2100 | 2110 ...................................................21 4.4.1 5 5.1 Starting NAVIGON 2100 | 2110 ...........................................................22 5.1.1 5.2 5.3 6 7 Initialising the GPS receiver...................................................22 Specifying a new destination ...............................................................23 5.2.1 Specifying the destination country ...................................
User's manual NAVIGON 2100 | 2110 9.2 Map in Preview mode ..........................................................................38 9.3 Map in Navigation mode ......................................................................40 9.4 Map in Destination search mode .........................................................42 9.4.1 10 10.1 GPS status, storing the current location ..............................................45 10.2 Turn-by-Turn List ............................................
User's manual NAVIGON 2100 | 2110 1 Introduction 1.1 About this manual 1.1.1 Conventions For better legibility and clarification, the following styles are used in this manual: Bold and italics: Registered names, company and product descriptions. SMALL CAPITALS: Window and dialogue box titles. Bold: Highlighting of important parts in the text. Underlined: Descriptions of buttons, input fields and other elements on the user interface. 1.1.
User's manual NAVIGON 2100 | 2110 to the rights of their respective owners without reservation. All mentioned names of products, societies, or brands may be registered trademarks of their respective owners. Every right that is not explicitly accorded is reserved. The absence of the explicit labelling of registered trademarks used in this manual does not imply that the brand is not subject to the rights of a third party. ► ► 1.3 Windows and ActiveSync are trademarks of the Microsoft Corporation.
User's manual NAVIGON 2100 | 2110 France Telephone: Service times: Costs: 0891-650065 Monday to Saturday from 8 a.m. to 8 p.m. CET € 0.225/min. Great Britain Telephone: Service times: Costs: 0871-2880154 Monday to Friday from 7 a.m. to 7 p.m. (local time) 0.10 GBP/min. Telephone: Service times: Costs: 840-320231 Monday to Friday from 8 a.m. to 8 p.m. CET 0,08€/min. Italy Netherlands Telephone: Service times: Costs: 0900-0400468 Monday to Friday from 8 a.m. to 8 p.m. CET € 0.30/min. + € 0.
User's manual NAVIGON 2100 | 2110 Sweden Telephone: Service times: Costs: 085-2054918 Monday to Friday from 8 a.m. to 8 p.m. CET dependent on telephone provider Switzerland Telephone: Service times: Costs: 0848-662544 Monday to Friday from 8 a.m. to 8 p.m. CET 8 a.m. - 5 p.m.: 0.11 CHF/min 5 p.m. - 10 p.m.: 0.09 CHF/min 10 p.m. - 8 a.m.: 0.06 CHF/min. Telephone: Service times: Costs: 902-882333 Monday to Friday from 8 a.m. to 8 p.m. CET 0,0966 €/min.
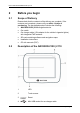
User's manual NAVIGON 2100 | 2110 2 Before you begin 2.1 Scope of Delivery Please check that the contents of the delivery are complete. If the contents are incomplete, please notify us within 14 days of purchasing. The purchased product includes the following: ► NAVIGON 2100 | 2110 navigation device ► Car cradle ► 2.
User's manual NAVIGON 2100 | 2110 5 Slot for SD-memory card 6 On/Off/Standby 7 Connection for external GPS antenna 2.3 Preparing NAVIGON 2100 | 2110 for use 2.3.1 Before using for the first time Charging the rechargeable battery Included in delivery of the NAVIGON 2100 | 2110 is a car charger cable with which power can be supplied to the navigation device via the vehicle's cigarette lighter.
User's manual NAVIGON 2100 | 2110 2.3.2 Registering the navigation system We recommend that you register your NAVIGON 2100 | 2110 navigation system on the NAVIGON AG website. Registration offers the following advantages: ► ► ► 2.3.3 You will receive information about new products on request. You can keep your navigation system up to date by downloading the NAVIGON fresh update software. You can purchase software online e.g.
User's manual NAVIGON 2100 | 2110 Securing the cradle 1. Clean that part of the windscreen to which you would like to secure the cradle. The windscreen must be dry and free of dirt and grease. 2. Place the suction cup of the cradle provided against the windscreen. 3. Press the lever on the suction cup towards the windscreen.
User's manual NAVIGON 2100 | 2110 2.3.4 Miscellaneous Removing the memory card 1. Switch the navigation device off by pressing the (On/Off/Standby) button for at least 6 seconds. 2. Press the memory card gently into the device until the lock disengages. Switching the navigation device off You can switch the navigation device off in two ways: ► Standby: Press the (On/Off/Standby) button briefly. In this state, the device requires virtually no power.
User's manual NAVIGON 2100 | 2110 2.5 Important safety information In your own interest, please read the following notices and safety information carefully before starting up your navigation system. 2.5.1 Navigation safety information Use navigation system at your own risk. Caution! To prevent accidents, do not operate the navigation system while driving.
User's manual NAVIGON 2100 | 2110 Caution! Do not open the navigation device's casing under any circumstances. Caution! Do not expose the navigation device to extreme heat or cold. This may damage the device or impair its function. Caution! Use only the charger provided or one that has been approved of by the manufacturer. Connect the charger to a suitable power supply. The voltage requirements can be found on the device case and/or the packaging.
User's manual NAVIGON 2100 | 2110 Caution! Do not run cables directly next to safety-relevant devices and power supplies. Caution! After installation, check all safety-relevant equipment in the car. Caution! The car charger cable is to be connected to cigarette lighters with an operating voltage of 12V only. 3 Operating the navigation software 3.1 Volume The volume of the spoken driving instructions can be adjusted during navigation. You have started navigation.
User's manual NAVIGON 2100 | 2110 GPS Ready: Data is being received from at least three satellites. Position can be calculated. For more detailed information regarding GPS status, please refer to chapter "GPS status" on page 45. Energy The Energy symbol can display the following conditions of the built-in battery: The device is being supplied by an external power source. The battery is being charged. The device is being supplied by its internal battery. The battery charge is sufficient.
User's manual NAVIGON 2100 | 2110 For details on TMC functionality, please refer to chapter "TMC (Traffic Information)" on page 46. 3.3 Software keyboard A software keyboard appears on the screen when text entries are necessary. All entries can be made on the software keyboard using the fingertips. Only capital letters can be entered. When entering town or street names you need not enter any special characters or umlauts. The navigation system fills in these characters for you automatically.
User's manual NAVIGON 2100 | 2110 In order to accept an entry from the list, simply tap on it. The list closes as soon as you have accepted an entry. 3.5 Options Some windows offer options that lead to further functions. A description of all available options can be found in chapter "Options" on page 36. 3.6 Menus Some buttons have menus which open when activated. Tap on a menu button to execute its function.
User's manual NAVIGON 2100 | 2110 The PASSWORD LOCK window opens. 2. Enter the password that is currently valid in the Password field. 3. Tap the Change password button. The NEW PASSWORD window opens. 4. Enter a new password in the New password field. 5. Enter this password again in the Confirm new password field. 6. Tap the Activate button. Note: The new password must contain precisely 4 digits. 4.3 Cancelling password protection 1. In the MAIN WINDOW, tap on Options > Settings > Options >Password Lock.
User's manual NAVIGON 2100 | 2110 Impaired GPS reception If GPS reception is impaired, navigation will be interrupted. The navigation software remains active. As soon as GPS reception is restored, the navigation system calculates any change of position which has occurred in the meantime. Navigation may simply be continued. Arriving at your destination When you have reached the specified destination, a message to this effect will be displayed.
User's manual NAVIGON 2100 | 2110 As soon as the navigation device has been switched on, initialisation of the GPS-receiver will begin. In the right-hand top corner of the display, you will see the GPS symbol. As soon as data from at least 3 satellites is received, the symbol changes to GPS Ready. Note: If the GPS symbol displays GPS Ready after considerably less than 20 minutes, it is advisable to leave the receiver switched on for at least a further 15 minutes so as to ensure reliable operation.
User's manual NAVIGON 2100 | 2110 The COVERED COUNTRIES list opens. 2. Tap on the country in which your destination lies. The COVERED COUNTRIES list closes again. The symbol will display the country code of the destination country. Note: Only countries of which at least a part is represented on the currently loaded map may be selected. 5.2.2 Destination address 1. In the MAIN WINDOW, tap on New Destination > Enter an Address.
User's manual NAVIGON 2100 | 2110 Note: For detailed information on how to start navigation, please refer to chapter "Starting navigation" on page 30. 5.2.3 Special destinations Special destinations, also called POIs (Points Of Interest) for short, are useful addresses that are catalogued according to particular criteria. Special destinations include ports, airports, restaurants, hotels, petrol stations, public buildings, doctor's surgeries, hospitals, shopping centres, etc.
User's manual NAVIGON 2100 | 2110 4. Tap on the name of the destination. 5. Tap the Start Navigation button. The map opens in Preview mode. For detailed information on how to start navigation, please refer to chapter "Starting navigation" on page 30. Special destinations of nationwide significance Special destinations of nationwide significance are airports, places of interest, national monuments, large ports etc.
User's manual NAVIGON 2100 | 2110 The Name of the Destination list opens. It contains special destinations from the specified category, sorted alphabetically. 5. Tap on the name of the destination. 6. Tap the Start Navigation button. The map opens in Preview mode. For detailed information on how to start navigation, please refer to chapter "Starting navigation" on page 30. 5.2.4 Quick access to special destinations The quick access system contains three categories of special destinations.
User's manual NAVIGON 2100 | 2110 For example, for many restaurants there is a telephone number available. You can then call the restaurant in order to reserve a table, for example. One of the destination entry windows described is open. ► Tap the (Destination Info) button. The DESTINATION INFO window opens. It contains all the information about the specified destination that is stored in the navigation system's database. ► ► 5.3 Tap the Cancel button to close the DESTINATION INFO window.
User's manual NAVIGON 2100 | 2110 1. In the MAIN WINDOW, tap on My Destinations > Favourites. 2. Tap the destination to which you would like to navigate. 3. Tap the Start Navigation button. The map opens in Preview mode. For detailed information on how to start navigation, please refer to chapter "Starting navigation" on page 30. 5.4 Navigating homewards In NAVIGON 2100 | 2110 you can save your address as home address. You can navigate to your home address at anytime by activating a single button.
User's manual NAVIGON 2100 | 2110 4. Tap the (OK) button. The DESTINATION ON MAP window opens. The detailed address data of the selected destination is displayed in the left-hand upper corner. 5. Tap the Take Me There button. The map opens in Preview mode. For detailed information on how to start navigation, please refer to chapter "Starting navigation" on page 30. 5.6 Starting navigation The map is open in Preview mode. The navigation destination is depicted by a small flag.
User's manual NAVIGON 2100 | 2110 No GPS reception If the received GPS signal is insufficient, the following message will appear: "GPS reception is currently not sufficient. Navigation starts automatically as soon as GPS reception is OK again." You have the following options: ► ► ► Wait until GPS reception is sufficient for determining position, the route will be recalculated and you can begin navigation. Tap the Cancel button. The MAIN WINDOW opens.
User's manual NAVIGON 2100 | 2110 You can then begin navigation to this destination very quickly by tapping the Take Me Home button in the MAIN WINDOW. 1. Select the destination which you want to define as your home address from the FAVOURITES list. (See chapter "Favourites" on page 28) 2. Tap on Options > Home Address. The selected destination has now been saved as your home address. Your home address now appears in the FAVOURITES list marked by a house symbol.
User's manual NAVIGON 2100 | 2110 2. Tap the corresponding button. 3. Enter the starting point. (See the corresponding section of chapter "Navigation" on page 21 ff.) 4. Tap the Set Starting Point button. The selected starting point will now be displayed next to the 0°(Starting Point) button. Changing the starting point ► Tap the Specify Starting Point field. The STARTING POINT menu opens. You can now enter a different starting point. Proceed as described above. 7.1.
User's manual NAVIGON 2100 | 2110 Route Point Down: Moves the selected route point backwards. (Example: route point 2 becomes route point 3). Delete: Deletes the selected route point. A dialog window prompts you to confirm deletion. 7.2 Managing routes You can save each planned route under a particular name. Note: Only the start point and route points will be saved, not, however, the calculated route. If you load a route that has been saved, it must be recalculated before navigation can begin.
User's manual NAVIGON 2100 | 2110 The ROUTE PLANNING window is open. The starting point and at least one route point have been entered. 1. Tap the Show Route button. The map window opens in Preview mode. The starting point and the route points are marked by flags. For each stage, the distance and the estimated trip time is given. This data is also displayed for the entire route. 7.3.2 Simulating routes It is also possible to simulate navigation.
User's manual NAVIGON 2100 | 2110 Turn-by-Turn List If you would like to see detailed directions for the route, tap on Options > Show Turn-by-Turn List. For detailed information about the functions in the TURN-BY-TURN LIST window, please refer to chapter "Turn-by-Turn List" on page 45. Starting navigation ► Tap the Start Navigation button or simply start driving. No GPS reception If the received GPS signal is insufficient, the following message will appear: "GPS reception is currently not sufficient.
User's manual NAVIGON 2100 | 2110 Logbook: Opens the LOGBOOK window. Here you can begin and end logbook recording. For detailed information, please refer to chapter "Logbook" on page 48. Saved Routes: Opens a dialog window in which you can load a stored route. GPS status: Opens the GPS STATUS window. Here you can see details regarding GPS reception. You can also save data regarding the current location. For more detailed information, please refer to chapter "GPS status" on page 45.
User's manual NAVIGON 2100 | 2110 Simulation: Simulates a navigation based on the displayed route. This simulation can be performed without GPS reception. Simulation is, however, restricted to routes of max 60 mi. Rename: Opens a window in which you can change the name for the selected destination or route. Traffic: Opens the TRAFFIC INFORMATION window in which pending reports are listed. For detailed information, please refer to chapter "TMC (Traffic Information)" on page 46.
User's manual NAVIGON 2100 | 2110 You have planned or loaded a route and tapped the Show Route button. The map opens in Preview mode. The entire route is visible. 1 2 The route is highlighted in orange. A triangle in orange shows your current position. If you display a planned or loaded route and the specified starting point is not the same as your current location, then the current position may or may not be shown on the preview. 3 The destination is marked with a little flag.
User's manual NAVIGON 2100 | 2110 ► 9.3 Tap the (Destination search) button to view the map in Destination search mode. (See "Map in Destination search mode" on page 42). Map in Navigation mode After the route has been viewed in Preview mode, navigation will start. The map opens in Navigation mode. 1 Signposting to be followed is displayed here. 2 Effective speed limits are displayed here (where available). 3 The route is marked by the colour orange.
User's manual NAVIGON 2100 | 2110 If you don't have to change direction for a longer period, you will see only a forward-facing arrow. The distance for which you are to follow the road you are on is displayed beneath the arrow. ► Tap the large arrow field to hear current route instructions. 6 The traffic lanes to be followed to your destination are depicted in the colour orange. 7 The height above sea level and the current speed are displayed here.
User's manual NAVIGON 2100 | 2110 Map functions in Navigation mode When the map is open in Navigation mode, tap any point on the map. Buttons with various functions will be displayed. 2D/3D: Changes between 2D and 3D mode. The symbol for the mode that is currently set is marked orange. Day/Night: Changes between "day" and "night" display modes. The symbol for the mode that is currently set is marked orange. Interim Destination: Opens a menu for entering an interim destination.
User's manual NAVIGON 2100 | 2110 Zoom Out: The map section shown becomes larger, but you will see fewer details. Zoom In: The map section becomes smaller, but you will see more details. Zoom Mode: When this button is active, you can plot a map section with the pen or with your finger. Plot the map section from upper left to bottom right and it will then zoom to fit the size of the screen. Plot the map section from bottom right to top left, and the map will zoom out.
User's manual NAVIGON 2100 | 2110 9.4.1 Operating in Destination search mode 1. Tap on the point to which you wish to navigate. The destination that you have selected appears under the cross hairs. The geographical coordinates of the destination and the corresponding address are shown in the bottom third of the screen. 2. Tap the (OK) buttton. Buttons with various functions will appear. Take Me There: Begins navigation to the selected point. If you are currently navigating, navigation will be aborted.
User's manual NAVIGON 2100 | 2110 10 Useful functions 10.1 GPS status, storing the current location In the GPS STATUS window, you will find an overview of the data the navigation system calculates from the received GPS signals. GPS status is available via the options of several windows. 1. Tap on Options > GPS status. The current location can be stored in the FAVOURITES list. 2. Tap the Save Position button. The SAVE DESTINATION AS... dialog window opens. The cursor blinks in the Name field. 3.
User's manual NAVIGON 2100 | 2110 2 Distance to this junction. 3 Name of the street onto which you must turn. 4 Indicates whether you want to travel on the relevant route section or not. (Allow): The relevant section may be included on the route. (Forbid): The relevant section may not be included on the route. 10.2.1 Blocking route sections 1. Tap on the route sections that you do not want to travel on, so that the 2. Tap the (Forbid) symbol appears next to them. (Modify Route) button.
User's manual NAVIGON 2100 | 2110 2. Tap the Traffic information button to select the messages to be displayed. For each traffic message in the list, information about the location and type of traffic obstruction will be displayed. ► Tap a message to display detailed information. ) or Ignore ( ) obstructions The navigation system can Avoid ( on the route. The Avoid / Ignore button shows the corresponding status. ► ► 10.3.2 Tap the button to select the alternative setting. Tap the window.
User's manual NAVIGON 2100 | 2110 10.4 Logbook You can use NAVIGON 2100 | 2110 to record a logbook. The logbook is recorded in the "Logbook.xls" file. You can open the file with Microsoft Excel. Each recorded trip is added at the bottom of the table as a new entry. During the first recording of a trip, the "Logbook.xls" file is created in the "MN6 Logbook" directory on the navigation device's memory card. If you delete or move this file, a new file will be created when you next record a trip.
User's manual NAVIGON 2100 | 2110 The settings of the individual windows are distributed on several windows. You can toggle between these windows with the (To the Left) and (To the Right) buttons. Some settings can only accept two or three different values. These settings can be recognised by the (Toggle) button. All potential values are visible. The value that is currently valid is highlighted in black. ► Tap the values.
User's manual NAVIGON 2100 | 2110 12 Appendix 12.1 Technical data Dimensions 102.6 x 79.5 x 18.7 mm Weight Operating conditions ca. 153 g Operating temperature -10°C bis 60°C Storage temperature -20°C bis 70°C Humidity 0% bis 90%, non-precipitating CPU Samsung 2440-400Mhz Operating System Microsoft Windows CE Net 5.0 ® 3.
User's manual NAVIGON 2100 | 2110 12.2 Identification and serial number The navigation device has been provided with various identification labels which can be found beneath the cover on the back of it. (e.g. CE label, serial number, ....) If you need to see any of these labels, please proceed as follows: Insert a sharp object (e.g. a knife or a small screwdriver) in the slot between the device and the rear cover. Twist the object used so that the rear cover opens.
User's manual NAVIGON 2100 | 2110 13 Index B G Block............................................ 42, 46 GPS Faulty reception ............................ 22 Initialise......................................... 23 Signals.......................................... 14 Symbols ........................................ 17 GPS status ........................................ 45 C Calibration ......................................... 37 Configuration .....................................
User's manual NAVIGON 2100 | 2110 N Navigation Block ....................................... 42, 46 Interim Destination........................ 42 No GPS reception................... 31, 36 POI on Your Route ....................... 42 Route Profile ........................... 30, 35 Skip Route Point ........................... 42 Start ........................................ 30, 35 Turn-by-Turn List .................... 30, 36 NAVIGON 2100 | 2110 Description.................................... 10 Energy .
User's manual NAVIGON 2100 | 2110 Recalculate Route ........................ 47 TMC .............................................. 47 Traffic Information......................... 47 Tuning Mode ................................. 47 Trade marks ........................................ 6 Traffic Information Recalculate Route ........................ 47 Show............................................. 46 Tuning Mode ................................. 47 Tuning Mode .....................................