User’s manual NAVIGON 12xx | 22xx English (United Kingdom) September 2008
The crossed-out wheeled bin means that within the European Union the product must be taken to separate collection at the product end-oflife. This applies to your device but also to any enhancements marked with this symbol. Do not dispose of these products as unsorted municipal waste. Imprint NAVIGON AG Schottmüllerstraße 20A D-20251 Hamburg The information contained herein may be changed at any time without prior notification.
User’s manual NAVIGON 12xx | 22xx Table of contents 1 Introduction .......................................................................................5 1.1 About this manual.....................................................................................5 1.1.1 1.1.2 1.2 Legal notice ..............................................................................................5 1.2.1 1.2.2 1.3 2 Questions about the product ....................................................................
User’s manual NAVIGON 12xx | 22xx 5.2.5 5.2.6 5.2.7 5.2.8 5.2.9 5.3 Managing destinations ...........................................................................32 5.3.1 5.3.2 5.4 Entering the starting point..........................................................33 Entering route points .................................................................33 Editing route points....................................................................34 Managing routes .......................................
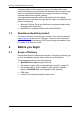
User’s manual NAVIGON 12xx | 22xx 1 Introduction 1.1 About this manual 1.1.1 Conventions For better legibility and clarification, the following styles are used in this manual: Bold and italics: Product names. SMALL CAPITALS: Window and dialogue box titles. Bold: Highlighting of important parts in the text. Underlined: Names of buttons, input boxes and other elements on the user interface. Underlined and italics: Names of control elements on the navigation device. 1.1.
User’s manual NAVIGON 12xx | 22xx proprietary rights of their respective owners. All trade marks, trade names and company names used in this document are or may be trade marks or registered trademarks of their respective owners. All rights reserved except those explicitly granted. If the registered trademarks used in this manual are not explicitly identified as such, this does not imply that the name is not subject to the rights of a third party. ► ► 1.
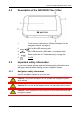
User’s manual NAVIGON 12xx | 22xx 2.2 2.3 Description of the NAVIGON 12xx | 22xx 1 Touch-screen (refer also to "Safety information for the navigation device" on page 8) 2 Slot for MicroSD memory card 3 Mini USB socket for USB cable / car charger cable 4 Reset (refer also to "Troubleshooting" on page 54) 5 On/Off Important safety information In your own interest, please read the following safety information and warnings carefully before starting up your navigation system. 2.3.
User’s manual NAVIGON 12xx | 22xx Caution! Follow the instructions of the navigation system only when the circumstances and the road traffic regulations allow you to do so! The navigation system will still guide you to your destination even if you deviate from the calculated route. Caution! Check that the cradle is secured and adjusted properly before each journey.
User’s manual NAVIGON 12xx | 22xx 2.3.3 Safety guidelines when installing the device in your car Caution! Fasten the cradle so that the navigation device is easy to see and operate by the driver. Make sure that the driver's view of the traffic is not impeded. Caution! Do not attach the cradle within the working zone of any airbags. Caution! Do not fasten the cradle too close to the steering wheel or other controls. The driver must not be obstructed in operating any car functions.
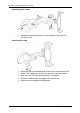
User’s manual NAVIGON 12xx | 22xx Assembling the cradle ► Assemble the cradle as shown in the illustration. No tools are needed for this. Securing the cradle 1. Clean that part of the windscreen to which you want to secure the cradle. The windscreen must be dry and free of dirt and grease. 2. Open the lever on the suction cup as far as possible. 3. Place the cradle suction cup against the windscreen. 4. Press the lever towards the windscreen.
User’s manual NAVIGON 12xx | 22xx Inserting the navigation device into the cradle 1. Insert the navigation device into the lower lugs of the bracket. (See illustration) 2. Then press the device towards the cradle until you hear the upper clip latch in place. Supplying power to the navigation device Included in delivery of the NAVIGON 12xx | 22xx is a car charger cable with which power can be supplied to the navigation device via the vehicle's cigarette lighter.
User’s manual NAVIGON 12xx | 22xx cable is connected, the device can receive current traffic messages. If required, it can change your route dynamically, e.g. in order to avoid a traffic jam. 2.4.3 Memory card A memory card is not required to operate the NAVIGON 12xx | 22xx because all the data are stored in the internal memory of the device. When you connect the NAVIGON 12xx | 22xx to your computer using a USB cable, the internal memory is detected as the 'NAVIGON' drive.
User’s manual NAVIGON 12xx | 22xx Windows XP 1. Tap on Next >. 2. Tap on Finish.
User’s manual NAVIGON 12xx | 22xx Windows Vista ► Tap on Cancel. Windows 2000 1. Tap on Next >.
User’s manual NAVIGON 12xx | 22xx 2. Tap on Next >. 3. Tap on Next >.
User’s manual NAVIGON 12xx | 22xx 4. Tap on Finish. 2.5 Navigating with GPS GPS is based on a total of at least 24 satellites orbiting the Earth and continuously transmitting signals of their position and time. The GPS receiver receives this data and calculates its own geographical position on the basis of the information transmitted by the various satellites. Data from at least three satellites is required for positioning with an acceptable degree of accuracy.
User’s manual NAVIGON 12xx | 22xx (On/Off) key for longer than 2 seconds! If Caution! Do not press the you press the key for longer than 10 seconds, a hardware reset will be carried out. After a hardware reset you must re-calibrate the touchscreen. The GPS receiver will also be re-initialised, which can take up to 20 minutes.
User’s manual NAVIGON 12xx | 22xx 4 Operating the NAVIGON 12xx | 22xx 4.1 Information Various information symbols are located at the top of many windows. GPS The GPS symbol can indicate the following GPS reception states: No GPS (No symbol): The built-in GPS receiver is not operational. Contact customer service if the problem persists. No Signal: Data is being received from less than three satellites. Position cannot be calculated. GPS Ready: Data is being received from at least three satellites.
User’s manual NAVIGON 12xx | 22xx TMC on Standby: Traffic messages can be received. Note: The TMC antenna is integrated in the car charger cable. The Tuning symbol may still appear therefore when the car charger cable is not connected to the NAVIGON 22xx. For details of the TMC function refer to chapter "TMC (Traffic Information" on page 48. Energy The Energy symbol can indicate the following states of the integrated battery: The device is being supplied by an external power source.
User’s manual NAVIGON 12xx | 22xx 4.2.1 Special keys inserts a space. deletes the character in front of the cursor. opens the keyboard with numerals. Latin, Cyrillic and Greek alphabet opens the keyboard with the Latin alphabet. opens the keyboard with the Cyrillic alphabet. opens the keyboard with the Greek alphabet.. When you want to enter addresses, names or POIs, the keyboard with the alphabet for the country in question will open automatically.
User’s manual NAVIGON 12xx | 22xx 4.2.2 Entering data Often you can select an entry from a list. This is the case, for example, when you enter a location. As soon as you enter the first letter, the largest city in the given country that begins with this letter appears. Enter more letters and after each entry the first city which begins with these letters will appear. ► When the correct location appears, tap on complete the entry.
User’s manual NAVIGON 12xx | 22xx Caution! Be sure to refer to all the safety information in chapter "Important safety information" on page 7. Impaired GPS reception As soon as GPS reception is restored, the navigation system calculates any change of position which has occurred in the meantime. You can then simply continue navigating. Arriving at your destination When you have reached your selected destination, a message to this effect will be displayed.
User’s manual NAVIGON 12xx | 22xx In the top right hand corner of the display, you will see the GPS symbol. As soon as data from at least three satellites is received, the icon will change to (GPS Ready). Note: Initialisation takes the least time if you do not start driving until the initialisation has finished. For more details about the GPS symbol refer to chapter "GPS" on page 18. Returning to the Navigation window The NAVIGATION window opens when the navigation application is started.
User’s manual NAVIGON 12xx | 22xx 2. Enter the first letter of the country in which your destination is situated. The COVERED COUNTRIES list opens. It shows all the countries which begin with this letter and for which a map is available. 3. Tap on the country in which your destination lies. The COVERED COUNTRIES list closes. The button bears the flag of the destination country. Note: The selection list contains only those countries whose maps are available to the navigation device. 5.2.
User’s manual NAVIGON 12xx | 22xx The map opens in Preview mode. The destination is indicated on the map. For detailed information on how to start navigation, please refer to chapter "Starting navigation" on page 30. Please read on there. 5.2.3 Points of interest Points of Interest, also called POI (Points Of Interest) for short, are useful addresses that are catalogued according to particular criteria.
User’s manual NAVIGON 12xx | 22xx Instead of the keyboard you are shown information about this POI from the database. (Refer to "Information about the destination" on page 28) 5. Tap on Start Navigation. The map opens in Preview mode. The destination is indicated on the map. For detailed information on how to start navigation, please refer to chapter "Starting navigation" on page 30. Please read on there.
User’s manual NAVIGON 12xx | 22xx POI in a particular location POIs in a particular location can be useful when navigating in an unfamiliar town. 1. In the NAVIGATION window, tap on New Destination > Search for POI > in a City. The POI IN A CITY window opens. 2. Enter the name or the postal code of the destination town. 3. Select a category from which you would like to find a POI. Categories in which no destinations are available in the selected town cannot be entered.
User’s manual NAVIGON 12xx | 22xx Direct access to POI The direct access area contains categories of POI. Destinations in your vicinity that correspond to one of these categories can be viewed here quickly and without further entry. ► Tap in the NAVIGATION window on Options > Settings > General in order to select the categories for direct access. Note: The categories for the Direct Access function are the same as those available for the POI on Your Route function.
User’s manual NAVIGON 12xx | 22xx ► ► 5.2.5 Tap on Cancel in order to close the DESTINATION INFO window again. Tap on (Map) in order to see the destination on the map. Last Destinations NAVIGON 12xx | 22xx saves the last 12 destinations to which you have navigated in the LAST DESTINATIONS list. 1. In the NAVIGATION window, tap on My Destinations > Last Destinations. 2. Tap on the destination to which you would like to navigate. 3. Tap on Start Navigation. The map opens in Preview mode.
User’s manual NAVIGON 12xx | 22xx Further information about entering your home address can be found in chapter "Defining a destination as home address" on page 32. ► In the Take Me Home window, tap on NAVIGATION. If you have not yet entered your home address, a dialog box will notify you of this. Navigation starts. The route profile used for the previous navigation will be applied. 5.2.8 Selecting destinations on the map You may select a destination directly on the map.
User’s manual NAVIGON 12xx | 22xx ► Tap on the arrival time if you want to see the estimated driving time instead. Route Profile The route is calculated on the basis of a route profile. ► If you want to view or change the route profile, tap Route Profile. Note: If you change the route profile, the changes will also apply to future navigations. Information about individual route profile settings can be obtained by tapping the related (Help) button.
User’s manual NAVIGON 12xx | 22xx 5.3 Managing destinations Every destination you enter and destinations from the LAST DESTINATIONS list can be saved in the FAVOURITES list. This makes sense if you frequently navigate to a particular destination. Note: Favourites are indicated on the map by a small flag with their name. At Options > Settings > Map Display > Categories Shown you can switch on and off the display function for favourites. 5.3.1 Saving destinations 1. Enter a destination.
User’s manual NAVIGON 12xx | 22xx The options list opens. 2. Tap on the Route Planning option. The ROUTE PLANNING window opens. 5.4.1 Entering the starting point The starting point of a route is the point at which you want to begin your trip. This is not necessarily the current location. If you are planning a route for your holidays at home, you could, for example, enter your hotel as the starting point.
User’s manual NAVIGON 12xx | 22xx The ROUTE POINT menu opens. 2. Tap on the button for how you want to enter the destination. 3. Enter the route point. (Refer to the corresponding section of chapter "Specifying a destination" on page 23 ff.) 4. Tap on Add. The selected route point is now shown next to its flow number. Repeat these steps for each destination that you want to add to your route. 5.4.3 Editing route points Route points can be deleted from a route.
User’s manual NAVIGON 12xx | 22xx 3. Tap on Save. The destination is now saved to the SAVED ROUTES list. The dialog window closes. Loading routes 1. Tap on Options > Saved Routes. 2. Tap on the route that you want to load. 3. Tap on Load Route. The ROUTE PLANNING window opens. The starting point and the route points of the loaded route have been entered. 5.4.
User’s manual NAVIGON 12xx | 22xx 5.4.7 Starting navigation You have calculated and displayed a route. Route Profile The route is calculated on the basis of a route profile. If you want to view or change the route profile, tap on Route Profile. Note: If you change the route profile, the changes will also apply to future navigations. Information about individual route profile settings can be obtained by tapping on the related (Help) button.
User’s manual NAVIGON 12xx | 22xx Add to Route: Opens the route planning. The selected address will be entered as the starting point of a new route. (Refer to "Multi-leg routes" on page 32.) Delete All: Deletes all destinations in the list (LAST DESTINATIONS list or FAVOURITES list, depending on where you opened the options). The list is then empty. A dialog window prompts you to confirm deletion.
User’s manual NAVIGON 12xx | 22xx Save as Favourite: Saves the selected destination to the FAVOURITES list. (Refer to "Saving destinations" on page 32.) Save Destination: Saves the selected address in the FAVOURITES list. (Refer to "Saving destinations" on page 32.) Save Route: Opens a window in which you can save the planned route under a specific name. (Refer to "Saving routes" on page 34.) Saved Routes: Opens a dialog window into which you can load a saved route. Settings: Opens the SETTINGS window.
User’s manual NAVIGON 12xx | 22xx You have planned or loaded a route and tapped on Show Route. The map opens in Preview mode. The entire route is visible. 1 2 The route is marked in orange. Your current position is indicated (). If you display a planned or loaded route and the specified starting point is not your current location, then it is possible that your current position will not be shown on the preview. 3 The destination is marked with a little flag.
User’s manual NAVIGON 12xx | 22xx ► ► 5.6.3 Tap on Options > Turn-by-Turn List to view detailed directions for the route. (Refer to "Turn-by-Turn List" on page 47) Tap on (Destination search) in order to view the map in Destination search mode. (Refer to "Map in Destination search mode” page 44) Map in Navigation mode After the route was shown in Preview mode, navigation was started. The map opens in Navigation mode. 1 Here is shown what signposts should be followed.
User’s manual NAVIGON 12xx | 22xx 6 (Only NAVIGON 22xx) The Traffic Information box opens if a reported traffic obstruction affects your route. If a distance is indicated in the Traffic Information box, no detour route was calculated yet for the traffic obstruction in question. ► Tap on the Traffic Information box in order to see the complete message. You can then decide whether a detour route is to be calculated (Detour) or not (Ignore).
User’s manual NAVIGON 12xx | 22xx Note: If you tap on the large arrow box, the current route instruction will be repeated. ► ► Tap on Options > Turn-by-Turn List to view detailed directions for the route. (Refer to "Turn-by-Turn List" on page 47.) Tap on (Destination search) in order to view the map in Destination search mode. (Refer to "Map in Destination search mode" on page 44.) Volume The volume of the spoken driving instructions can be adjusted during navigation. 1. Tap on (Volume).
User’s manual NAVIGON 12xx | 22xx Block: Tap on this button in order to block a section of the route that lies in front of you, i.e. to recalculate the route in order to avoid this section, e.g. if you have heard on the radio of a traffic jam affecting this section. (Refer to "Block" on page 47.) Tap on this button again to remove the block. POI on Your Route: Tap on this button to display POIs on your route. This way you can quickly find out, for example, how far it is to the nearest services.
User’s manual NAVIGON 12xx | 22xx ► If you want to change to Navigation mode before then, just tap on any point on the map. Note: The Reality View mode is not available for all motorway junctions and three-leg motorway junctions. Availability depends on the map material used. 5.6.5 Map in Destination search mode The map is always in Destination search mode, when a pair of cross hairs are to be seen.
User’s manual NAVIGON 12xx | 22xx Entire Route: Zooms the map so that the entire route is visible. Current Position: Selects the section of map displayed so that the current location is at the centre. Operating in Destination search mode 1. Tap on the point to which you want to navigate. The destination that you have selected appears under the cross hairs. The geographical coordinates of the destination and the corresponding address are shown in the bottom third of the screen. 2.
User’s manual NAVIGON 12xx | 22xx 5.7 Useful functions 5.7.1 Direct Help If you arrive at the scene of an accident or have an accident yourself, it may be necessary to call for emergency aid and to give the answering office your current location. ► Tap on Options > Direct Help. The DIRECT HELP window opens. If GPS reception is good enough, the address and the geographic cooordinates of your current location will be indicated. ► Tap on map.
User’s manual NAVIGON 12xx | 22xx The current location can be saved in the FAVOURITES list. 1. Tap Save Position. The SAVE DESTINATION AS... dialog box opens. 2. Enter a name for the destination. 3. Tap on Save. 5.7.3 Block You can block a leg of the route at any time during a navigation, i.e. to re-calculate the route in order to avoid the leg, e.g. if you have heard on the radio of a traffic jam affecting this section. Note: The block is valid only for the current navigation.
User’s manual NAVIGON 12xx | 22xx 1 Schematic depiction of the next junction where you must make a turn. 2 Distance to this junction. 3 Route instruction and if available the name of the street into which you must turn. 4 Indicates whether you want to drive on the route section in question or not. (Allow): The section in question is allowed on the route. (Forbid): The section in question is not allowed on the route. Blocking route sections 1.
User’s manual NAVIGON 12xx | 22xx Note: TMC is available free of charge in many European countries. PremiumTMC, promising a faster and more up-to-date service, is offered (exclusively or in addition) in some countries at a charge. You can subscribe to PremiumTMC services on our website www.navigon.com. Displaying traffic information Current traffic information is available via the options button in many windows. ► Tap on Options > Traffic. The TRAFFIC INFORMATION window opens.
User’s manual NAVIGON 12xx | 22xx calculated for this obstruction, then the position of the message in the list is indicated. 5 Here the reported obstruction is displayed as a traffic sign. 6 Here the affected road is indicated. 7 Here you can see on which section of the road the obstruction lies. 8 The navigation system can Detour ( ) or Ignore ( the route. The button shows the active status. ► Tap on the button to select the alternative setting. You can use the messages.
User’s manual NAVIGON 12xx | 22xx ► ► Automatically: An alternative route will be calculated automatically. The system will inform you on the recalculation. On Request: An announcement from the navigation device tells you that a traffic message concerns your route. On the screen the Traffic Information box indicates the distance to the reported traffic obstruction. Tap on the Traffic Information box. You can then decide whether an alternative route is to be calculated or not.
User’s manual NAVIGON 12xx | 22xx Some settings can accept several different values. These settings can be recognised by the visible. 1. Tap on (List) button. The currently valid value is (List) A list with all possible values opens. The currently valid value is marked. 2. Tap on the value you want. It is now marked. 3. Tap on OK. The list closes. The new value is indicated. For each setting there is a (Help) button. When you tap on it you will see an exact definition of the setting in question.
User’s manual NAVIGON 12xx | 22xx 7 Appendix 7.1 Technical data Dimensions Weight Operating conditions 95.8 x 72.3 x 17.6 mm approx.
User’s manual NAVIGON 12xx | 22xx 7.2 Declaration of conformity The NAVIGON 12xx | 22xx described in this manual bears the CE label among others. Products with the CE marking comply with Radio & Telecommunication Terminal Equipment Directive (R&TTE) (1999/5/ECC), the Electromagnetic Compatibility Directive (89/336/ECC) and the Low Voltage Directive (73/23/ECC) – as amended by Directive 93/68/ECC – issued by the European Community Commission.
User’s manual NAVIGON 12xx | 22xx My NAVIGON 12xx | 22xx makes no response any longer, the screen is frozen. Perform a reset. This can be done in two ways: 1. Use a thin object to press the Reset key. (Refer to "Description of the NAVIGON 12xx | 22xx" on page 7) The device is now deactivated. 2. Press the (On/Off) key for at least 10 seconds. - OR – 1. Press the (On/Off) key for at least 6 seconds. The device is now deactivated. 2. Press the (On/Off) switch for at least 10 seconds.
User’s manual NAVIGON 12xx | 22xx 9 Index A F Address ............................................. 24 Advise of Traffic Controls .................. 55 Favourites ................................... 29, 32 B Block...................................... 43, 47, 48 C Compass ........................................... 18 Configuration ..................................... 51 Conventions followed in this manual................................................. 5 Current Position Save.....................
User’s manual NAVIGON 12xx | 22xx N R Navigation Block ................................. 43, 47, 48 Interim Destination........................ 42 No GPS................................... 31, 36 POI................................................ 43 POI on Your Route ....................... 43 Route Profile ........................... 31, 36 Skip Route Point ........................... 42 Start ........................................ 30, 36 Turn-by-Turn List .................... 31, 36 Unblock ........
User’s manual NAVIGON 12xx | 22xx T U Take Me Home............................ 29, 32 TMC Recalculate Route ........................ 50 Show............................................. 49 Symbols ........................................ 18 Tuning Mode ................................. 50 TMC Settings Recalculate Route ........................ 50 TMC .............................................. 50 Traffic Information......................... 50 Tuning Mode .................................