
User's Manual
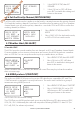
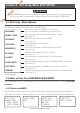
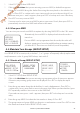
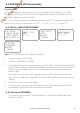
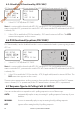
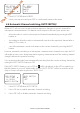
Table Of Contents
- Section 1 - General Information
- Section 2 - The Radio Menu (MENU)
- Section 3 - Radio Setup Menu (RADIO SETUP)
- Section 4 - DSC Setup Menu (DSC SETUP)
- 4-1 DSC Setup - Menu Options
- 4-2 Enter or View Your USER MMSI (USER MMSI)
- 4-3 Maintain Your Groups (GROUP SETUP)
- 4-4 Response to Individual Calls (INDIV REPLY)
- 4-5 ATIS MMSI & ATIS Functionality
- 4-6 DSC functionality options (DSC FUNC)
- 4-7 Response Type to LL Polling Calls (LL REPLY)
- 4-8 Automatic Channel switching (AUTO SWITCH)
- 4-9 DSC Test Reply (TEST REPLY)
- 4-10 Set the inactivity timer (TIMEOUT)
- 4-1 DSC Setup - Menu Options
- Section 5 - Sending and Receiving DSC Calls
- 5-1 What is DSC?
- 5-2 Sending DSC calls
- 5-2-1 Make a Routine Call (INDIVIDUAL)
- 5-2-2 Retrying a Routine Call
- 5-2-3 Acknowledgement of an Individual Incoming Call (INDIV)
- 5-2-4 Recall the Most Recent Incoming Call (LAST CALL)
- 5-2-5 Call a Group (GROUP)
- 5-2-6 Call All Ships (ALL SHIPS)
- 5-2-7 Call using the Call Log (CALL LOG)
- 5-2-8 Call using the Distress Log (DISTR LOG)
- 5-2-9 Call using the Sent Call Log (SENT CALL)
- 5-2-10 Request the LL Position of a Buddy (LL REQUEST)
- 5-2-11 Make a DSC test call (DSC TEST)
- 5-3 Receiving DSC Calls
- 5-2 Sending DSC calls
- 5-1 What is DSC?
- Section 6 - Distress Calls
- Section 7 - Installation
- Appendix A - Technical Specifications
- Appendix B - Troubleshooting
- Appendix C - US & ROW VHF Marine Channel Charts
- Appendix D - EU VHF Marine Channel Charts
- Appendix E - MMSI, FCC and License Information

Lowrance | Link-5 VHF User Guide28
4-9 DSC Test Reply (TEST REPLY)
You can respond to incoming DSC TEST calls with an automatic response or with a manual
response.
MANUAL
manual responce is required, press ENT to confirm or press EXIT to cancel.
AUTO automatically replies after a 10 second delay with an ACK to any incoming
DSC TEST call.
DSC SETUP
LL REPLY ▲
AUTO SWITCH
►TEST REPLY▼
TEST REPLY
►MANUAL
AUTO
4-10 Set the inactivity timer (TIMEOUT)
You can set the inactivity timer with the following options:
AUTOMATED
you can set the inactivity timer to automatically timeout after a period of
inactivity for the following two categories: NON-DISTRESS or DISTRESS
Timeout options are:
DISTRESS: NO TIMEOUT; 5 MINS; 10 MINS (default is NO TIMEOUT)
NON-DISTR: NO TIMEOUT; 10 MINS; 15 MINS (default is 15 MINS)
NON AUTO you can set the inactivity timer to exit any non-automated procedure
activity. Timeout options are:
NO TIMEOUT; 10 MINS; 15 MINS (default is 10 MINS)
Note: If NO TIMEOUT is selected, then you must press the EXIT key to exit the procedure.
Example: to set a 10 minute TIMEOUT for non-automated functions:
1. Select TIMEOUT, then select NON AUTO
2. Select desired timeout period: NO TIMEOUT, 10 MINS or 15 MINS
NON AUTO
NO TIMEOUT
►10 MINS
15 MINS
TIMEOUT
AUTOMATED
►NON AUTO
DSC SETUP
AUTO SWITC▲
TEST REPLY
►TIMEOUT
In this example, 10 MINS has been selected, meaning the radio will exit any non-automated
procedure after a period of 10 minutes of non-activity.
Draft - Final approval