
User's Manual
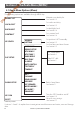
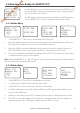
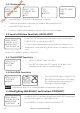
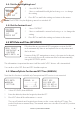
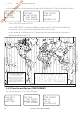
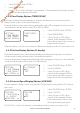

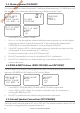
Table Of Contents
- Section 1 - General Information
- Section 2 - The Radio Menu (MENU)
- Section 3 - Radio Setup Menu (RADIO SETUP)
- Section 4 - DSC Setup Menu (DSC SETUP)
- 4-1 DSC Setup - Menu Options
- 4-2 Enter or View Your USER MMSI (USER MMSI)
- 4-3 Maintain Your Groups (GROUP SETUP)
- 4-4 Response to Individual Calls (INDIV REPLY)
- 4-5 ATIS MMSI & ATIS Functionality
- 4-6 DSC functionality options (DSC FUNC)
- 4-7 Response Type to LL Polling Calls (LL REPLY)
- 4-8 Automatic Channel switching (AUTO SWITCH)
- 4-9 DSC Test Reply (TEST REPLY)
- 4-10 Set the inactivity timer (TIMEOUT)
- 4-1 DSC Setup - Menu Options
- Section 5 - Sending and Receiving DSC Calls
- 5-1 What is DSC?
- 5-2 Sending DSC calls
- 5-2-1 Make a Routine Call (INDIVIDUAL)
- 5-2-2 Retrying a Routine Call
- 5-2-3 Acknowledgement of an Individual Incoming Call (INDIV)
- 5-2-4 Recall the Most Recent Incoming Call (LAST CALL)
- 5-2-5 Call a Group (GROUP)
- 5-2-6 Call All Ships (ALL SHIPS)
- 5-2-7 Call using the Call Log (CALL LOG)
- 5-2-8 Call using the Distress Log (DISTR LOG)
- 5-2-9 Call using the Sent Call Log (SENT CALL)
- 5-2-10 Request the LL Position of a Buddy (LL REQUEST)
- 5-2-11 Make a DSC test call (DSC TEST)
- 5-3 Receiving DSC Calls
- 5-2 Sending DSC calls
- 5-1 What is DSC?
- Section 6 - Distress Calls
- Section 7 - Installation
- Appendix A - Technical Specifications
- Appendix B - Troubleshooting
- Appendix C - US & ROW VHF Marine Channel Charts
- Appendix D - EU VHF Marine Channel Charts
- Appendix E - MMSI, FCC and License Information

Lowrance | Link-5 VHF User Guide20
3-3 Channel Names (CH NAME)
The channel charts are listed in Appendix C with their default name tags. CH NAME gives you
the option to edit or delete the channel name tags displayed on the screen.
1. Select RADIO SETUP, then CH NAME.
2. Use + or - to step through the channels with their name tags until you see the channel
name tag you want to change, then press ENT. In this example, the channel name
TELEPHONE associated with channel 01 is being changed to PHONE1.
3. Select EDIT and press ENT to edit the existing name tag. Input the new name over the
existing name. It can be a maximum of 12 characters.
To delete the channel name, select DELETE and press ENT.
4. Press ENT (repeatedly if necessary) to display the YES/NO confirmation.
5. Press ENT to confirm the new channel name tag or the deletion, then press EXIT to
return to the menu.
3-4 RING & BEEP Volume (RING VOLUME) and (KEY BEEP)
Set the volume level of the incoming signal beeps (RING VOLUME) and/or the error and warn-
ing beeps (KEY BEEP) to HIGH (high) or LOW (low) as follows:
1. Select RADIO SETUP, then RING VOLUME or BEEP VOLUME as appropriate.
2. Select a HIGH or LOW volume. (It is possible to turn the beeps off completely by
selecting KEY BEEP then OFF.)
3. Press ENT to enable the new volume setting and return to the menu.
3-5 Internal Speaker Connections (INT SPEAKER)
Switch the radio’s internal speaker ON (on) or OFF (off ). The external speaker is always ON (on)
if a speaker is plugged into the external speaker jack.
RADIO SETUP
►CH NAME
RING VOLUME
KEY BEEP ▼
01
CH NAME
TELEPHONE
TELEPHONE
►EDIT
DELETE
EDIT CH NAME
TELEPHONE
EDIT CH NAME
PHONE1
►YES
NO
RADIO SETUP
CH NAME
►RING VOLUME
KEY BEEP ▼
RING VOLUME
►HIGH
LOW
KEY BEEP
►HIGH
LOW
OFF
Draft - Final approval