
User's Manual
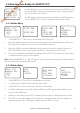
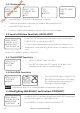
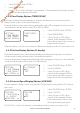

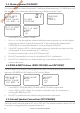
Table Of Contents
- Section 1 - General Information
- Section 2 - The Radio Menu (MENU)
- Section 3 - Radio Setup Menu (RADIO SETUP)
- Section 4 - DSC Setup Menu (DSC SETUP)
- 4-1 DSC Setup - Menu Options
- 4-2 Enter or View Your USER MMSI (USER MMSI)
- 4-3 Maintain Your Groups (GROUP SETUP)
- 4-4 Response to Individual Calls (INDIV REPLY)
- 4-5 ATIS MMSI & ATIS Functionality
- 4-6 DSC functionality options (DSC FUNC)
- 4-7 Response Type to LL Polling Calls (LL REPLY)
- 4-8 Automatic Channel switching (AUTO SWITCH)
- 4-9 DSC Test Reply (TEST REPLY)
- 4-10 Set the inactivity timer (TIMEOUT)
- 4-1 DSC Setup - Menu Options
- Section 5 - Sending and Receiving DSC Calls
- 5-1 What is DSC?
- 5-2 Sending DSC calls
- 5-2-1 Make a Routine Call (INDIVIDUAL)
- 5-2-2 Retrying a Routine Call
- 5-2-3 Acknowledgement of an Individual Incoming Call (INDIV)
- 5-2-4 Recall the Most Recent Incoming Call (LAST CALL)
- 5-2-5 Call a Group (GROUP)
- 5-2-6 Call All Ships (ALL SHIPS)
- 5-2-7 Call using the Call Log (CALL LOG)
- 5-2-8 Call using the Distress Log (DISTR LOG)
- 5-2-9 Call using the Sent Call Log (SENT CALL)
- 5-2-10 Request the LL Position of a Buddy (LL REQUEST)
- 5-2-11 Make a DSC test call (DSC TEST)
- 5-3 Receiving DSC Calls
- 5-2 Sending DSC calls
- 5-1 What is DSC?
- Section 6 - Distress Calls
- Section 7 - Installation
- Appendix A - Technical Specifications
- Appendix B - Troubleshooting
- Appendix C - US & ROW VHF Marine Channel Charts
- Appendix D - EU VHF Marine Channel Charts
- Appendix E - MMSI, FCC and License Information

Lowrance | Link-5 VHF User Guide 17
1. Select GPS/DATA, then SETTING.
2. Select TIME FORMAT.
3. Select 12 Hr or 24 Hr as desired. In this example, 12 hour format has been selected and
so the LCD shows the AM or PM suffix.
2-5-4 Time Display Options (TIME DISPLAY)
If you have entered the time manually as described in the previous sections, the time is
always shown on the screen with the prefix M.
However, if the vessel position is being updated through a GPS navigation receiver, you can
switch the time display on the screen ON or OFF as follows:
1. Select GPS/DATA, then SETTING.
2. Select TIME DISPLAY.
3. Select ON (on) or OFF (off ) as
desired. In this example, OFF has
been selected and so the screen no
longer shows the time.
If the time display is set ON, course and speed data are not displayed on the LCD (see section 2-5-6).
2-5-5 Position Display Options (LL display)
If you have entered the vessel position manually as described in the previous section, the
vessel position is always shown on the screen with the suffix M.
However, if the time is being updated through a GPS navigation receiver, you can switch the
vessel position display on the screen on or off as follows:
1. Select GPS/DATA, then SETTING.
2. Select LL DISPLAY.
3. Select ON (on) or OFF (off ) as
desired. In this example, OFF has
been selected and the screen no
longer shows the vessel position.
2-5-6 Course & Speed Display Options (COG/SOG)
Use this option to display course over ground (COG) and speed over ground (SOG) data on
the screen.
1. Select GPS/DATA, then SETTING.
2. Select COG/SOG.
3. Select ON (on) or OFF (off ) as
desired. In this example, ON has
been selected and so the screen
shows the bearing and speed.
If COG/SOG is set ON (on), the time is not displayed on the screen (see section 2-5-4).
SETTING
TIME OFFSET
TIME FORMAT
►TIME DISPL▼
TIME DISPLY
►ON
OFF
SETTING
TIME FORMA▲
TIME DISPLY
►LL DISPLY ▼
LL DISPLAY
►ON
OFF
SETTING
TIME DISPL▲
LL DISPLY
►COG/SOG ▼
COG/SOG
ON
►OFF
Draft - Final approval