
User's Manual
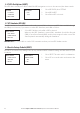
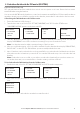

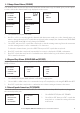
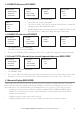

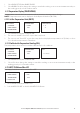
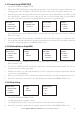
Table Of Contents
- Section 1 - General Information
- Section 2 - The Radio Menu (MENU)
- 2-1 The Radio Menu Options (MENU)
- 2-2 Show Weather, SNR or Happy Fish on Handset (INFO DATA)
- 2-3 Maintain Your Buddy List (BUDDY LIST)
- 2-4 Local or Distance Sensitivity (LOCAL/DIST)
- 2-5 Backlighting (BACKLIGHT) and Contrast (CONTRAST)
- 2-6 GPS Data and Time (GPS/DATA)
- 2-7 GPS Simulator (GPS SIM)
- 2-8 Reset to Factory Defaults (RESET)
- 2-9 Subscribe or Un-Subscribe the 705 handset (HS SETTING)
- Section 3 - Radio Setup Menu (RADIO SETUP)
- 3-1 The Radio Setup Menu Options (RADIO SETUP)
- 3-2 Select the Channel Bank (UIC) (US only)
- 3-3 Change Channel Names (CH NAME)
- 3-4 Ring and Beep Volume (RING VOLUME and KEY BEEP)
- 3-5 Internal Speaker Connections (INT SPEAKER)
- 3-6 Set the Priority Channel (WATCH MODE)
- 3-7 Weather Alert (WX ALERT) (US only)
- 3-8 NMEA or NAVBUS protocol (COM PORT) (721 / 725 only)
- 3-9 Barometric Displays (BARO SENSOR)
- 3-10 Temperature Display (TEMPERATURE)
- 3-11 HAPPY FISH Alarm ON or OFF
- Section 4 - DSC SETUP Menu
- 4-1 What is DSC?
- 4-2 DSC SETUP Menu Options
- 4-3 Check Your User MMSI (USER MMSI)
- 4-4 Maintain Your Groups (GROUP SETUP)
- 4-5 Response to Individual Calls (INDIV REPLY) (US only)
- 4-6 ATIS MMSI & ATIS Functionality (EU only)
- 4-7 DSC Functionality (DSC FUNC)
- 4-8 Response Type to LL Polling Calls (LL REPLY)
- 4-9 Mute the Notification Ringtone
- Section 5 - Send and Receive DSC Calls
- 5-1 The DSC CALL Menu Options
- 5-2 Call an Individual (INDIVIDUAL)
- 5-3 Call the Most Recent Caller (LAST CALL)
- 5-4 Call a Group (GROUP)
- 5-5 Call All Ships (ALL SHIPS)
- 5-6 Call using the Call Log (CALL LOG)
- 5-7 Call using the Distress Log (DIST LOG)
- 5-8 Request the LL Position of a Buddy (LL REQUEST)
- 5-9 Track Your Buddy (TRACK BUDDY)
- 5-10 Receive an All Ships Call (RCV: ALL SHIP)
- 5-11 Receive an Individual Call (RCV: INDIV)
- 5-12 Receive a Group Call (RCV: GROUP)
- 5-13 Receive a Geographic Call (RCV: GEOGRAPH)
- 5-14 Receive a Polled Position Call (RCV:POSITION)
- Section 6 - Distress Calls
- Appendix A - Technical Specifications
- Appendix B - Troubleshooting
- Appendix C - VHF Marine Channel Charts
- Appendix D - EU Inland Waterway Channels
- Appendix E - MMSI and License Information
- Section 7 - Install the Explorer 721/725

26
Northstar Explorer VHF Series: 721/725 Operation and Installation Manual Northstar Explorer VHF Series: 721/725 Operation and Installation Manual
Information regarding Barometer, Weather and Happy Fish operation:
For these functions to operate correctly, the barometer sensor built into the microphone requires a
permanent power connection. When the radio is turned off with the power knob on the radio, power
continuestoflowtothebarometersensor.Thisenablesa24hourbarometertrendtobecollectedandis
used with the Happy Fish and Weather predictor.
Notes:
Barometric data is maintained even if the radio is switched off (via the power knob).•
If the power supply to the radio is disconnected (vessel Battery Master is turned OFF), the •
barometer trend will cease and will re-start when power is re-applied.
Happy Fish and Weather may not function, or may be inaccurate for several hours after initial •
power up.
Baro history is not shown on Optional Handset (701/705) only Baro units.•
In open ocean conditions the weather icon can be less accurate than when close to large land •
masses.
3-9-1 Set the Barometric Units (BARO UNITS)
RADIO SETUP
WX ALERT
COM PORT
> BARO SENSOR
BARO UNIT
> MILLIBARS
INCHES-HG
BARO SENSOR
> BARO UNITS
BARO DISPLY
CAL.
1. Select RADIO SETUP, then BARO SENSOR.
2. The cursor is at BARO UNITS. Press ENT or press the rotary knob.
3. The cursor is at MILLIBARS. Press ENT or press the rotary knob to show barometric pressure in MILLIBARS
or select INCHES-HG to show barometric pressure in inches of mercury.
3-9-2 Switch the Barometric Display ON or OFF (BARO DISPLY)
RADIO SETUP
WX ALERT
COM PORT
> BARO SENSOR
BARO DISPLY
> LCD ON
LCD OFF
BARO SENSOR
BARO UNITS
> BARO DISPLY
BARO CAL.
1. Select RADIO SETUP, then BARO SENSOR.
2. Select BARO DISPLY.
3. The cursor is at LCD OFF. Press ENT or press the rotary knob to switch OFF the barometric display on the
base unit, or select LCD ON to show the barometric display on the base unit when turned off.
IMPORTANT: LCD OFF is the default. This minimises the current drain of the standby vessel battery to
about 3mA average. If the barometric display is set to LCD ON the current drain is continuous at about
85mA.
3-9-3 Calibrate the Barometric Sensor (BARO CAL.)
The barometric functions and icons work best when calibrated to local conditions. The operating range
is from 960mb to 1060mb.
RADIO SETUP
WX ALERT
COM PORT
> BARO SENSOR
CAL
> ± 0.00 In-Hg
BARO SENSOR
BARO UNITS
BARO DISPLY
> CAL