
User's Manual
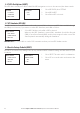
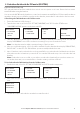

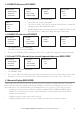

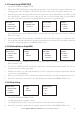
Table Of Contents
- Section 1 - General Information
- Section 2 - The Radio Menu (MENU)
- 2-1 The Radio Menu Options (MENU)
- 2-2 Show Weather, SNR or Happy Fish on Handset (INFO DATA)
- 2-3 Maintain Your Buddy List (BUDDY LIST)
- 2-4 Local or Distance Sensitivity (LOCAL/DIST)
- 2-5 Backlighting (BACKLIGHT) and Contrast (CONTRAST)
- 2-6 GPS Data and Time (GPS/DATA)
- 2-7 GPS Simulator (GPS SIM)
- 2-8 Reset to Factory Defaults (RESET)
- 2-9 Subscribe or Un-Subscribe the 705 handset (HS SETTING)
- Section 3 - Radio Setup Menu (RADIO SETUP)
- 3-1 The Radio Setup Menu Options (RADIO SETUP)
- 3-2 Select the Channel Bank (UIC) (US only)
- 3-3 Change Channel Names (CH NAME)
- 3-4 Ring and Beep Volume (RING VOLUME and KEY BEEP)
- 3-5 Internal Speaker Connections (INT SPEAKER)
- 3-6 Set the Priority Channel (WATCH MODE)
- 3-7 Weather Alert (WX ALERT) (US only)
- 3-8 NMEA or NAVBUS protocol (COM PORT) (721 / 725 only)
- 3-9 Barometric Displays (BARO SENSOR)
- 3-10 Temperature Display (TEMPERATURE)
- 3-11 HAPPY FISH Alarm ON or OFF
- Section 4 - DSC SETUP Menu
- 4-1 What is DSC?
- 4-2 DSC SETUP Menu Options
- 4-3 Check Your User MMSI (USER MMSI)
- 4-4 Maintain Your Groups (GROUP SETUP)
- 4-5 Response to Individual Calls (INDIV REPLY) (US only)
- 4-6 ATIS MMSI & ATIS Functionality (EU only)
- 4-7 DSC Functionality (DSC FUNC)
- 4-8 Response Type to LL Polling Calls (LL REPLY)
- 4-9 Mute the Notification Ringtone
- Section 5 - Send and Receive DSC Calls
- 5-1 The DSC CALL Menu Options
- 5-2 Call an Individual (INDIVIDUAL)
- 5-3 Call the Most Recent Caller (LAST CALL)
- 5-4 Call a Group (GROUP)
- 5-5 Call All Ships (ALL SHIPS)
- 5-6 Call using the Call Log (CALL LOG)
- 5-7 Call using the Distress Log (DIST LOG)
- 5-8 Request the LL Position of a Buddy (LL REQUEST)
- 5-9 Track Your Buddy (TRACK BUDDY)
- 5-10 Receive an All Ships Call (RCV: ALL SHIP)
- 5-11 Receive an Individual Call (RCV: INDIV)
- 5-12 Receive a Group Call (RCV: GROUP)
- 5-13 Receive a Geographic Call (RCV: GEOGRAPH)
- 5-14 Receive a Polled Position Call (RCV:POSITION)
- Section 6 - Distress Calls
- Appendix A - Technical Specifications
- Appendix B - Troubleshooting
- Appendix C - VHF Marine Channel Charts
- Appendix D - EU Inland Waterway Channels
- Appendix E - MMSI and License Information
- Section 7 - Install the Explorer 721/725

22 Northstar Explorer VHF Series: 721/725 Operation and Installation Manual Northstar Explorer VHF Series: 721/725 Operation and Installation Manual
Section 3 - Radio Setup Menu (RADIO SETUP)
Hold down CALL/MENU then scroll down and select RADIO SETUP.
Press ENT or push the rotary knob to show the RADIO SETUP menu options.
Sections1-3and1-4explainhowtonavigatearoundthemenuandenter,saveandchangedata.
3-1 The Radio Setup Menu Options (RADIO SETUP)
3-2 Select the Channel Bank (UIC) (US only)
There is a choice of three channel banks; USA, International, or Canadian (see Appendix C for details).
1. Select RADIO SETUP.
2. The cursor is at UIC. Press ENT or push the rotary
knob to display the list of channel banks.
3. Select the channel bank to use then press ENT
or push the rotary knob to confirm the setting
and return to the menu.
RADIO SETUP
> UIC
CH NAME
RING VOLUME
UIC
> USA
INT’L
CANADA
Edit or delete channel names.
See Section 3-3.
Selects WX Alert scanning mode ON (on) or OFF (off ) (US only).
See section 3-7.
Selects Dual or Tri watch scanning (US only).
See section 3-6.
Turn the radio’s internal speakers ON or OFF.
See section 3-5.
Select NMEA protocol for communications between the VHF radio and any
other instruments. (721 / 725 only) See section 3-8.
Set the volume level of the beeps.
See section 3-4.
Set the volume level of the incoming call notification beeps.
See section 3-4.
Select the channel bank (US only).
See Section 3-2.
UIC
CH NAME
RING VOLUME
KEY BEEP
INT SPEAKER
WATCH MODE
WX ALERT
COM PORT
BARO SENSOR
TEMPERATURE
HAPPY FISH
Select the temperature units, calibrate the sensor.
See Section 3-10.
Select the barometric units, calibrate the sensor, turn the display ON or OFF.
See Section 3-9.
Select the HAPPY FISH alarm to be ON or OFF.
See Section 3-11.