
User's Manual
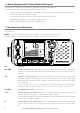
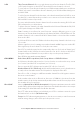
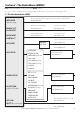
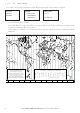
Table Of Contents
- Section 1 - General Information
- Section 2 - The Radio Menu (MENU)
- 2-1 The Radio Menu Options (MENU)
- 2-2 Show Weather, SNR or Happy Fish on Handset (INFO DATA)
- 2-3 Maintain Your Buddy List (BUDDY LIST)
- 2-4 Local or Distance Sensitivity (LOCAL/DIST)
- 2-5 Backlighting (BACKLIGHT) and Contrast (CONTRAST)
- 2-6 GPS Data and Time (GPS/DATA)
- 2-7 GPS Simulator (GPS SIM)
- 2-8 Reset to Factory Defaults (RESET)
- 2-9 Subscribe or Un-Subscribe the 705 handset (HS SETTING)
- Section 3 - Radio Setup Menu (RADIO SETUP)
- 3-1 The Radio Setup Menu Options (RADIO SETUP)
- 3-2 Select the Channel Bank (UIC) (US only)
- 3-3 Change Channel Names (CH NAME)
- 3-4 Ring and Beep Volume (RING VOLUME and KEY BEEP)
- 3-5 Internal Speaker Connections (INT SPEAKER)
- 3-6 Set the Priority Channel (WATCH MODE)
- 3-7 Weather Alert (WX ALERT) (US only)
- 3-8 NMEA or NAVBUS protocol (COM PORT) (721 / 725 only)
- 3-9 Barometric Displays (BARO SENSOR)
- 3-10 Temperature Display (TEMPERATURE)
- 3-11 HAPPY FISH Alarm ON or OFF
- Section 4 - DSC SETUP Menu
- 4-1 What is DSC?
- 4-2 DSC SETUP Menu Options
- 4-3 Check Your User MMSI (USER MMSI)
- 4-4 Maintain Your Groups (GROUP SETUP)
- 4-5 Response to Individual Calls (INDIV REPLY) (US only)
- 4-6 ATIS MMSI & ATIS Functionality (EU only)
- 4-7 DSC Functionality (DSC FUNC)
- 4-8 Response Type to LL Polling Calls (LL REPLY)
- 4-9 Mute the Notification Ringtone
- Section 5 - Send and Receive DSC Calls
- 5-1 The DSC CALL Menu Options
- 5-2 Call an Individual (INDIVIDUAL)
- 5-3 Call the Most Recent Caller (LAST CALL)
- 5-4 Call a Group (GROUP)
- 5-5 Call All Ships (ALL SHIPS)
- 5-6 Call using the Call Log (CALL LOG)
- 5-7 Call using the Distress Log (DIST LOG)
- 5-8 Request the LL Position of a Buddy (LL REQUEST)
- 5-9 Track Your Buddy (TRACK BUDDY)
- 5-10 Receive an All Ships Call (RCV: ALL SHIP)
- 5-11 Receive an Individual Call (RCV: INDIV)
- 5-12 Receive a Group Call (RCV: GROUP)
- 5-13 Receive a Geographic Call (RCV: GEOGRAPH)
- 5-14 Receive a Polled Position Call (RCV:POSITION)
- Section 6 - Distress Calls
- Appendix A - Technical Specifications
- Appendix B - Troubleshooting
- Appendix C - VHF Marine Channel Charts
- Appendix D - EU Inland Waterway Channels
- Appendix E - MMSI and License Information
- Section 7 - Install the Explorer 721/725
11
Northstar Explorer VHF Series: 721/725 Operation and Installation Manual
3 CH Three Favorite Channels. Press to toggle between your favorite channels. The CH1, CH2,
or CH3 symbol appears on the LCD to show which favorite channel is selected.
To scan only one of your favorite channels, press 3CH then immediately press and release
SCAN. If you want to scan all three favorite channels, press 3CH then immediately press
and hold SCAN.
To add a favorite channel for the first time, select that channel then hold 3CH to store
it in the CH1 location. Repeat the procedure to store two more favorite channels in the
CH2 and CH3 locations respectively.
If you try and add another favorite channel it will overwrite the existing CH3. CH1 and
CH2 remain unless you delete them.
To delete a favorite channel, select that channel then hold down 3CH until the CH1, CH2
or CH3 symbol disappears off the LCD.
SCAN Scan. Scanning is not allowed in some European countries. Otherwise, press to scan
between your current channel and the priority channel in DUAL or TRI WATCH mode. The
weather channel is also scanned if the USA channel bank is selected and the weather
alert mode is ON.
Hold down SCAN to enter ALL SCAN mode where the priority channel is checked every
1.5 seconds.
When a signal is received, scanning stops at that channel and BUSY appears on the LCD.
If the signal stops for more than 5 seconds, the scan restarts.
Press ENT or push the rotary knob to temporarily skip over (lock out) an “always busy”
channel when in ALL SCAN mode and resume the scan. An X is shown on the LCD to
designate a skipped channel. It’s not possible to skip over the priority channel.
Press SCAN to stop at the current channel.
CALL/MENU Radio Menu, DSC Set up Menu, Radio Set up Menu and DSC CALL Menu.
Hold down to show the radio menu (see Section 2) and to access the radio set up menu
(seeSection3)andtheDSCsetupmenu(seeSection4).
Press to enter the DSC call menu and to make DSC calls (see Section 5).
WX Weather Channel. 721/725US only. In USA and Canadian waters, press to hear the most
recently selected weather station. The WX symbol is displayed on the LCD.
Press CH + or CH - to change to a different weather channel. Press WX again to return to
the most recent channel.
If the weather alert mode is ON and an alert tone of 1050 Hz is broadcast from the
weather station, it’s picked up automatically and the alarm sounds. Press any key to hear
the weather alert voice message.
IC or H/L IC Intercom. Optional 701 or 705 handset required. Hold down to enter Intercom mode on USA
models. EU models need just a single press and release.. This disables the radio receiver except
for incoming DSC calls and the intercom calls the other unit.
Press PTT when invited. When you’re finished, press ESC to exit Intercom mode or put
the handset back on hook (701 hadset only.)
ESC Escape. Use ESC when navigating menus, to clear incorrect entries, to exit from a menu
without saving changes, and to back up to the previous screen.