
Specifications
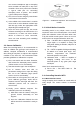
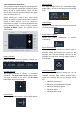

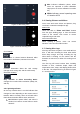
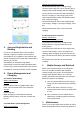

Figure 3.8 – Dive Log Display Page
3. Account Registration and
Binding
In order to use Navatics MITO, users would be
required to sign up a Navatics account with an
email address. Once registered, users will be able
to bind Senseplay Race remote and Navatics MITO
device to an account.
After binded, the smartphone app will be
automatically connect the binded Senseplay Race
remote to the previous Navatics MITO the moment
it establishes connection with the remote controller.
4. Power Management and
Charging
5.1. Navatics MITO Battery
Battery specifications
Indicator
Navatics MITO battery is equipped with 4 blue
LEDs, each represents 25% of its total power.
Charger
(16.8V Charger).
When charging, the LED indicators will start
blinking until the battery is full, then all LEDs will
turn off.
5.2 Tether Roller Power Management
Battery specifications
Charger and Charging Indicator:
Navatics MITO tether roller is charged using
common USB charger via Type-C charging port. It
supports both normal charging and fast charging.
As an indicator, the power LED will start blinking
when it is charging. In fast charging, the power
LED in Navatics MITO tether roller will blink faster
than in normal charging.
Navatics MITO tether roller is also equipped with
solar charger, adding 1 hour usage in bright, sunny
day.
Navatics MITO tether roller can be used while
charging
5.3 Senseplay Race Controller
Battery specifications
Charger and Charging Indicator
Senseplay Race Controller is equipped with 4
battery indicator, each represents 25% of the
battery power.
Senseplay Race Controller can be charged using
common USB charger, it does not support fast
charging. When charging, the power indicator will
blink, and the blue LED among the buttons will light
up.
Senseplay Race Controller can be used while
charging.
5. Media Storage and Retrieval
When users captured images or record videos,
there are 2 medias created, lower resolution
cached storage in the phone, and full resolution
storage inside Navatics MITO. To access the
storage and retrieve the media files from Navatics
MITO, the steps are as following:
1) Turn off Navatics MITO to free the storage
usage from the camera before the following
steps.
2) Connect the tether connector on top of
Navatics MITO with connector-to-USB cable,
to a PC
3) Once connected, the PC should detect a
USB storage containing photos and videos
from Navatics MITO
6. Maintenance
There are a few precautions that needs to be taken
when using Navatics MITO. Please pay attention to