
Product Manual


Page 8
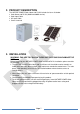
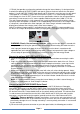
Understanding the unit features
Control and Display Panel
Main Unit Installation
IMPORTANT: The AC plug on the power supply cord is used as the disconnect
device. The socket-outlet shall be installed near the equipment and shall be
easily accessible for rapid disconnect.
To install the unit, connect the AC power cord (IEC end) to the back of the unit. Plug the other end
of the AC input power cord directly into a wall outlet and unit is ready to use. Unit will automatically
turn on.
If the battery capacity is low, „Status‟ indicator on display panel turns to flashing green and
display shows battery capacity and the unit will automatically charge up the battery.
If the battery is full, „Status‟ indicator will turns to solid green and display show „Ful‟
Unplug the input power cord to simulate power failure and the indicator on display will turn amber
indicating unit is running in backup power mode. AC output is now being provided from battery
power.
Reconnecting the AC power cord back to a wall outlet will switch unit back to standby mode and
AC output is now being provided directly from utility power again.
The unit is successfully installed and functioning properly.
PV Solar Panel Installation
The system comes with a solar input port and an internal solar charge controller rated at 140W
USB Output
AC Outputs
Input circuit breaker
AC Input socket
Solar Input Port
Front view Rear view
„Select‟ button used
for feature setting and
display function
„Power‟ button
„Status‟ indicator
„Solar Charge‟ indicator