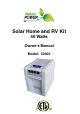
Solar Home and RV Kit 40 Watts Owner’s Manual Model: 40400
For safe and optimum performance, the Solar Home and RV Kit must be used properly. Carefully read and follow all instructions and guidelines in this manual and give special attention to the CAUTION and WARNING statements. PLEASE KEEP THIS MANUAL FOR FUTURE REFERENCE Note: Due to unit contain large battery capacity, upon purchasing, immediately charge unit for more than 24 hours or through the solar panel for more than 72 hours depending on the availability of the sun light.
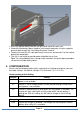
Table of Contents 1. INTRODUCTION..............................................................................................4 2. PRODUCT DESCRIPTION ..............................................................................6 3. INSTALLATION ...............................................................................................6 4. CONFIGURATION .........................................................................................10 5. OPERATION ....................................
1. INTRODUCTION Thank you for purchasing the Nature Power Solar Home and RV Kit. With our state of the art, easy to use design, this product will offer you reliable service for providing a solar-powered rechargeable power source for your home, cabin, or campsite. With its highly technical design and comprehensive features, the Nature Power Solar Home and RV Kit will provide you with a simple yet effective user experience as you learn to generate your own power.
Avoid dropping any metal tool or object on the battery. Doing so could create a spark or short circuit which goes through the battery or another electrical tool that may create an explosion. WARNING: Shock Hazard. Keep away from children! Avoid moisture. Never expose unit to water. Unit provides 120Vac from inverter or by pass utility power, treat the output socket the same as regular wall AC sockets at home.
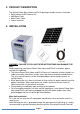
2. PRODUCT DESCRIPTION The Nature Power Solar Home and RV Kit package includes the items list below. Solar Home and RV Kit base unit 40W Solar Panel Solar Panel Cable Owner‟s manual 3. INSTALLATION WARNING: FAILURE TO FOLLOW THESE INSTRUCTIONS CAN DAMAGE THE UNIT.
locates at the back of the battery box. Follow instruction below to test the unit: Turn unit on by pressing and holding the Power button for about a second until a beep sound occur. The „Status‟ light turns on indicating the Nature Power Solar Home and RV Kit is ON. The unit is functioning in standby mode and is ready to provide backup power. AC output is now being provided directly from utility power.
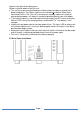
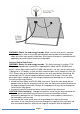
WARNING: Shock, fire and energy hazards. Make sure the solar panel is covered with an opaque sheet or facing the ground before connected or disconnected the cable wire to the solar panel junction box. All wiring must be done in accordance with applicable local and national electrical wiring codes. Connect Unit to Solar Panel: WARNING: Shock, fire and energy hazards. The Solar input port is rated at 17.5V 4A and is designed to be used with the supplied Solar Home and RV Kit 40W solar panel.
connection. Secure the solar cable to the plastic junction box by the supplied strain relief Cover the junction box with the cover and secure it with the screw. Plug in the other side of the solar panel cord plug to the solar input port located at the back of the Nature Power Solar Home and RV Kit battery box. Please note the polarity of the connector. Remove the opaque sheet or flip the solar panel with solar cell surface facing upwards.
Place the optional battery box on the right hand side of the main unit. Ground the two battery boxes together and to earth ground by using the supplied ground cable through the “Grounding Electrode Terminal” Take out the auxiliary DC input port from the main unit and connect it to the second battery box output port. The unit is now ready to provide power to double the run time. Tips: The second battery box is design to be stackable. Using the above procedure can parallel multiple battery boxes. 4.
Ch1 Internal 5A charger is enabled. Charger will automatically charge the internal battery when AC is available. Alarm Setting AL0 Audio alarm sound is disabled. Alarm will not sound when warning and fault occur. AL1 Audio alarm sound is enabled. Alarm sounds when warning or fault occurs.
In2 Ch0 AL1 Backup Priority Unit will provide output using battery and solar power as higher priority. AC output will only switch to utility mode when battery is low and available. Audio alarm is enabled and will sound when any warning or fault occurs Note: Only use this mode when there is sufficient solar power to power up the load. In2 Ch0 AL0 Backup Priority with Alarm Disable Same as “Backup priority mode‟ but with alarm disabled. Audio alarm will not sound when any warning or fault occurs.
To change unit function: To enter the feature setting mode, press and hold “Power” and “Select” button together for about 5 seconds until a beep is sounded. Display will show current inverter setting as “In0 or In1 or In2” Press and hold “Select” button for 1 second to toggle between the three settings. Once the desired setting is selected, press and hold “Power” button for 1 second to set the desired setting and carry on with setting the other feature.
5. OPERATION WARNING: RISK OF EQUIPMENT DAMAGE Do not plug surge-protected power bars into the unit‟s 120 VAC outlets. Do not connect an AC power source to the 120 VAC outlets. Do not connect the unit‟s AC power input cord to its 120 VAC outlets.
capacity in % Full Automatic Silent In1,Ch1, Al0 Auto backup with internal AC charger disable In1, Ch0, Al1 Auto backup with internal AC charger and alarm disable In1, Ch0, Al0 Backup priority In2,Ch0, Al1 Flashing amber Same as above Same as above and utility AC power is just detected and AC output will switch to utility power within a few seconds Solid red “E01-E11” Error on unit is detected. AC output is disconnected.
green Display shows battery capacity Solid red Backup priority with alarm disable In2,Ch0,Al 0 Backup disable In0,Ch1, Al1 Backup disable with alarm disable In0,Ch1, Al0 Backup and charger disable In0,Ch0,Al 0or Al1 “E01-E11” Error on unit is detected. AC output is disconnected. See Trouble Shooting section. Same as “Backup Priority mode” but with audio alarm disabled. The unit fault protection features remain active and will shut down without audio warning when fault occurs.
E02 Inverter has sensed input over voltage and has shutdown Check battery voltage or if any external charger is connected to the battery box E03 Inverter output has sensed overload or short circuit and was shutdown Check load connected to the output. Reduce load and restart the unit E04 Inverter has sensed internal temperature was high and has shutdown Turn unit off and wait for 15 minutes before restarting.
battery For computer use, use laptop, or desktop computer with LCD monitor instead of desktop computers with CRT monitor. Use small televisions instead of big screen TV‟s Use small desk lamps (25 to 40 W) instead of high-wattage lamps. Battery Replacement The battery box contains a 60AH battery. Qualified battery/electronic technician is required to replaced the battery. To replace the battery, please contact customer service for details. 6.
7. SPECIFICATIONS Note: Specifications are subject to change without notices. Inverter Specification: Output Current/Power: 12A/1440W continuous 15A/1800W maximum Surge Power: 2880W peak Output Voltage: 120 VAC/ 60 Hz Output Waveform: Modified Sinewave Peak Efficiency: 90% No Load battery draw (unit in standby): < 3W DC Input Voltage operating range: 10.5 – 15.5 Vdc Internal AC Charger Specification: Output Current: 5 ADC Output Voltage (Absorption/Float): 14.8/13.5 VDC Recharge Voltage: 12.
9. WARRANTY One Year Limited Warranty (Receipt Required) The limited warranty program is the only one that applies to this unit, and it sets forth all the responsibilities of Nature Power. There is no other warranty, other than those described herein. Any implied warranty of merchant ability of fitness for a particular purpose on this unit is limited in duration to the duration of this warranty.