
Installation Guide


COLUMN KIT INSTALLATION INSTRUCTIONS
Generally, columns less than four feet high can be stacked without mortar, placed on 6" granular leveling pads, and do not require
footings below frost. Usually columns should have a minimum of one course of units (six inches) buried below grade. While NCP
columns make excellent decorative landscape fixtures, they should not be used to support loads or exceed four feet in height without
structural reinforcement designed by a qualified engineer. Do not use rigid adhesive or mortars for NCP columns on flexible granular
pads, they will shift slightly causing rigid adhesives to fail.
Columns can be built taller than four-feet-high but a taller column requires a structural footing below frost, and tied to concrete and
steel reinforcement within the column. The center hole of the column provides a space in which steel-reinforced concrete can be
placed. Column units may require temporary bracing during placement of concrete within the column until the concrete sets. A
qualified professional Engineer should provide a design for columns four feet high or higher.
Install the column cap (1 unit).
The column cap should be adhered to the column
blocks following the guidelines above allowing a
roughly 1" overhang around each side of the
column.
Follow the guidelines in step 3 to assemble the
rest of the column to the desired height.
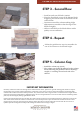
STEP 5 - Column Cap
IMPORTANT INFORMATION
STEP 4 - Repeat
STEP 3 - Second Row
Install second row of blocks (4 units).
Place the first block on top of the bottom block
staggering the intersection of two blocks on the
course below.
Continue around the column making slight
adjustments as needed so that the edge of the
blocks fit tightly.
Adhere each block to the blocks below with a
quality concrete adhesive.