
Manual
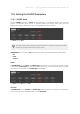

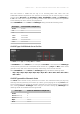
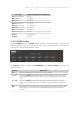
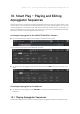
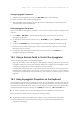
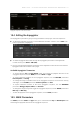
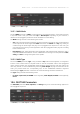
Table Of Contents
- Table of Contents
- 1. Disclaimer
- 2. Welcome to KOMPLETE KONTROL
- 3. Accessibility
- 4. The KOMPLETE KONTROL Workflow
- 5. Setting up KOMPLETE KONTROL
- 6. Software Overview
- 7. Keyboard Overview
- 8. Global Controls and Preferences
- 9. MIDI Communication
- 10. Using the MIDI Assignment Editor
- 11. Host Integration
- 12. Browsing the Library
- 12.1. Browser Basics
- 12.2. Opening the Browser
- 12.3. Loading Preset Files
- 12.4. Choosing Between Factory Content and User Content
- 12.5. Filtering Preset Files by Product
- 12.6. Filtering Preset Files by Bank
- 12.7. Resetting the Product Selection
- 12.8. Types and Characters Tags
- 12.9. Working with Favorites
- 12.10. Performing a Text Search
- 12.11. Displaying Preset File Information
- 12.12. Auditioning your Preset Files
- 13. Working with Effects
- 14. Working with Loops and One-Shot Samples
- 15. Managing the Library
- 15.1. Saving Preset Files to the User Library
- 15.2. Deleting User Preset Files from the User Library
- 15.3. Editing the Tags and Properties of User Preset Files
- 15.4. Syncing Multiple Instances
- 15.5. Working with the Files Pane
- 15.6. Loading VST Plug-ins
- 15.7. Installing NKS Instruments
- 15.8. Importing KOMPLETE KONTROL-Compatible User Files
- 16. Controlling Instrument, Loop, One-shot and Effect Parameters
- 17. Smart Play – Playing and Editing Scales and Chords
- 18. Smart Play – Playing and Editing Arpeggiator Sequences
- 18.1. Playing Arpeggiator Sequences
- 18.2. Using a Sustain Pedal to Control the Arpeggiator
- 18.3. Using Arpeggiator Snapshots on the Keyboard
- 18.4. Editing the Arpeggiator
- 18.5. MAIN Parameters
- 18.6. RHYTHM Parameters
- 18.7. OTHER Parameters
- 18.8. ADVANCED Parameters
- 18.9. RANGE Parameters
- 18.10. HOLD Parameter
- 19. Envelopes

Playing Arpeggiator Sequences
1. Switch on the Arpeggiator by pressing the ARP (Edit) button on the keyboard.
2. Press a number of keys to start the Arpeggiator.
3. The Arpeggiator automatically plays back the notes corresponding to the pressed keys as a
sequence, rather than simultaneously.
Editing Arpeggiator Parameters
You can also edit the Arpeggiator parameters in the Control section for further tweaking of the
sequence:
1. Press SHIFT + ARP (Edit) to map the displays and knobs of the Control section to the
Arpeggiator parameters.
2. To change the direction of the sequence to e.g., UP-DOWN, turn Knob 2 (TYPE, by default set
to UP).
3. To adjust the OCTAVES reach of the Arpeggiator, turn Knob 6 (by default set to 1) to e.g., 4.
→ The notes corresponding to any keys you press are played back as a sequence, up and then
down again over four octaves.
4. To map the knobs and displays to Instrument parameters again, press PLUG-IN. The
Arpeggiator will still be switched on.
18.2. Using a Sustain Pedal to Control the Arpeggiator
You can use a sustain pedal to control the Arpeggiator.
• Pressing the sustain pedal while keys are held and then releasing those keys continues the
arpeggiator sequence. This way the footswitch behaves as a trigger for the Arpeggiator. When
a new key is pressed, the new note is added to the current sequence.
• Releasing the sustain pedal with no keys pressed stops the sequence and all playing notes.
Releasing the sustain pedal with keys still pressed removes all notes from the sequence
except those corresponding to the pressed keys. The sequence continues with the pressed
keys only.
18.3. Using Arpeggiator Snapshots on the Keyboard
The Arpeggiator snapshots let you quickly recall four sets of Arpeggiator settings. This way you
can compare settings, or quickly switch between them during a performance. On the keyboard, the
snapshots are mapped to Button 5–8 on the Control section in Arp Edit mode. In the displays, they
are labeled with their respective settings for the RATE parameter (e.g., 1/8, 1/16, 1/16 T, etc.).
▶ To select a snapshot, press its corresponding button on the keyboard’s Control section.
→ All settings associated with this snapshot are instantly recalled.
▶ To change the settings associated with a snapshot, select it and adjust the parameters.
→ The new settings are saved automatically, and you can switch forth and back between
snapshots to recall them.
SMAR T PLA Y – PLAY ING AND E DIT I NG A RPEG GIAT OR S E QUE N CES 170