
Manual
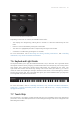
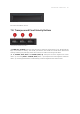

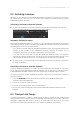
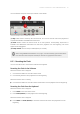

Table Of Contents
- Table of Contents
- 1. Disclaimer
- 2. Welcome to KOMPLETE KONTROL
- 3. Accessibility
- 4. The KOMPLETE KONTROL Workflow
- 5. Setting up KOMPLETE KONTROL
- 6. Software Overview
- 7. Keyboard Overview
- 8. Global Controls and Preferences
- 9. MIDI Communication
- 10. Using the MIDI Assignment Editor
- 11. Host Integration
- 12. Browsing the Library
- 12.1. Browser Basics
- 12.2. Opening the Browser
- 12.3. Loading Preset Files
- 12.4. Choosing Between Factory Content and User Content
- 12.5. Filtering Preset Files by Product
- 12.6. Filtering Preset Files by Bank
- 12.7. Resetting the Product Selection
- 12.8. Types and Characters Tags
- 12.9. Working with Favorites
- 12.10. Performing a Text Search
- 12.11. Displaying Preset File Information
- 12.12. Auditioning your Preset Files
- 13. Working with Effects
- 14. Working with Loops and One-Shot Samples
- 15. Managing the Library
- 15.1. Saving Preset Files to the User Library
- 15.2. Deleting User Preset Files from the User Library
- 15.3. Editing the Tags and Properties of User Preset Files
- 15.4. Syncing Multiple Instances
- 15.5. Working with the Files Pane
- 15.6. Loading VST Plug-ins
- 15.7. Installing NKS Instruments
- 15.8. Importing KOMPLETE KONTROL-Compatible User Files
- 16. Controlling Instrument, Loop, One-shot and Effect Parameters
- 17. Smart Play – Playing and Editing Scales and Chords
- 18. Smart Play – Playing and Editing Arpeggiator Sequences
- 18.1. Playing Arpeggiator Sequences
- 18.2. Using a Sustain Pedal to Control the Arpeggiator
- 18.3. Using Arpeggiator Snapshots on the Keyboard
- 18.4. Editing the Arpeggiator
- 18.5. MAIN Parameters
- 18.6. RHYTHM Parameters
- 18.7. OTHER Parameters
- 18.8. ADVANCED Parameters
- 18.9. RANGE Parameters
- 18.10. HOLD Parameter
- 19. Envelopes

The 4-D encoder situated below the Mode buttons.
Depending on the menu or context, the available actions differ:
• The displays are navigated by pushing the 4-D encoder in a direction indicated by the four
LEDs.
• Entries in a list are browsed by turning the 4-D encoder.
• The value of a highlighted parameter is adjusted by turning the 4-D encoder.
• A selection is conrmed by pressing the 4-D encoder.
For more information, refer to Browsing the Library, Working with Effects, and Controlling
Instrument, Loop, One-shot and Effect Parameters.
7.6. Keybed and Light Guide
The keybed enables you to play the loaded Instrument, Loop or One-shot. The Light Guide above
the keybed visualizes the key mapping of loaded Instruments and samples by color coding. Active
and inactive keys respectively sample based Instruments are indicated by the LEDs. The
Light Guide also reflects the Smart Play settings. This means when you select e.g., a scale or
chord, the LEDs corresponding to the keys contained in that scale or chord will light up, whereas
inactive keys remain unlit. The Light Guide also gives you visual feedback when you play back
incoming MIDI note patterns from the host.
The Keybed and the Light Guide.
For more information, refer to Controlling Instrument, Loop, One-shot and Effect Parameters,
Smart Play – Playing and Editing Scales and Chords, and Smart Play – Playing and Editing
Arpeggiator Sequences.
7.7. Touch Strip
The Touch Strip is an intuitive control element that gives you immediate control over Instrument
parameters. It can send MIDI pitch bend or control change messages and can be congured in the
MIDI Assignment editor.
KEYB O ARD OVER VIEW 45