VXI/VME Getting Started with Your VXI/VMEpc™ 600 Series for Windows 95/NT VXI/VMEpc 600 Series for Windows 95/NT May 1998 Edition Part Number 321882A-01
Internet Support E-mail: support@natinst.com FTP Site: ftp.natinst.com Web Address: http://www.natinst.
Important Information Warranty The National Instruments VXI/VMEpc 600 Series embedded computers and accessories are warranted against defects in materials and workmanship for a period of one year from the date of shipment, as evidenced by receipts or other documentation. National Instruments will, at its option, repair or replace equipment that proves to be defective during the warranty period. This warranty includes parts and labor.
Compliance FCC/DOC Radio Frequency Interference Class A Compliance This equipment generates and uses radio frequency energy and, if not installed and used in strict accordance with the instructions in this manual, may cause interference to radio and television reception. Classification requirements are the same for the Federal Communications Commission (FCC) and the Canadian Department of Communications (DOC).
Contents About This Manual Organization of This Manual .........................................................................................vii Conventions Used in This Manual.................................................................................viii How to Use This Documentation Set ............................................................................ix Related Documentation..................................................................................................
Contents Appendix A Default Settings Appendix B Common Questions Appendix C Reinstalling the NI-VXI/VISA Software Appendix D Customer Communication Glossary Index Tables Table 3-1. NI-VXI/VISA Examples ...................................................................... 3-5 Table A-1. Table A-2. Table A-3. Table A-4. Table A-5. Table A-6. VXI/VMEpc 600 Series Hardware Default Settings ........................... A-1 VXIpc T&M Explorer Device Tab Default Settings ...........................
About This Manual Use this manual to get started with the VXI/VMEpc 600 Series embedded computers and the NI-VXI/VISA software for Windows 95/NT. This manual summarizes the setup instructions and default settings for the hardware and software. You may find that these sections contain all the information you need to get started.
About This Manual • The Index contains an alphabetical list of key terms and topics used in this manual, including the page where you can find each one. Conventions Used in This Manual The following conventions are used in this manual: ♦ The ♦ symbol indicates that the text following it applies only to a specific product, a specific operating system, or a specific software version. This icon to the left of bold italicized text denotes a note, which alerts you to important information.
About This Manual How to Use This Documentation Set Getting Started Manual Installation and Configuration VXI/VMEpc 600 Series User Manual Change Hardware Settings (Optional) NI-VXI User Manual Use Online Utilities: NI-VISA User Manual NI-VXI Reference NI-VXI and NI-VISA Function Help, T&M Explorer, NI Spy, VIC/VISAIC NI-VISA Reference Begin by reading this manual, Getting Started with Your VXI/VMEpc 600 Series for Windows 95/NT, to get basic instructions for setting up the hardware and software
About This Manual The VXI/VMEpc 600 Series User Manual contains more details about changing the hardware installation or configuration from the defaults, and using the hardware. When you are familiar with the material in these manuals, you can begin to use the NI-VXI User Manual. This manual presents the concepts of VXI and prepares you for detailed explanations of the NI-VXI functions.
About This Manual Customer Communication National Instruments wants to receive your comments on our products and manuals. We are interested in the applications you develop with our products, and we want to help if you have problems with them. To make it easy for you to contact us, this manual contains comment and configuration forms for you to complete. These forms are in Appendix D, Customer Communication, at the end of this manual.
1 Introduction This chapter describes the VXI/VMEpc 600 Series of embedded computers along with the NI-VXI/VISA software, lists what you need to get started, lists optional software, and gives an overview of the directory structure on your hard drive. How to Use This Manual The following flowchart shows where to turn in this manual for more details on configuring and using the hardware and software.
Chapter 1 Introduction ❑ Monitor with VGA or better resolution ❑ National Instruments software media for the VXI/VMEpc 600 Series The NI-VXI/VISA software is already installed on your VXI/VMEpc-650 computer. It is also included on disk in the event that you need to reinstall your software. For installation instructions, please refer to Appendix C, Reinstalling the NI-VXI/VISA Software.
Chapter 1 Introduction The NI-VXI/VISA software for the VXI/VMEpc 600 Series is already installed on your hard drive. It includes an interactive configuration and troubleshooting program, libraries of software routines for test and measurement (T&M) programming, interactive control programs for both NI-VXI and NI-VISA, a logging utility you can use for debugging your applications, and a VXI Resource Manager.
Chapter 1 Introduction • NI-VISA for Windows 95/NT—This is a 32-bit driver designed for Windows 95/NT. Note that for VME and VXI support, the NI-VXI driver must be installed. You can use this driver to develop and run 32-bit applications for Windows 95/NT. National Instruments Application Software Your VXI/VMEpc 600 Series kit comes with the NI-VXI/VISA bus interface software already installed for you.
Chapter 1 Introduction Files and Directories Installed on Your Hard Drive Your hard drive includes a directory called images in its root that contains software and soft copies of manuals for the operating system and for the peripherals. The directory structure under the images directory is logically organized into several levels. In the images directory itself, you will find a manuals directory, an os directory, and directories for each of the peripherals of your computer.
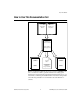
Setting up Your VXI/VME System 2 This chapter contains basic instructions for setting up the VXI/VMEpc 600 Series and the NI-VXI/VISA software. You can use this material as a guide to quickly configure and operate your VXI/VME system using the VXI/VMEpc 600 Series. This chapter assumes that you intend to perform a basic configuration as follows: • You have one VXI/VMEbus chassis in which you will be using the VXI/VMEpc-650 as System Controller.
Chapter 2 Setting up Your VXI/VME System Installing the Hardware ! Caution To prevent electrostatic discharge, touch the antistatic plastic package to a metal part of your VXI/VMEbus chassis before removing the VXI/VMEpc-650 from the package. Warning To protect both yourself and the chassis from electrical hazards, the chassis should remain off until you are finished installing the VXI/VMEpc module. Plug in your chassis but leave the power turned off.
Chapter 2 Setting up Your VXI/VME System Installed Software Your VXI/VMEpc 600 Series kit comes with the NI-VXI/VISA bus interface software already installed. However, if you receive a software update, or if you need to reinstall software in the event that your files were accidentally erased, refer to Appendix C, Reinstalling the NI-VXI/VISA Software. This appendix explains how to use the Setup program.
Chapter 2 Setting up Your VXI/VME System Verifying Your System Configuration After you finish configuring the system through T&M Explorer, verify the system configuration through one of the interactive control utilities. Use VIC under NI-VXI or VISAIC under NI-VISA. For an example on how to use VIC, refer to the Device Interaction section in Chapter 3, Developing Your Application.
Developing Your Application 3 This chapter discusses the software utilities you can use to start developing applications that use the NI-VXI/VISA driver. After verifying your system configuration, you can begin to develop your VXI/VME or VISA application software. Be sure to check the README.txt file for the latest application development notes and changes. Your software includes several utilities to assist you in your system development. These include T&M Explorer, Resman, NI Spy, VISAIC, and VIC.
Chapter 3 Developing Your Application manually add your VME devices in T&M Explorer using the Add VME Device Wizard to reserve system resources when the Resource Manager runs. Systems consisting of only a VMEpc 600 Series controller, a VME chassis, and VME boards do not need to run Resman when using NI-VXI software even though the devices do not appear in the T&M Explorer connection tree.
Chapter 3 Developing Your Application Device Interaction After Resman has detected and configured all VXI devices, you can view specific information on each device in your system by using the T&M Explorer utility. This utility includes a System View, which contains a description for each device, including each VXI device’s logical address. You can interact with your VXI devices by using the VIC or VISAIC utility (VIC for NI-VXI or VISAIC for NI-VISA).
Chapter 3 Developing Your Application Alternatively, you can use VISAIC to interact with your devices. VISAIC lists the available devices, similar to what T&M Explorer displays. By double-clicking on a given device, you can open a VISA session and access the device through it. For more information regarding VISAIC, use the right-click help available from all panels. Programming with VXI National Instruments provides two different programming interfaces for accessing your instruments: NI-VISA and NI-VXI.
Chapter 3 Developing Your Application Table 3-1 summarizes the topics addressed by the example programs. Table 3-1. NI-VXI/VISA Examples NI-VISA Example Coverage Note NI-VXI Example Message-Based Access VISAws.c VXIws.c High-Level Register Access VISAhigh.c VXIhigh.c Low-Level Register Access VISAlow.c VXIlow.c Sharing Memory VISAmem.c VXImem.c Interrupt Handling VISAint.c VXIint.c Trigger Handling VISAtrig.c VXItrig.
Chapter 3 Developing Your Application Compiler Symbols for NI-VXI You may need to define some symbols so that the NI-VXI library can work properly with your program. Note Skip this section if you are programming with NI-VISA only. NI-VISA does not use these symbols. You can define the symbols using #define statements in the source code or you can use either the /D or the -D option in your compiler (both the Microsoft and Borland compilers support the /D and -D options).
Chapter 3 Developing Your Application For the Borland C compiler: -DVXINT; BINARY_COMPATIBLE; You will also need to link in the appropriate import library for your code. If you are using a Microsoft C compiler, use the nivxint.lib in the nivxi\win32\msc\ directory. If you are using a Borland C compiler, use the nivxint.lib in the nivxi\win32\borlandc\ directory.
A Default Settings This appendix summarizes the default settings for the hardware and software in your kit. If you need more information about a particular setting, or if you want to try a different configuration, please refer to the VXI/VMEpc 600 Series User Manual for your hardware reference and the T&M Explorer online help for your software reference.
Appendix A Default Settings Table A-1. VXI/VMEpc 600 Series Hardware Default Settings (Continued) Jumper Description Default Setting Description W7—CLK10 SMB Polarity (VXI only) Not inverted W8—Ethernet EEPROM Enabled. Do not alter this setting. W9—MITE User Configuration EEPROM Load values from user side W11—System Controller Slot Detection Mode Automatically detect slot W20—Clear CMOS Disabled. Change only when clearing CMOS. Table A-2.
Appendix A Default Settings Table A-3. VXIpc T&M Explorer Shared Memory Tab Default Settings (Continued) Editor Field Default Setting Upper half window byte swapping Disabled Map upper and lower halves at same PCI address Disabled Table A-4. VXIpc T&M Explorer PCI Tab Default Settings Editor Field Default Setting Low-level register access API support Enabled User window size 64 KB VXI/VME-MXI-2 This section summarizes the software default settings for the VXI-MXI-2 and VME-MXI-2.
Appendix A Default Settings Table A-6. VXI/VME-MXI-2 T&M Explorer VXI/VME Bus Tab Default Settings Editor Field Default Setting Bus timeout value 125 µs Slot 0 configuration Auto-detect Auto retry Disabled Transfer limit 256 Arbiter type Priority Fair requester Enabled Arbiter timeout Enabled Request level 3 Table A-7.
B Common Questions This appendix addresses common questions you may have about using the NI-VXI/VISA software on the VXI/VMEpc platform. What are some of the differences between the old utilities and the new ones? The old utility components are as follows: • VXIinit—This utility initializes your National Instruments controller hardware with settings determined in VXIedit. • Resman—This utility initializes and configures all the other devices in your VXI system.
Appendix B Common Questions 8. Run VISAIC to verify that you can communicate with your system using VISA. The new utility components are as follows: • T&M Explorer—Use this utility to configure, view, and initialize your system. • Resman—You can still use this as before. However, you can perform resource manager operations directly from T&M Explorer or configure it to run Resman automatically at startup. See What about running Resman? later in this section. • VIC—Use as before.
Appendix B Common Questions This includes National Instruments VXI-DAQ cards, which means you can configure these devices from T&M Explorer without having to run the DAQ Configuration Utility. What about running Resman? Resman is the name of the utility that performs the duties of a VXI Resource Manager as discussed in the VXIbus specification. When you set a National Instruments controller to Logical Address 0, you will at some point need to run Resman to configure your VXI instruments.
Appendix B Common Questions How can I determine which version of the NI-VXI/VISA software I have installed? Following are several ways to find this information: • From T&M Explorer, select About... from the Help menu. In the About dialog box, press the Software Info button. This displays version information on NI-VXI and NI-VISA files. • Under Windows 95 and Windows NT 4.0, you can find version information by right-clicking on any component and selecting the Properties option.
Appendix B Common Questions information that it collects to the RESMAN.TBL file in the TBL subdirectory of the NIVXI directory. You can also run Resource Manager operations from T&M Explorer. Through T&M Explorer, you can also configure Resman to run automatically at computer startup. What can I do to make sure that my system is up and running? The fastest method for testing the system is to run Resman. This program attempts to access memory in the upper A16 address space of each device in the system.
Appendix B Common Questions What kind of signal is CLK10 and what kind of signal do I need for an external CLK10? ♦ VXI Only—CLK10 is a differential ECL signal on the backplane. However, the oscillator and the EXTCLK input on the front panel use TTL levels; therefore, you need to supply a TTL-level signal for EXTCLK. Our voltage converters convert the signal to differential ECL. What is the accuracy of the CLK10 signal? ♦ VXI Only—The CLK10 signal generated by the VXIpc-650 is ±100 ppm (0.
Appendix B Common Questions What must I do if I want to install the VXI/VMEpc-650 in a slot other than the System Controller slot? The VXI/VMEpc 600 Series automatically detects whether it is in the System Controller slot (first slot) of a VXI/VMEbus mainframe. You do not need to change jumper settings to install the VXI/VMEpc controller in a different slot unless you have defeated the first slot detector (FSD) circuitry by changing the appropriate jumper setting on the VXI/VMEpc.
Reinstalling the NI-VXI/VISA Software C This appendix contains the instructions on how to reinstall your NI-VXI/VISA software. Your VXI/VMEpc 600 Series controller was shipped with the NI-VXI/VISA software already installed. It is unlikely that you will ever need to use these instructions.
Appendix C Reinstalling the NI-VXI/VISA Software Installing the Software This section describes how to install the 32-bit NI-VXI/VISA software for the VXI/VMEpc 600 Series. The Setup program works the same whether you are using Windows 95 or Windows NT. Please carefully read these directions along with any messages on the screen before making your selections. You can quit the Setup program at any time by pressing the Cancel button.
Appendix C • Reinstalling the NI-VXI/VISA Software Custom setup gives you complete control over which files and utilities you want installed on your system. This option is recommended for advanced users. 5. The Express setup completes without further questions. Follow the prompts if you select either the Typical or the Custom setup options. The final prompt displays the choices you made concerning applications, support, and destination directories. Click on the Next button to begin the installation.
Customer Communication D For your convenience, this appendix contains forms to help you gather the information necessary to help us solve your technical problems and a form you can use to comment on the product documentation. When you contact us, we need the information on the Technical Support Form and the configuration form, if your manual contains one, about your system configuration to answer your questions as quickly as possible.
Fax-on-Demand Support Fax-on-Demand is a 24-hour information retrieval system containing a library of documents on a wide range of technical information. You can access Fax-on-Demand from a touch-tone telephone at 512 418 1111. E-Mail Support (Currently USA Only) You can submit technical support questions to the applications engineering team through e-mail at the Internet address listed below. Remember to include your name, address, and phone number so we can contact you with solutions and suggestions.
Technical Support Form Photocopy this form and update it each time you make changes to your software or hardware, and use the completed copy of this form as a reference for your current configuration. Completing this form accurately before contacting National Instruments for technical support helps our applications engineers answer your questions more efficiently.
VXI/VMEpc 600 Series Hardware and Software Configuration Form Record the settings and revisions of your hardware and software on the line to the right of each item. Complete a new copy of this form each time you revise your software or hardware configuration, and use this form as a reference for your current configuration. Completing this form accurately before contacting National Instruments for technical support helps our applications engineers answer your questions more efficiently.
VXI/VMEpc Configuration Editor Settings (T&M Explorer) Logical Address ______________________________________________________________ Device Class _________________________________________________________________ Size of Servant Area ___________________________________________________________ Number of Handlers ___________________________________________________________ Number of Interrupters _________________________________________________________ Memory Sharing ___________________________________________
Transfer Limit on MXIbus ______________________________________________________ MXI Fair Requester ___________________________________________________________ Parity Checking _______________________________________________________________ MXI-2 CLK10 Direction (VXI-MXI-2 only) ________________________________________ Other Products Computer make and model ________________________________________________________ Microprocessor __________________________________________________________________ Clock frequenc
Documentation Comment Form National Instruments encourages you to comment on the documentation supplied with our products. This information helps us provide quality products to meet your needs. Title: Getting Started with Your VXI/VMEpc™ 600 Series for Windows 95/NT Edition Date: May 1998 Part Number: 321882A-01 Please comment on the completeness, clarity, and organization of the manual.
Glossary Prefix Meanings Value p- pico 10 –12 n- nano- 10 –9 µ- micro- 10 – 6 m- milli- 10 –3 k- kilo- 10 3 M- mega- 10 6 G- giga- 10 9 t- tera- 10 12 A A16 space VXIbus address space equivalent to the VME 64 KB short address space. In VXI, the upper 16 KB of A16 space is allocated for use by VXI devices configuration registers. This 16 KB region is referred to as VXI configuration space.
Glossary ANSI American National Standards Institute API Application Programming Interface; the direct interface that an end user sees when creating an application ASIC application-specific integrated circuit B B bytes backplane An assembly, typically a printed circuit board, with 96-pin connectors and signal paths that bus the connector pins. A C-size VXIbus system will have two sets of bused connectors called J1 and J2.
Glossary C CLK10 A 10 MHz, ±100 ppm, individually buffered (to each module slot), differential ECL system clock that is sourced from Slot 0 of a VXIbus mainframe and distributed to Slots 1 through 12 on P2. It is distributed to each slot as a single-source, single-destination signal with a matched delay of under 8 ns.
Glossary embedded controller An intelligent CPU (controller) interface plugged directly into the VXI backplane, giving it direct access to the VXIbus. It must have all of its required VXI interface capabilities built in. F fair requester A VXIbus device that will not arbitrate for the VXIbus after releasing it until it detects the bus request signal inactive. This ensures that all requesting devices will be granted use of the bus.
Glossary K KB kilobytes of memory L LED light-emitting diode logical address An 8-bit number that uniquely identifies each VXIbus device in a system. It defines the A16 register address of a device, and indicates Commander and Servant relationships. M master A functional part of a VME/VXIbus device that initiates data transfers on the backplane. A transfer can be either a read or a write.
Glossary Non-Slot 0 device A device configured for installation in any slot in a VXIbus mainframe other than Slot 0. Installing such a device into Slot 0 can damage the device, the VXIbus backplane, or both. P PCI Peripheral Component Interconnect. The PCI bus is a high-performance 32-bit or 64-bit bus with multiplexed address and data lines.
Glossary SIMM Single In-line Memory Module slave A functional part of a VME/VXIbus device that detects data transfer cycles initiated by a VMEbus master and responds to the transfers when the address specifies one of the device’s registers SMB Sub Miniature Type B connector that features a snap coupling for fast connection System Controller a device configured for installation in Slot 0 of a VXIbus mainframe or Slot 1 of a VMEbus chassis.
Glossary VISAIC VISA Interactive Control Program, a part of the NI-VISA software. Used to program devices, and develop and debug application programs VME Versa Module Eurocard or IEEE 1014 VMEbus System Controller a device configured for installation in Slot 1 of a VMEbus chassis. This device is unique in the VMEbus system in that it performs the VMEbus System Controller functions, including clock sourcing and arbitration for data transfers across the backplane.
Index Numbers D 32-bit registers, accessing, B-5 debugging applications, 3-7 default settings VXI/VME-MXI-2 T&M Explorer Device Tab default settings (table), A-3 T&M Explorer MXI-2 Bus Tab default settings (table), A-4 T&M Explorer VXI/VME Bus Tab default settings (table), A-4 VXI/VMEpc 600 Series hardware default settings (table), A-1 to A-2 VXIpc T&M Explorer Device Tab default settings (table), A-2 VXIpc T&M Explorer PCI Tab default settings (table), A-2 VXIpc T&M Explorer Shared Memory Tab default se
Index E VXIpc T&M Explorer Shared Memory Tab default settings (table), A-2 electronic support services, D-1 to D-2 e-mail support, D-2 example programs for NI-VXI/VISA software, 3-4 to 3-5 Examples directory, 3-4 topics addressed (table), 3-5 I IDE drives, B-7 images directory, 1-5 installation booting system for first time, 2-3 hardware, 2-2 installed software, 2-3 reinstalling NI-VXI/VISA software, C-1 to C-3 VXI/VMEpc 600 Series in slot other than system controller slot, B-6 to B-7 instrument drivers
Index Q NI-488.
Index V software, 1-2 to 1-4. See also specific utilities, e.g., Resman utility.
Index VXI/VMEpc embedded computers, determining serial number and hardware revision, B-4 files and directories installed on hard drive, 1-5 hardware description, 1-2 installing in slot other than system controller slot, B-7 LEDs on front, B-5 requirements for getting started, 1-1 to 1-2 software description. See software. upgrading, B-7 © National Instruments Corporation W writing applications. See developing applications.