Quick Start Guide Compact FieldPoint™ Mounting Accessories for Stand-Alone Controllers What You Need to Get Set Up • • cFP-21xx controller Number 2 Phillips screwdriver • Panel, DIN rail, or desktop mounting accessory kit Mounting the Controller on the Base You can mount the cFP-21xx on a panel, on 35mm DIN rail, or on a desk or table. Each mounting kit described in this document is shipped with a base which you must fasten to the controller.
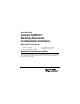
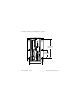
The following figure shows the proper orientation of the base in relation to the controller. Compact FieldPoint cFP-21xx POWER STATUS TOP A B C D COM 1/RS-232 RESET C INPUT 11-30 V-1.5 A MAX ETHERNET LINK ACT V1 V2 100 Mbps Make sure that power is disconnected from the controller before you mount it on the base. Caution Compact FieldPoint Mounting Accessories 2 ni.
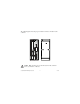
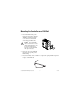
1. Align the captive screws on the controller with the holes in the base. 188794C-01 2. Using a number 2 Phillips screwdriver with a shank of at least 64 mm (2.5 in.) length, tighten the captive screws to 1.1 N · m (10 lb · in.) of torque. Co mp act Fie ldp oin TO P t IP ADDRESS: PO WER ST AT US A B C RE N114 D SE T bp s © National Instruments Corporation 3 INPUT 11-30V 1.
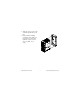
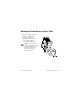
Mounting the Controller on a Panel 1. Fasten the panel-mount plate to the back of the base using a number 2 Phillips screwdriver and the 8-32 × 5/16 in. countersunk screws shipped with the kit. N114 IP ADDRESS: 1 A-0 839 192 If you substitute other screws for the screws shipped with the kit, do not use screws longer than 5/16 in. to fasten the panel-mount plate to the base. Caution Compact FieldPoint Mounting Accessories 4 ni.
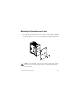
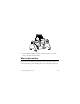
2. Bolt or screw the panel-mount plate to a panel. Compact FieldPoint cFP-2120 POWER STATUS A B C D 101.60 mm (4.000 in.) C ETHERNET LINK ACT 45.72 mm (1.800 in.) INPUT 11-30 V 1.5A MAX COM 1/RS-232 RESET V1 V2 100 Mbps 69.34 mm (2.730 in.
Mounting the Controller on a DIN Rail 1. Fasten the DIN rail clip to the back of the base using a number 2 Phillips screwdriver and the 8-32 × 5/16 in. countersunk screws shipped with the kit. If you substitute other screws for the screws shipped with the kit, do not use screws longer than 5/16 in. to fasten the DIN rail clip to the base. Caution 2. Insert one edge of the DIN rail into the deeper opening of the DIN rail clip. 3.
Mounting the Controller on a Desk or Table 1. Fasten the desktop mounting bracket to the back of the base using a number 2 Phillips screwdriver and the 8-32 × 5/16 in. panhead screws shipped with the kit. If you substitute other screws for the screws shipped with the kit, do not use screws longer than 5/16 in. to fasten the bracket to the base.
2. Using a number 2 Phillips screwdriver, tighten the captive screws on the two legs into the holes in the bracket. Where to Go from Here Refer to the cFP-21xx Quick Start Guide and the Measurement and Automation Explorer Help for FieldPoint for information about connecting the cFP-21xx to your network, wiring power, installing software, and configuring the cFP-21xx. Compact FieldPoint Mounting Accessories 8 ni.
Where to Go for Support The National Instruments Web site is your complete resource for technical support. At ni.com/support you have access to everything from troubleshooting and application development self-help resources to email and phone assistance from NI Application Engineers. National Instruments corporate headquarters is located at 11500 North Mopac Expressway, Austin, Texas, 78759-3504. National Instruments also has offices located around the world to help address your support needs.
National Instruments, NI, ni.com, and LabVIEW are trademarks of National Instruments Corporation. Refer to the Terms of Use section on ni.com/legal for more information about National Instruments trademarks. Other product and company names mentioned herein are trademarks or trade names of their respective companies. For patents covering National Instruments products, refer to the appropriate location: Help»Patents in your software, the patents.txt file on your CD, or ni.com/patents.