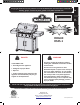
This gas grill must be used only outdoors in a well-ventilated space and must not be used inside a building, garage, screened-in porch, gazebo or any other enclosed area. EN APPLY SERIAL NUMBER LABEL FROM CARTON Serial No. XXXXXX000000 MODEL NO. FR PG.17 DO NOT DISCARD PG.32 ROGUE R525-1 ! ! DANGER WARNING Do not try to light this appliance without reading the “LIGHTING” instructions section of this manual. IF YOU SMELL GAS: • Shut off gas to the appliance. • Extinguish any open flame.
EN Napoleon President’s 15 Year Limited Warranty NAPOLEON products are designed with superior components and materials, and are assembled by trained craftsmen who take great pride in their work. The burner and valve assembly are leak tested and test-fired at a quality test station. This grill has been thoroughly inspected by a qualified technician before packaging and shipping to ensure that you, the customer, receive the quality product you expect from NAPOLEON.
! WARNING! Failure to follow these instructions could result in property damage, personal injury or death. Read and follow all warnings and instructions in this manual prior to operating grill. Safe Operating Practices • This gas grill must be assembled exactly according to the instructions in the manual. If the grill was store assembled, you must review the assembly instructions to confirm correct assembly and perform the required leak tests before operating the grill.
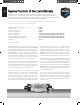
12 1/2” (31cm) 60 1/2”(144cm) [NON FOLDED SIDE SHELF] 56 1/4” (104cm) [FOLDED SHELVES] www.napoleon.com 48 1/2” (122cm) LID CLOSED 63”(160cm) LID OPEN 36”(92cm) GRILL HEIGHT 25”(64cm ) GRILL DEPTH ALL DIMENSIONS ARE APPROXIMATE EN GRILL SIZE: 18” X 28 3/4” = 525 in2 WARMING RACK SIZE: 6 1/4” X 28 1/2” = 180 in2 4 x 12,000 BTU MAIN BURNER R525-1 NA GRILL 4 DIMENSIONS N415-0580 Mar 30.
General Information This Gas Barbecue Is Certified under Canadian and American National Standards CSA 1.6-2018 and ANSI Z21.58-2018 respectively for Outdoor Gas Grills and should be installed to conform with local codes. In absence of local codes, install to the current CAN B149.1 Natural Gas and Propane Installation Code in Canada or to the National Fuel Gas Code, ANSI Z223.1 in the United States.
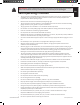
EN Cylinder Connection: Ensure the gas regulator hose is kink free. Remove the cap or plug from the cylinder fuel valve. Insert the black QCC1 regulator nipple onto the QCC1 fuel valve. Hand tighten clockwise. Do not use tools. Leak test all joints prior to using the grill. A leak test must be performed annually and each time a cylinder is hooked up or if a part of the gas system is replaced.
! WARNING! • The installation must be performed by a licensed gas fitter, and all connections must be leak tested before operating the grill. • Do not route hose underneath the drip pan. • Do not route hose between bottom shelf space and back panel. • Do not route hose over top of rear panel. • Ensure all hose connections are tightened using two wrenches. Do not use Teflon tape or pipe dope on any hose connection.
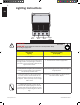
Lighting Instructions EN Left Burner ! Left Centre Right Centre Burner Burner Right Burner WARNING! Open lid. WARNING! Ensure all burner controls are in the off position. Slowly Off Position turn on the gas supply valve. Main Burner Lighting Side Burner Lighting (if equipped) 1. Open grill lid 1. Open burner cover. 2. Push and turn any main burner knob slowly to the high position. If the pilot lights, continue to push down on the control knob until the burner lights and then release. 2.
Cooking Instructions Initial Lighting: When lit for the first time, the gas grill emits a slight odor. This is a normal temporary condition caused by the “burn-in” of internal paints and lubricants used in the manufacturing process and does not occur again. Simply run the main burners on high for approximately one-half hour. Main Burner Use: When searing foods, we recommend preheating the grill by operating all main burners in the high position with the lid closed for approximately 10 minutes.
Cleaning Instructions EN WARNING! Always wear protective gloves and safety glasses when servicing your grill. ! WARNING! To avoid the possibility of burns, maintenance should be done only when the grill is cool. Avoid unprotected contact with hot surfaces. Ensure all burners are turned off. Clean grill in an area where cleaning solutions will not harm decks, lawns, or patios. Do not use oven cleaner to clean any part of this gas grill.
! 11 WARNING! Accumulated grease is a fire hazard. Drip Pan: Clean the drip pan frequently (every 4 – 5 uses or as often as required) to avoid grease buildup. Grease and excess drippings pass through to the drip pan, located beneath the gas grill and accumulate in the disposable grease tray below the drip pan. To access the disposable grease tray or to clean the drip pan, slide the drip pan free of the grill.
Burner: The burner is made from heavy wall 304 stainless steel, but extreme heat and a corrosive environment can cause surface corrosion to occur. This can be removed with a brass wire brush. CAUTION! Beware of Spiders. EN Spiders and insects are attracted to the smell of propane and natural gas. The burner is equipped with an insect screen on the air shutter, which reduces the likelihood of insects building nests inside the burner but does not entirely eliminate the problem.
Troubleshooting Problem EN Possible Causes Low heat / Low flame Improper lighting procedure. when valve turned to high. Improper preheating. Solution Ensure lighting procedure is followed carefully. All gas grill valves must be in the off position when the tank valve is turned on. Turn tank on slowly to allow pressure to equalize. See lighting instructions. Pipe must be sized according to installation code. Preheat grill with main burners on high for 10 minutes. Excessive flare-ups/ uneven heat.
Problem EN Humming regulator. Possible Causes Normal occurrence on hot days. Solution This is not a defect. It is caused by internal vibrations in the regulator and does not affect the performance or safety of the gas grill. Humming regulators will not be replaced. Burners will not cross light Dirty or corroded cross light brackets. each other. Clean or replace as required. “Paint” appears to be peeling inside lid or hood. Grease build-up on inside surfaces. This is not a defect.
KEEP YOUR RECEIPT AS PROOF OF PURCHASE TO VALIDATE YOUR WARRANTY. Ordering Replacement Parts EN Warranty Information MODEL: DATE OF PURCHASE: SERIAL NUMBER: (Record information here for easy reference) For replacement parts and warranty claims, contact the Napoleon dealer where the product was purchased. Before contacting the dealer, check the Napoleon Grills Website for more extensive cleaning, maintenance, troubleshooting and parts replacement instructions at www.napoleon.com.
www.napoleon.com N415-0580 Mar 30.
Ce gril doit être utilisé uniquement à l’extérieur, dans un endroit bien aéré et ne doit jamais être utilisé à l’intérieur d’un bâtiment, d’un garage, d’un gazebo, d’une véranda avec paramoustique, ou de tout autre endroit fermé. SERIENNUMMER-AUFKLEBER VOM KARTON HIER ANBRINGEN Seriennr. XXXXXX000000 Model-Nr. FREN NE PAS JETER ROGUE R525-1 ! ! DANGER SI VOUS DÉTECTEZ UNE ODEUR DE GAZ : • Fermez l’alimentation en gaz à l’appareil. • Éteignez toute flamme nue. • Ouvrez le couvercle.
Garantie limitée de 15 ans de Napoléon FR Les produits NAPOLÉON sont conçus avec des composants et des matériaux de qualité supérieure, assemblés par des artisans qualifiés qui sont fiers de leur travail. Le brûleur et le montage de la soupape subissent un test de détection de fuite et d’allumage à une station de test de la qualité.
! AVERTISSEMENT! Si ces instructions ne sont pas suivies, des dommages matériels, des blessures corporelles ou des pertes de vie pourraient s’ensuivre. Lisez et respectez tous les avertissements et les instructions de ce manuel avant de faire fonctionner le gril. Pratiques sécuritaires d’utilisation • • Ce gril à gaz doit être assemblé conformément aux instructions du manuel.
www.napoleon.com 12 1/2” (31cm) 36”(92cm) HAUTEUR DU GRILLE 25”(64cm ) GRILL DEPTH TOUTES LES DIMENSIONS SONTS APPROXIMATIVES 48 1/2” (122cm) COUVERCLE FERMÉ 63”(160cm) COUVERCLE OUVERT 60 1/2”(144cm) [PLATEAU LATÉRAL NON PLIÉ] 56 1/4” (104cm) [PLATEAU PLIÉ] FR DIMENSIONS GRILLE: 18” X 28 3/4” = 525 in2 DIMENSIONS GRILLE RÉCHAUD: 6 1/4” X 28 1/2” = 180 in2 4 x 12,000 BTU BRÛLEUR PRINCIPAL R525-1 NA GRILLE 20 DIMENSIONS N415-0580 Mar 30.
Information générale 21 Ce gril à gaz est certifié selon les normes nationales canadiennes et américaines, CSA 1.6-2018 et ANSI Z21.58-2018 respectivement pour des grils à gaz pour l’extérieur et son installation devrait être conforme aux codes locaux. En l’absence de codes locaux, installez selon les normes courantes CAN/CSA-B149.1 du code d’installation du gaz naturel et de Propane au Canada ou selon les normes ANSIZ223.1 du « National Fuel Gas Code » aux États-Unis.
Installation bouteille de propane : Placez le cylindre dans le trou dans la tablette du bas. D’autres bouteilles peuvent être acceptables à condition qu’ils s’adaptent pas correctement dans l’anneau de bassin de rétention. Raccord de la bonbonne : Assurez-vous que le tuyau du régulateur de gaz est sans anomalie. Enlevez les bouchons sur la soupape de gaz à la bonbonne. Connectez le régulateur QCC1 sur la soupape de gaz QCC1. Serrez à la main dans le sens des aiguilles d’une montre.
! AVERTISSEMENT! • L’installation doit être effectuée par un installateur certifié pour le gaz et tous les raccordements doivent être testés pour des fuites avant de faire fonctionner le gril. • Ne pas passer le tuyau d’alimentation sous le tiroir d’égouttement. • Ne passez pas le boyau entre l’espace dans la tablette inférieure et le panneau arrière. • N’acheminez pas le boyau par-dessus le panneau arrière. • Assurez-vous que tous les raccordements de boyaux sont serrés à l’aide de deux clés.
Instruction d’allumage FR Brûleur de gauche ! Brûleur centre de gauche Brûleur centre de droite Brûleur de droite Position fermée AVERTISSEMENT! Ouvrez le couvercle. AVERTISSEMENT! Fermez tous les boutons de contrôle des brûleurs, ouvrez la soupape d’alimentation en gaz lentement. Allumage du brûleur principal Allumage du brûleur latéral. (si équipé) 1. Ouvrez le couvercle. 1. Ouvrez le couvercle du brûleur. 2.
Instructions d’opération Éclairage initial : Lorsqu’il est allumé pour la première fois, le gril dégagera une légère odeur. Ceci est un phénomène normal et temporaire causé par l’évaporation des peintures et lubrifiants internes utilisés dans le processus de fabrication et ne se reproduira plus. Allumez simplement les brûleurs de cuve à « élevé » pendant une demi-heure.
Nettoyage AVERTISSEMENT! Portez toujours des gants protecteurs et des lunettes de sécurité lorsque vous faites l’entretien de votre gril. FR ! AVERTISSEMENT! Assurez-vous que les brûleurs sont éteints avant de nettoyer. Éviter tout contact avec les surfaces chaudes. Nettoyez votre gril dans un endroit où les produits de nettoyage n’endommageront pas votre patio, terrain ou terrasse. N’utilisez pas de produit de nettoyage à fourneau pour nettoyer votre gril.
! Nettoyage du panneau de commande: Le texte sur le panneau de commande est imprimé directement sur l’acier inoxydable. Avec un bon entretien, le texte restera toujours sombre et lisible. Ne pas utiliser de détergents abrasifs (Ajax, Vim, Old Dutch, etc.) pour nettoyer les surfaces en acier inoxydable, en particulier la partie imprimée du panneau de commande. Le texte disparaîtra progressivement si vous utilisez ces produits. Utilisez uniquement de l’eau chaude savonneuse pour nettoyer.
3. Allumez les brûleurs et positionnez-les à « élevé ». Inspectez visuellement les flammes. Lorsque les volets sont ajustés, éteignez les brûleurs, serrez la vis de verrouillage et replacez les pièces qui avaient été enlevées. Assurez-vous que les petits grillages contre les insectes sont installés.
Guide de dépannage Problème Causes possibles Solutions Faible chaleur/petite flamme lorsque Pour le propane - procédure Assurez-vous que la procédure d’allumage est le bouton de contrôle est à « élevé ». d’allumage incorrect. suivie à la lettre. Tous les boutons de contrôle du gril doivent être fermés lorsque vous ouvrez la soupape de la bonbonne. Tournez la soupape de la bonbonne lentement pour assurer l’équilibre de la pression. Voir les instructions d’allumage.
Problème FR Causes possibles Solutions Le régulateur murmure lorsque l’appareil fonctionne. Problème normal par temps Ceci n’est pas un défaut. Le murmure est causé chaud. par une vibration à l’intérieur du régulateur et n’affecte en rien la performance et la sécurité du gril à gaz. Les régulateurs émettant un murmure ne seront pas remplacés. Les brûleurs ne s’allument pas les uns aux autres. Supports de pont d’allumage Nettoyez ou remplacez au besoin. sales ou corrodés.
GARDEZ VOTRE REÇU COMME PREUVE D’ACHAT POUR VALIDER VOTRE Commande de pièces de rechange Information sur la garantie MODÈLE : DATE D’ACHAT : NUMÉRO DE SÉRIE : (Inscrivez l’information ici pour y avoir accès facilement.) Pour commander des pièces de rechange ou faire une réclamation sous garantie, communiquez avec le détaillant Napoléon où le produit a été acheté.
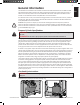
CAUTION! During unpacking and assembly we recommended you wear work gloves and safety glasses for your protection. Although we make every effort to make the assembly process as problem free and safe as possible, it is characteristic of fabricated steel parts that the edges and corners might be sharp and could cause cuts if handled incorrectly. Getting Started ! 1. Remove all cart panels, hardware, and grill head from carton. Raise lid and remove any components packed inside.
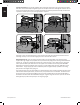
Proper Hose Connection (Propane) Branchement Adéquat Du Boyau ! WARNING! Ensure the hose does not contact any high temperature surfaces, or it may melt and leak causing a fire. AVERTISSEMENT! Assurez-vous que le boyau ne touche à aucune surface à haute température sinon il risque de fondre, de provoquer une fuite et causer un feu. 1 x N160-0045 WARNING! Clip hose to side cart panel using bushing supplied.
! ! Leak Testing Instructions WARNING! A leak test must be performed annually and each time a cylinder is hooked up or if a part of the gas system is replaced. WARNING! Never use an open flame to check for gas leaks. Be certain no sparks or open flames are in the area while you check for leaks. Sparks or open flames will result in a fire or explosion, damage to property, serious bodily injury, or death.
Test de détection de fuites ! ! AVERTISSEMENT! Il doit être fait avant la première utilisation, annuellement et à chaque fois qu’une pièce du système de gaz est remplacée ou réparée. AVERTISSEMENT! N’utilisez pas une flamme nue pour vérifier pour des fuites de gaz. Assurezvous qu’il n’y ait aucune étincelle ni flamme nue à proximité de l’endroit à vérifier.
R525-1 Parts List / Liste des pieces Item/ Article Part # / No de pièce Description R525 1 N520-0049 warming rack / grille-rechaud x 2 S83024 cast cooking grid kit / trousse de grille de cuisson (fonte de fer) x S83023 stainless cooking grid kit / trousse de grille de cuisson (acier inoxydable) ac 3 S87001 burner & sear plate kit / trousse de plaque de brûleur et brûleur x 4 S87013 cross light bracket kit / trousse de support pour l’allumage croisé du brûleur principal x 5 N200-
R525-1 Parts List / Liste des pieces Item/ Article Part # / No de pièce Description R525 62050 Burner & Jetfire maintenance kit / trousse d’entretien pour brûleur et système Jetfire x N590-0261 condiment basket / panier à condiments ac 69811 rotisserie kit / ensemble de la rôtissoire ac 61525 cover / housse ac 56365 griddle / plague de cuisson en acier inoxydable ac 56018 stainless steel griddle / plague de cuisson en acier inoxydable ac 67732 charcoal tray / support à charbon ac
R525 -1 NA 28 27 32 33 29 31 33 36 30 39 34 40 4 3 41 1 42 43 2 6 7 48 49 50 51 5 47 52 9 53 8 11 32 17 35 15 10 22 12 13 23 18 39 15 36 14 37 24 16 19 20 12 39 38 21 25 26 www.napoleon.com N415-0580 Mar 30.
N415-0580 Mar 30.20 www.napoleon.
www.napoleon.