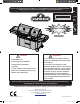
This gas grill must be used only outdoors in a well-ventilated space and must not be used inside a building, garage, screened-in porch, gazebo or any other enclosed area. EN APPLY SERIAL NUMBER LABEL FROM CARTON Serial No. XXXXXX000000 MODEL NO. DE PG.19 DO NOT DISCARD PG.37 PRO825 WARNING DANGER IF YOU SMELL GAS: • Shut off gas to the appliance. • Extinguish any open flame. • Open lid. • If odor continues, keep away from the appliance and immediately call your gas supplier or fire department.
EN Napoleon President’s Limited Lifetime Warranty NAPOLEON products are designed with superior components and materials, and are assembled by trained craftsmen who take great pride in their work. The burner and valve assembly are leak tested and test-fired at a quality test station. This grill has been thoroughly inspected by a qualified technician before packaging and shipping to ensure that you, the customer, receive the quality product you expect from NAPOLEON.
WARNING! Failure to follow these instructions could result in property damage, personal injury or death. Read and follow all warnings and instructions in this manual prior to operating grill. Safe Operating Practices • • • • • • • • • • • • • • • • • • • • • • • • • • • • • • • • • • • • • • • • This gas grill must be assembled exactly according to the instructions in the manual.
EN DIMENSIONS PRO825 GRILL 2 GRILL SIZE: 3265 cm2 (500 in ) 2 2 2160 cm (325 in ) 2 2 WARMING RACK SIZE: 1635 cm (255 in ) 2 2 1080 cm (165 in ) ALL DIMENSIONS ARE APPROXIMATE OVERALL WIDTH 239cm 94 1/4" OVERALL DEPTH 64cm 25 1/4" 43cm [17"] OVERALL HEIGHT 130cm [51"] (145cm [56"] - LID OPEN) GRILL HEIGHT 93cm [ 36 1/2" ] 91cm [ 36" ] www.napoleongrills.com N415-0425CE-GB-DE DEC 11.18.indd 4 N415-0425CE-GB-DE DEC 11.
Correct Disposal Of This Product This marking indicates that this product should not be disposed with other household wastes throughout the EU. To prevent possible harm to the environment or human health from uncontrolled waste disposal, recycle it responsibly to promote the sustainable reuse of material resources. To return your used device, please use the return and collection systems or contact the retailer where the product was purchased. They can take this product for environmental safe recycling.
WARNING! • • • • EN • • Do not route hose underneath drip pan. Do not route hose between space in bottom shelf and back panel. Do not route hose over top of back panel. Ensure all connections are tightened using two wrenches. Do not use Teflon tape or pipe dope on any hose connection. Ensure the hose does not contact any high temperature surfaces, or it may melt and leak causing a fire.
This unit includes an internal regulator which stabilizes the gas pressure and improves grill performance. This regulator cannot be adjusted. There is a pressure tap located on the side of the regulator. It can be used by a qualified service person when servicing the grill to determine if the regulator is functioning properly. The screw within the pressure tap must always be kept tight, except when performing a pressure test on the regulator (qualified service personnel only).
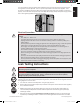
Lighting Instructions EN Smoker Burner Igniter Light Left Tube Burner Rear Right Smoker Right Left Burner Centre Centre Tray Tube Tube Burner Tube Burner Burner Left Warming Right Infra Burner Infra Red Red Burner Burner Off Position WARNING! Open lid WARNING! Ensure all burner controls are in the off position. Slowly turn on the gas supply valve. Main Burner Lighting Smoker Burner Lighting Rear Burner Lighting (if equipped) Side Burner Lighting (if equipped) 1. Open grill lid. 1.
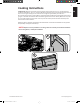
Cooking Instructions Initial Lighting: When lit for the first time, the gas grill emits a slight odor. This is a normal temporary condition caused by the “burn-in” of internal paints and lubricants used in the manufacturing process and does not occur again. Simply run the main burners on high for approximately one-half hour. Do not locate this gas grill in windy settings. High winds adversely affect the cooking performance of the gas grill.
EN Main Burner Use: When searing foods, we recommend preheating the grill by operating all main burners in the high position with the lid closed for approximately 10 minutes. Food cooked for short periods of time (fish, vegetables) can be grilled with the lid open. Cooking with the lid closed will ensure higher, more even temperatures that can reduce cooking time and cook meat more evenly.
Flame Side Burner Use (if equipped): The side burner can be used like any stove top burner, for gravies, soups etc. For best performance, the gas grill should be located with the side burner protected from the wind. WARNING! Never grill food directly on the side burner grate. pans only. It is designed for use with pots and EN WARNING! Do not close the side burner lid while it is operating or hot.
Infrared Grilling Chart EN Food Control Setting Cooking Time Helpful Suggestions Steak 1 in. (2.54cm) thick High setting 2 min. each side. 4 min. – Rare High setting 2 min. each side then medium setting. 6 min. – Medium High setting 2 min. each side then medium setting. 8 min. – Well done When selecting meat for grilling, ask for marbled fat distribution. The fat acts as a natural tenderizer while cooking and keeps it moist and juicy. High setting 2 min. each side. 4 min.
Cleaning Instructions EN WARNING! Always wear protective gloves and safety glasses when servicing your grill. WARNING! To avoid the possibility of burns, maintenance should be done only when the grill is cool. Avoid unprotected contact with hot surfaces. Ensure all burners are turned off. Clean grill in an area where cleaning solutions will not harm decks, lawns, or patios. Do not use oven cleaner to clean any part of this gas grill.
EN Maintenance Instructions We recommend this gas grill be thoroughly inspected and serviced annually by a qualified service person. At all times keep the gas grill area free from combustible materials, gasoline and other flammable vapors and liquids. Do not obstruct the flow of ventilation and combustion air. Keep the cylinder enclosure ventilation openings (located on the cart sides and at the front and back of the bottom shelf) free and clear from debris.
3. Impaired ventilation of hot air from the grill - For the burners to function properly, hot air must have a way to escape the grill. If the hot air is not allowed to escape, the burners can become deprived of oxygen causing them to back-flash. If this occurs repeatedly, the ceramic could crack. Never cover more than 75% of the cooking surface with solid metal (i.e., griddle or large pan). EN 4. Incorrect cleaning - Do not clean the ceramic tile with a wire brush.
EN Troubleshooting Problem Possible Causes Solution Low heat / Low flame when valve turned to high. For propane - improper lighting procedure. Ensure lighting procedure is followed carefully. All gas grill valves must be in the off position when the tank valve is turned on. Turn tank on slowly to allow pressure to equalize. See lighting instructions. Improper preheating. Preheat grill with both main burners on high for 10 to 15 minutes. Sear plates installed incorrectly.
Problem Possible Causes Solution Infrared burner (if equipped) flashes back (during operation the burner abruptly makes a loud “whoosh” sound, followed by a continuous blow-torch type sound and grows dim.) Ceramic tiles overloaded with grease drippings and build-up. Ports are clogged. Turn burner off and allow to cool for at least two minutes. Relight burner and burn on high for at least five minutes or until the ceramic tiles are evenly glowing red.
EN KEEP YOUR RECEIPT AS PROOF OF PURCHASE TO VALIDATE YOUR WARRANTY. Ordering Replacement Parts Warranty Information MODEL: DATE OF PURCHASE: SERIAL NUMBER: (Record information here for easy reference) For replacement parts and warranty claims, contact the Napoleon dealer where the product was purchased. Before contacting the dealer, check the Napoleon Grills Website for more extensive cleaning, maintenance, troubleshooting and parts replacement instructions at www.napoleongrills.com.
Dieser Gasgrill darf nur an einem gut belüfteten Ort im Freien benutzt werden, nicht jedoch in einem Gebäude, einer Garage oder einem anderen geschlossenen Bereich. SERIENNUMMER-AUFKLEBER VOM KARTON HIER ANBRINGEN Seriennr. XXXXXX000000 Model-Nr. DE BITTE SORGFÄLTIG AUFBEWAHREN PRO825 WARNUNG GEFAHR WENN ES NACH GAS RIECHT: • Gaszufuhr zum Gerät absperren. • Flammen löschen. • Haube öffnen.
Napoleon President Beschränkte Garantie auf Lebenszeit Hochwertige Komponenten und Materialien bilden die Grundlage der NAPOLEON Produkte. Sie werden von gelernten Handwerkern, denen ihre Arbeit mit großem Stolz erfüllt, montiert. Brenner und Ventilsystem wurden an einem Prüfstand auf Dichtigkeit geprüft und im Test betrieben.
ACHTUNG! Nichtbefolgung dieser Anweisungen kann zu Bränden mit schweren Verletzungen oder zum Tod führen. Lesen Sie die Sicherheitshinweise sorgfältig und leisten Sie diesen Folge bevor Sie den Grill in Betrieb nehmen. Vorsichtsmassnahmen • • • • • • • • • • • • • • • • • • • • • • • • • • • • • • • • • • • • • • Bei der Montage dieses Gasgrills müssen die Anweisungen im Handbuch genau befolgt werden.
ABMESSUNGEN PRO825 GRILL 2 GRILL SIZE: 3265 cm2 (500 in ) 2 2 2160 cm (325 in ) 2 2 WARMING RACK SIZE: 1635 cm (255 in ) 2 2 1080 cm (165 in ) ALL DIMENSIONS ARE APPROXIMATE DE OVERALL WIDTH 239cm 94 1/4" OVERALL DEPTH 64cm 25 1/4" 43cm [17"] OVERALL HEIGHT 130cm [51"] (145cm [56"] - LID OPEN) GRILL HEIGHT 93cm [ 36 1/2" ] 91cm [ 36" ] www.napoleongrills.com N415-0425CE-GB-DE DEC 11.18.indd 22 N415-0425CE-GB-DE DEC 11.
Entsorgung von Altgeräten aus privaten Haushalten in der EU Dieses Symbol auf dem Produkt oder dessen Verpackung gibt an, dass das Produkt innerhalb der EU nicht zusammen mit dem Restmüll entsorgt werden darf. Die separate Sammlung und das Recyceln Ihrer alten Elektrogeräte zum Zeitpunkt ihrer Entsorgung trägt zum Schutz der Umwelt bei und gewährleistet, dass sie auf eine Art und Weise recycelt werden, die keine Gefährdung für die Gesundheit des Menschen und der Umwelt darstellt.
ACHTUNG! DE • Schlauch nicht unterhalb der Auffangschale verlegen. • Schlauch nicht im Zwischenraum zwischen dem unteren Regal und der hinteren Abdeckung verlegen. • Schlauch nicht über die Oberseite der hinteren Abdeckung verlegen. • Alle Schlauchanschlüsse mit zwei Rohrschlüsseln fest anziehen. Kein Teflon-Abdichtungsband oder Dichtungskitt für die Rohrverbindungen verwenden. • Den Schlauch von heißen Oberflächen fernhalten. Schmelzen des Schlauchs kann zu Bränden führen.
Diese Einheit ist mit einem internen Druckregler ausgestattet, der den Gasdruck stabilisiert und die Grillleistung verbessert. Dieser Druckregler ist nicht anpassbar. An der Seite des Druckreglers befindet sich ein Druckhahn. Dieser kann von einem entsprechend ausgebildeten Kundendiensttechniker dazu verwendet werden, die Funktion des Druckreglers zu überprüfen.
Zündanleitung Raucher Brenner DE Zünder Lampen Linker Hinterer Linker Rechter Raucher Rechter Linker Wärmen Rechter Brenner Brenner Mittlerer Mittlerer Tablett Brenner Infrarot Brenner Infrarot Brenner Brenner Brenner Brenner VORSICHT! Grilldeckel öffnen! Ausschaltstellung VOSICHT! Stellen Sie sicher, dass alle Regler in Off-Position sind. Drehen Sie langsam das Gaszufuhrventil auf.
Grillanleitung Beim allerersten Erhitzen gibt der Gasgrill einen leichten Geruch ab. Der Geruch wird durch das „Einbrennen” der Innenlacke und Verdunsten der Schmiermittel aus der Fertigung verursacht, ist ganz normal und tritt später nicht mehr auf. Vor der ersten Benutzung sollten Sie darum die Hauptbrenner etwa eine halbe Stunde mit größter Hitze brennen lassen.
DE Grillen Mit Den Hauptbrennern: Vor dem Anbraten von Grillgut wird 10 Minuten Vorwärmen empfohlen. Dafür werden alle Hauptbrenner auf die höchste Stufe gestellt und die Haube geschlossen. Kurz zu grillende Nahrungsmittel wie Fisch und Gemüse können bei offener Haube gegrillt werden. Beim Grillen bei geschlossener Haube ist die Temperatur gleichmäßiger und höher, sodass die Grillzeit kürzer ist und das Fleisch gleichmäßiger gegrillt wird. Benötigt ein Grillgut länger als 30 Minuten, wie z. B.
Smoken mit dem Räucher-Einsatz: Der Smoker-Brenner wurde speziell für die Verwendung des RäucherEinsatzes entwickelt. Folgen Sie den Anweisungen zur Entzündung des Smoker-Brenners und heizen Sie ihn etwa 10 Minuten vor, wobei sie die Hitze reduzieren. Öffnen Sie die Räucher-Lade und füllen Sie eine kleine Menge Räucherchips in die geschlossene Abteilung des Räucher-Einsatzes. Um ein „Überräuchern“ zu verhindern, verwenden Sie zu Beginn lieber weniger Räucherchips.
Infrarot-Grilltabelle Grillgut Brennerstufe Grillzeit Empfehlungen Steak, 2,5 cm dick 2 Min. pro Seite auf höchster Stufe Englisch: 4 Min. 2 Min. pro Seite auf höchster Stufe, dann mittlere Stufe Medium: 6 Min. Durchwachsenes Fleisch eignet sich am besten zum Grillen. Das Fett macht das Fleisch zart und saftig. 2 Min. pro Seite auf höchster Stufe, dann mittlere Stufe Durch: 8 Min. 2 Min. pro Seite auf höchster Stufe Englisch: 4 Min. 2,5 Min. pro Seite auf höchster Stufe Medium: 5 Min.
Reinigungsanleitung 31 WARNUNG! Beim reinigungsanleitung sollten Arbeitshandschuhe und eine Schutzbrille getragen werden. WARNUNG! Zum Reinigen müssen die Brenner ausgeschaltet sein. Heiße Flächen nicht ungeschützt berühren. Grill an einen Ort stellen, wo das Reinigungsmittel keinen Schaden anrichten kann (nicht auf die Terrasse oder den Rasen). Kein Teil dieses Gasgrills darf mit Ofenreiniger gesäubert werden. Grillroste oder andere Teile des Gasgrills nicht in einem selbstreinigenden Ofen säubern.
Wartungs Anleitung Der Gasgrill sollte jährlich von einem zugelassenen Wartungsdienst überprüft und gewartet werden. Brennbare Materialien, Benzin und andere brennbare Dämpfe und Flüssigkeiten müssen entfernt vom Gasgrill gelagert werden. Luftwege zur Belüftung und zum Brenner nicht blockieren. Lüftungslöcher des Gasflaschenschranks (an den Grillwagenseiten und der Vorder- und Rückseite des unteren Regalbodens) stets frei von Schmutz und Ablagerungen halten.
3. Schlechte Belüftung des Grills – Die heiße Luft muss aus dem Grill entweichen können, damit die Brenner richtig funktionieren. Bei schlechter Belüftung kommt es zu Sauerstoffmangel, was zu Flammenrückschlägen führt. Wenn dies wiederholt passiert, reißt die Keramik. Darum sollte niemals mehr als 75% der Grillfläche mit Vollmetall (d.h. von einem Grillblech oder einer großen Pfanne) abgedeckt sein.
Problembehandlung Problem Mögliche Ursachen Lösung Geringe Hitze / Niedrige Flamme trotz Reglerposition „high“. Bei Propangas – unsachgemäßer Anzünd-/Brennvorgang. Stellen Sie sicher, dass die Anzünde-Anleitung genau befolgt wird. Alle Regler müssen sich in Off-Position befinden, wenn das Gasflaschenventil aufgedreht wird. Drehen Sie das Ventil langsam auf, sodass sich der Druck gleichmäßig verteilen kann. Siehe auch: Anzünde-Anleitung. Unsachgemäßes Vorheizen.
Problem Mögliche Ursachen Lösung Infrarotbrenner (sofern vorhanden) flammt während der Nutzung auf, macht plötzlich laute Zisch-Geräusche, gefolgt von einem kontinuierlichen Geräusch wie dem einer Lötlampe, und Brenner wird dunkler. Keramikplatte ist mit Ablagerungen und Fetten beschmutzt. Auslässe sind verstopft. Schalten Sie den Brenner ab und lassen Sie ihn mindestens 2 Minuten abkühlen.
RECHNUNG/KASSENBON ALS KAUFBELEG FÜR GARANTIEANFRAGEN AUFBEWAHREN ERSATZTEILBESTELLFORMULAR DE GARANTIEINFORMATIONEN MODELL: KAUFDATUM: SERIENNUMMER: (Speichern Sie diese Informationen hier als künftige Referenz) Für Ersatzteile und Garantieanfragen, kontaktieren Sie Ihren Napoleonhändler, bei dem das Produkt gekauft wurde. Vor Sie Ihren Händler kontaktieren, lesen Sie bitte die Napoleon Grills Website, um mehr über Reinigung, Wartung, Troubleshooting und Ersatzteilmontage zu erfahren: www.
CAUTION! During unpacking and assembly we recommended you wear work gloves and safety glasses for your protection. Although we make every effort to make the assembly process as problem free and safe as possible, it is characteristic of fabricated steel parts that the edges and corners might be sharp and could cause cuts if handled incorrectly. Getting Started 1. Remove all cart panels, hardware, and grill head from carton. Raise lid and remove any components packed inside.
Cooking Grid Placement: The cooking grid can be placed at two different heights. The higher height is for use with pots and pans. The recommended diameter is 10” (254 mm) to 16” (406 mm). The lower position can be used with a wok (14” (355 mm) recommended). Ensure the burner is off and the grid is cool to the touch before changing between the two heights. The grid must be at the lower position in order to close the lid.
The cabinet doors have been aligned at the factory but hinge adjustment may be necessary if the grill has been moved or is sitting on uneven ground. For easy hinge adjustment follow the illustrations outlined below. Die Grilltüren wurden werkseitig bereits ausgerichtet. Eine neuerliche Adjustierung kann notwendig sein, wenn der Grill bewegt wurde oder auf unebenem Boden steht. Für eine einfache Adjustierung der Scharniere folgen Sie bitte den folgenden Illustrationen. x2 N415-0425CE-GB-DE DEC 11.
Rotisserie Kit Assembly Instruction (optional) Assemble rotisserie kit components as shown. Anweisungen für die Montage des Drehspieß-Sets (optionale) Komponenten des Drehspieß-Sets wie gezeigt montieren. X Ensure stop bushing is tightened on the inside of hood casting. Sicherstellen, dass die Anschlagbuchse an der Innenseite des Haubengussteils fest angezogen ist. www.napoleongrills.com N415-0425CE-GB-DE DEC 11.18.indd 40 N415-0425CE-GB-DE DEC 11.
Providing Power To The Internal Lights CAUTION! To ensure protection against electric shock, use only a Ground Fault Interrupter (GFI) protected circuit with this outdoor gas cooking appliance. To provide power to the internal lights, plug the transformer cord into a grounded electrical cord. The light switch located on the control panel allows you to easily turn the internal lights on and off. • Ensure the cord is approved and marked for OUTDOOR USE.
N415-0425CE-GB-DE DEC 11.18.indd 42 www.napoleongrills.com 12V AC FUSE HOLDER SIDE BURNER ELECTRODE REAR BURNER ELECTRODE SMOKER ELECTRODE TRANSFORMER 120V AC FUSE 4A SLOW BLOW EXTENSION CORD GFI Outlet GROUND WIRE C20 IGNITER MODUAL C21 C11 C13 1.
Proper Hose Connection (Propane) Ordnungsgemäßer Schlauchanschluss (Propan) All cylinders 7kg or larger must be placed outside the enclosure (under the right side shelf) on level ground. The hose assembly must be routed through the knock out hole in the right side panel. Gasflaschen mit einem Gewicht von 7 kg oder mehr außerhalb des Schranks (unter dem rechten Seitenregal) ebenerdig aufstellen. Die Schlauchinstallation muss durch die vorgestanzte Öffnung im rechten Seitenpaneel erfolgen.
Cylinder Connection / Flaschenanschluss NOTE! Some regulator hoses contain a nut and a left hand thread, and others must press ON to connect and OFF to detach. Follow the instructions provided below for the appropriate regulator hose. HINWEIS! Einige Druckminderer-Schlauch-Sets haben eine Mutter und ein Linksgewinde, während bei anderen ON zum Anschluss und OFF zum Abtrennen gedrückt werden muss. Bitte beachten Sie die untenstehenden Anweisungen für das jeweilige Modell. FIG. 1 FIG. 2 FIG.3 FIG.
Leak Testing Instructions WARNING! A leak test must be performed annually and each time a cylinder is hooked up or if a part of the gas system is replaced. WARNING! Never use an open flame to check for gas leaks. Be certain no sparks or open flames are in the area while you check for leaks. Sparks or open flames will result in a fire or explosion, damage to property, serious bodily injury, or death.
Anleitung Für Die Leckageprüfung WARNUNG! Ein Leckagetest muss vor der ersten Benutzung, jährlich und nach Auswechseln oder Warten eines Gasbauteils durchgeführt werden. WARNUNG! Während der Prüfung ist Rauchen verboten. Alle Zündquellen sind zu entfernen. Leckageprüfung: Ein Leckagetest muss vor der ersten Benutzung, jährlich und nach Auswechseln oder Warten eines Gasbauteils durchgeführt werden. Während der Prüfung ist Rauchen verboten. Alle Zündquellen sind zu entfernen.
Parts List / Stückliste ITEM PART # DESCRIPTION 825 1 N010-0814 base x 2 N570-0038 1/4-20 x 1/2" screw x 3 N100-0057 main burner x 4 N100-0049 smoker burner x 5 N080-0320 cross light bracket x 6 N080-0321 cross light bracket small x 7 N080-0405 sear plate mount x 8 N200-0106 smoker burner cover x 9 N510-0013 black silicone lid bumper x N510-0017 black silicone lid bumper 60A x 10 N080-0339 burner grease shield x 11 N080-0340 burner grease shield small x
Parts List / Stückliste ITEM PART # DESCRIPTION 825 45 N240-0036 rear burner electrode x 46 N305-0082 sear plate x 47 N305-0085 cooking grids large x 48 N305-0092 cooking grids small x 49 N010-0800-SER smoker tube x 50 N135-0059-GY1HT left side hood casting x 51 N135-0060-GY1HT right side hood casting x 52 N335-0076-BK2GL hood insert, large x 53 N335-0077-BK2GL hood insert, small x 54 N570-0012 1/4”-20 X 5/8 carriage bolt x 55 W735-0011 3/4" washer x 56
Parts List / Stückliste ITEM PART # DESCRIPTION 825 N530-0044 regulator -Poland x N530-0046 regulator -Czech Republic x 79 N735-0021 washer #8 stn stl x 80 N010-0857 step down regulator x 81 N720-0072 quick connection flex x 82 N010-0811-SS assembly lid large x 83 N010-0810-SS assembly lid small x 84 N051-0012 control knob bezel small x 85 N160-0031 wire clip x 86 N010-0929 assembly control panel x N160-0042 clip, control panel wires x 87 N010-0933 hood ass
82 68 87 69 88 83 70 45 22 42 14 39 61 10 43 44 56 13 7 47 8 95 46 6 3 9 1 75 56 85 15 38 73 4 76 81 2 66 62 11 5 12 48 74 4 20 89 18 20 19 71 72 90 17 22 56 15 92 16 63 21 41 78 91 80 49 86 86 32 49 40 93 35 27 36 34 24 31 84 25 37 77 94 21 30 33 26 21 28 87 57 59 64 54 65 67 79 40 55 50 44 www.napoleongrills.com N415-0425CE-GB-DE DEC 11.18.
Parts List / Stückliste ITEM PART # DESCRIPTION 825 101 N010-0922-GY1SG bottom shelf x 102 N130-0016 caster, locking x 103 N735-0003 1/4" lockwasher x 104 N570-0082 1/4-20 x 1/2" screw x 105 N015-0011 axle x 106 N745-0009 wheel x 107 N450-0023 axle cap x 108 N120-0037 wheel hub cap x 109 N475-0427-GY1SG left-right panel x 110 N080-0401-GY1SG bracket side shelf x 111 N570-0008 #8 x 1/2" screw x 112 N475-0429-GY1SG panel right rear x 113 N475-0428-GY1SG
Parts List / Stückliste ITEM PART # DESCRIPTION 825 143 55110 tool hook bracket x 144 62008 grease trays foil x 145 N160-0039 wire clip x 146 N570-0087 1/4-20 x 7/8" screw x 147 N735-0001 washer side shelf x 148 N200-0124-GY1SG back cover x 149 N010-0887 cabinet light x 150 Z080-0012 bottle opener x 151 N080-0318-GY1SG bracket drip pan guide x 152 N750-0018 electronic ignition lead x 153 N010-0873-GY1SG tank ring x 154 N370-0781P kit side shelf left p
N415-0425CE-GB-DE DEC 11.18 N415-0425CE-GB-DE DEC 11.18.indd 53 118 154 150 115 109 135 142 119 143 136 104 146 138 130 104 102 132 151 131 137 125 147 114 127 139 144 110 116 121 149 145 103 123 133 140 152 141 111 126 148 133 129 113 124 122 151 111 108 128 107 101 144 115 147 106 105 146 115 134 153 139 125 124 155 136 117 119 120 137 112 53 www.napoleongrills.
Parts List / Stückliste ITEM PART # DESCRIPTION 825 201 N135-0065-GY1HT left side lid casting x 202 N715-0091 trim left side lid casting x 203 N135-0064-GY1HT right side lid casting x 204 N715-0092 right side lid trim x 205 N335-0122 large stainless steel lid insert x 206 N585-0128 lid heat shield large x 207 N385-0308-SER NAPOLEON logo x 208 N450-0044 logo clips x 209 N510-0013 black silicone lid bumper x N510-0017 black silicone lid bumper 60A x 210 N010-08
Parts List / Stückliste ITEM PART # DESCRIPTION 825 244 N305-0093 cast iron side burner grate x 245 N570-0008 #8 x 1/2" screw x 246 N325-0063 shelf handle front x 247 N325-0064 shelf handle side x 248 N500-0054 air shutter plate x 249 N720-0056 side burner flex x 250 N255-0061 quick disconnect nipple x 251 N385-0144-SER prestige logo x 252 N010-0992 stainless steel side shelf right x 253 N385-0185 PRO button logo x 254 N120-0034-GY0TX right side shelf end ca
202 82 214 201 205 215 83 213 203 202 201 217 215 204 213 203 204 214 212 210 211 211 207 209 209 208 154 212 216 218 206 243 240 155 241 219 242 220 209 244 238 239 245 252 231 254 232 248 233 227 229 228 246 226 251 247 223 221 234 213 222 231 253 230 213 247 224 230 250 246 249 www.napoleongrills.com N415-0425CE-GB-DE DEC 11.18.indd 56 237 236 235 225 N415-0425CE-GB-DE DEC 11.
Notes N415-0425CE-GB-DE DEC 11.18 N415-0425CE-GB-DE DEC 11.18.indd 57 57 www.napoleongrills.
Notes www.napoleongrills.com N415-0425CE-GB-DE DEC 11.18.indd 58 N415-0425CE-GB-DE DEC 11.
Notes N415-0425CE-GB-DE DEC 11.18 N415-0425CE-GB-DE DEC 11.18.indd 59 59 www.napoleongrills.
Napoleon products are protected by one or more U.S. and Canadian and/or foreign patents or patents pending. www.napoleongrills.com N415-0425CE-GB-DE DEC 11.18.