
Full Product Manual


EN
W415-1454 / F / 03.16.17
14
5.0 FINISHING
!
WARNING
POWER SUPPLY SERVICE MUST BE COMPLETED PRIOR TO FINISHING TO AVOID
RECONSTRUCTION.
HEAT VENTS AND AIR OPENINGS CANNOT BE COVERED IN ANY CIRCUMSTANCES.
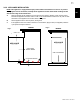
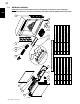
5.1 GLASS DOOR REMOVAL AND INSTALLATION
A. Remove the 4 screws off the appliance, as shown.
B. Remove the glass front and place on a soft non-
abrasive surface.
C. Reverse these steps to reinstall the glass front.
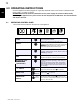
!
WARNING
FACING AND/OR FINISHING MATERIAL MUST NOT INTERFERE WITH AIR FLOW THROUGH
AIR OPENINGS, LOUVRES OPENINGS, OPERATION OF LOUVRES OR DOORS OR ACCESS FOR
SERVICE. OBSERVE ALL CLEARANCES WHEN APPLYING COMBUSTIBLE MATERIALS.
BEFORE DOOR IS REMOVED TURN THE APPLIANCE OFF AND WAIT UNTIL APPLIANCE IS COOL
TO THE TOUCH. DOORS ARE HEAVY AND FRAGILE SO HANDLE WITH CARE.
SCREW
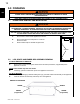
A. Remove the packaging materials holding the logs, grate and ember bed assembly to the appliance.
B. Pinch the back of the assembly and lift it up from the appliance.
5.2 LOG, GRATE AND EMBER BED ASSEMBLY REMOVAL
For Model NEFB29H:
A. Remove the 4 screws securing the ember bed to the sides (and bottom, if applicable) of the
appliance, as shown.
NOTE: Some models only have two screws.
B. Lift the log, grate and ember bed up from the appliance and remove.
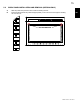
For Model NEFB24H and NEFB27H:
SCREW SCREW
SCREW
(if applicable)
SCREW
(if applicable)
NEFB27H ILLUSTRATED