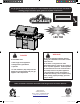
This gas grill must be used only outdoors in a well-ventilated space and must not be used inside a building, garage, screened-in porch, gazebo or any other enclosed area. APPLY SERIAL NUMBER LABEL FROM CARTON Serial No. XXXXXX000000 MODEL NO. PG.18 LEX 730 ! ! DANGER IF YOU SMELL GAS: • Shut off gas to the appliance. • Extinguish any open flame. • Open lid. • If odor continues, keep away from the appliance and immediately call your gas supplier or fire department.
Napoleon President’s 15 Year Limited Warranty NAPOLEON products are designed with superior components and materials, and are assembled by trained craftsmen who take great pride in their work. The burner and valve assembly are leak tested and test-fired at a quality test station. This grill has been thoroughly inspected by a qualified technician before packaging and shipping to ensure that you, the customer, receive the quality product you expect from NAPOLEON.
! WARNING! Failure to follow these instructions could result in property damage, personal injury or death. Read and follow all warnings and instructions in this manual prior to operating grill. Safe Operating Practices • • • • • • • • • • • • • • • • • • • • • • • • • • • • • • • • • • • • • • • • N415-0274-AU NOV3018 N415-0274-AU NOV3018.indd 3 This gas grill must be assembled exactly according to the instructions in the manual.
Location Locating Your Outdoor Gas Grill It is important when selecting a location for your gas grill to ensure clearances to adjacent combustibles are met. This appliance is intended for installation on an outdoor patio or in your yard. ‘This appliance shall only be used in an above ground open-air situation with natural ventilation, without stagnant areas, where gas leakage and products of combustion are rapidly dispersed by wind and natural convection.
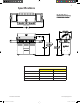
Specifications OVERALL WIDTH OVERALL HEIGHT ORIFICE SIZES ULPG NG 1.2 mm 1.9 mm MAIN INFRARED BURNER #58 #50 REAR BURNER #58 #48 SIDE BURNER #62 1.59 mm MAIN FLAME BURNER N415-0274-AU NOV3018 N415-0274-AU NOV3018.indd 5 www.napoleongrills.
General Information This gas grill is certified for outdoor use and should be installed to conform to local codes. Check gas type and specifications located on the rating plate located on the back panel of the grill. Natural Gas Hook-Up ! The installation must be performed by a licensed gas fitter in accordance with AS/NZS 5601, and all connections must be leak tested before operating the grill.
Universal Liquefied Petroleum Gas Cylinder Specifications ! WARNING! If these instructions are not followed exactly, a fire causing death or serious injury may occur. This gas grill has been designed for use with an approved 9 kg size Universal Liquefied Petroleum Gas cylinder (not supplied). The Universal Liquefied Petroleum Gas cylinder must be equipped with a POL tank valve connection.
! ! Leak Testing Instructions WARNING! A leak test must be performed annually and each time a cylinder is hooked up or if a part of the gas system is replaced. WARNING! Never use an open flame to check for gas leaks. Be certain no sparks or open flames are in the area while you check for leaks. Sparks or open flames will result in a fire or explosion, damage to property, serious bodily injury, or death.
Lighting Instructions Side Burner Lights ! Left Burner Rear Left Centre Centre Right Centre Infra Red Burner Burner Burner Burner Burner Off Position WARNING! Open lid. WARNING! Ensure all burner controls are in the off position. Turn on the gas supply valve. Main Burner Lighting ! Side Burner Lighting (If equipped) 1. Open grill lid. 1. Open grill lid. 1. Open side burner cover. 2. Push and turn any main burner knob slowly to the ‘hi’ position.
Operating The Grill Initial Lighting: When lit for the first time, the gas grill emits a slight odor. This is a normal temporary condition caused by the “burn-in” of internal paints and lubricants used in the manufacturing process and does not occur again. Simply run the main burners on high for approximately one-half hour. ! Main Burner Use: When searing foods, the lid must be kept open and the burners can be set to high.
! ! Side Burner Use (if equipped): The side burner can be used like any stove top burner, for gravies, soups etc. For best performance, the gas grill should be located with the side burner protected from the wind. The recommended pan diameter is 250 to 300 mm. WARNING! Never grill food directly on the side burner grate. pans only. It is designed for use with pots and WARNING! Close the side burner lid when using the rotisserie kit.
Infrared Grilling Chart Food Control Setting Cooking Time Helpful Suggestions Steak 1 in. (2.54cm) thick High setting 2 min. each side. 4 min. – Rare High setting 2 min. each side 6 min. – Medium When selecting meat for grilling, ask for marbled fat distribution. The fat acts as a natural tenderizer while cooking and keeps it moist and juicy. then medium setting. High setting 2 min. each side 8 min. – Well done then medium setting. Hamburger 1/2 in. (1.27cm) thick www.napoleongrills.
Maintenance / Cleaning Instructions We recommend this gas grill be thoroughly inspected and serviced annually by a qualified service person. At all times keep the gas grill area free from combustible materials, gasoline and other flammable vapors and liquids. Do not obstruct the flow of ventilation and combustion air. Keep the cylinder enclosure ventilation openings (located on the cart sides and at the front and back of the bottom shelf) free and clear from debris.
! ! Grids And Warming Rack: The grids and warming rack are best cleaned with a brass wire brush during the pre-heating period. Steel wool can be used for stubborn stains. It is normal that stainless grids (if equipped) will discolor permanently from regular usage due to the high temperature of the cooking surface. Control Panel: The control panel text is printed directly on the stainless steel and with proper maintenance will remain dark and legible.
Infrared Burners: Because of the high intensity of the infrared burner, most drippings and food particles that fall onto the burner surface are immediately incinerated. However, some debris and residue may remain. To remove this residue after cooking, operate the grill on high for 5-10 minutes. Do not clean the ceramic tile with a wire brush.
Problem Possible Causes Solution Rear and Side burners will not light with the igniter, but will light with a match. Dead battery / or installed incorrectly. Replace with premium heavy duty battery. Loose electrode wire or switch terminal wires. Check that electrode wire is firmly pushed onto the terminal on the back of the igniter. Check that the lead wires from the module to the ignition switch (if equipped) are firmly pushed onto their respective terminals. Lifting flames on burner.
KEEP YOUR RECEIPT AS PROOF OF PURCHASE TO VALIDATE YOUR WARRANTY. Ordering Replacement Parts Warranty Information MODEL: DATE OF PURCHASE: SERIAL NUMBER: (Record information here for easy reference) For replacement parts and warranty claims, contact the Napoleon dealer where the product was purchased. Before contacting the dealer, check the Napoleon Grills Website for more extensive cleaning, maintenance, troubleshooting and parts replacement instructions at www.napoleongrills.com.
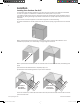
CAUTION! During unpacking and assembly we recommended you wear work gloves and safety glasses for your protection. Although we make every effort to make the assembly process as problem free and safe as possible, it is characteristic of fabricated steel parts that the edges and corners might be sharp and could cause cuts if handled incorrectly. Getting Started ! 1. Remove all cart panels, hardware, and grill head from carton. Raise lid and remove any components packed inside.
2 X N430-0002 16 X N570-0073 (1/4-20 X 3/8”) ! N415-0274-AU NOV3018 N415-0274-AU NOV3018.indd 19 3/8”(10mm) non revolving caster- left side www.napoleongrills.
! Universal Liquefied Petroleum Gas Only 1 2 4 x N570-0080 (#14 x 1/2”) www.napoleongrills.com N415-0274-AU NOV3018.
6 x N570-0080 (#14 x 1/2”) 3/8”(10mm) ! N415-0274-AU NOV3018 N415-0274-AU NOV3018.indd 21 Universal Liquefied Petroleum Gas Only www.napoleongrills.
4 x N570-0080 (#14 x 1/2”) 6 x N570-0080 (#14 x 1/2”) www.napoleongrills.com N415-0274-AU NOV3018.
2 x N570-0080 (#14 x 1/2”) N415-0274-AU NOV3018 N415-0274-AU NOV3018.indd 23 3/8”(10mm) www.napoleongrills.
4 x N570-0091 (1/4-20 X 3/8”) ! ! WARNING! Universal Liquefied Petroleum Gas Only - To avoid assembly difficulties, prior to mounting the grill head, remove zip tie holding regulator. This was installed at the factory to protect the regulator hose during shipping and is no longer required. (Take care when removing the tie not to damage the hose). Ensure the regulator hose does not become pinched between the grill head and the cart. Two people are required for this step. www.napoleongrills.
! ATTENTION! Ensure that all tabs are bent down before installation. N415-0274-AU NOV3018 N415-0274-AU NOV3018.indd 25 www.napoleongrills.
4 x N570-0080 (#14 x 1/2”) 3/8”(10mm) Back View Front View ! www.napoleongrills.com N415-0274-AU NOV3018.indd 26 ATTENTION! Ensure that all tabs are bent up after installation.
2 x N570-0073 (1/4-20 X 3/8”) N415-0274-AU NOV3018 N415-0274-AU NOV3018.indd 27 3/8”(10mm) www.napoleongrills.
4 x N570-0099 (#14 x 3/4”) ! WARNING! Do not over tighten the screws, as this will cause the handle to crack. www.napoleongrills.com N415-0274-AU NOV3018.
8 x N570-0076 (#8 X 1/2”) 4 x N570-0013 (#8 X 5/8”) N570-0013 (#8 X 5/8”) N415-0274-AU NOV3018 N415-0274-AU NOV3018.indd 29 Engage edge of shelf under ribs in end cap. www.napoleongrills.
4 x N570-0082 (1/4-20 X 5/8”) 4 x N735-0001 3/8”(10mm) Tabs located on either side of ice bucket must engage notches in side shelf. www.napoleongrills.com N415-0274-AU NOV3018.
4 x N570-0082 (1/4-20 X 5/8”) 4 x N735-0001 1 x N160-0023 3/8”(10mm) Fit orifice into burner tube and secure with hose retainer clip supplied. Attach the wire to the side burner electrode. N415-0274-AU NOV3018 N415-0274-AU NOV3018.indd 31 www.napoleongrills.
N570-0080 (#14 x 1/2”) ! 3/8”(10mm) Universal Liquefied Petroleum Gas Only 1 4 x N570-0099 (#14 x 3/4”) 4 x N340-0007 ! 3 3/8”(10mm) WARNING! Do not over tighten the screws, as this will cause the handle to crack. www.napoleongrills.com N415-0274-AU NOV3018.
2 x N105-0011 2 x N160-0022 BOTTOM 1 2 3 4 TOP N415-0274-AU NOV3018 N415-0274-AU NOV3018.indd 33 www.napoleongrills.
FOLD TABS OVER TO SECURE GLASS IN PLACE. www.napoleongrills.com N415-0274-AU NOV3018.
disposable grease tray N415-0274-AU NOV3018 N415-0274-AU NOV3018.indd 35 www.napoleongrills.
www.napoleongrills.com N415-0274-AU NOV3018.
Rotisserie Kit Assembly Instruction (optional) Assemble rotisserie kit components as shown. Ensure stop bushing is tightened on the inside of hood casting. N415-0274-AU NOV3018 N415-0274-AU NOV3018.indd 37 www.napoleongrills.
Universal Liquefied Petroleum Gas - Proper Hose Connection Clip hose to side panel using hose retainer clip supplied. Ensure the regulator drops into the small opening, between the tank heat shield and the right side of the cabinet. ! WARNING – FIRE HAZARD The regulator must be attached so that no part of the hose touches the underside of the grill or drip pan. A fire will result if these directions are ignored. www.napoleongrills.com N415-0274-AU NOV3018.
Natural Gas Only – Proper Hose Connection 3/4”(19mm) ! ! ! ! WARNING! The installation must be performed by a licensed gas fitter, and all connections must be leak tested before operating the grill. Do not use pipe dope or teflon tape on this connection. Tighten the connection with two wrenches. WARNING – FIRE HAZARD WARNING! Do not route hose underneath drip pan. WARNING! Do not route hose over top of rear panel.
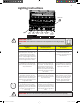
Parts List Item Part # Description LEX730RSBI 1 N590-0151-GY1SG bottom shelf x 2 N475-0236-GY1SG left/right cart enclosure panel x 3 N475-0326-GY1SG rear cart enclosure panel x 4 N655-0181-GY1SG front cabinet support x 5 N080-0212-GY1SG stabilizer brackets x 6 N130-0012 revolving caster x 7 N130-0013 non revolving caster x 8 N010-0765 drawer housing assembly x 9 N010-0766-M02 drawer assembly x N010-0766-BK black drawer assembly x 10 N735-0001 insulated washer
Parts List Item Part # Description LEX730RSBI 41 N010-0519-AU manifold assembly p N010-0520-AU manifold assembly n 42 N100-0036 main burner x 43 N010-0499 infra red burner x 44 N300-0006 infrared burner glass x 45 N080-0309 bracket infra red glass support x 46 N215-0007-M01 deflector infrared burner x 47 N080-0209 main burner cross light bracket x 48 N080-0207 support bracket infra red burner x 49 N660-0002 switch light x 50 N051-0006 control knob bezel large
Parts List Item Part # Description LEX730RSBI 82 N735-0003 1/4” lockwasher x 83 N010-0527P-AU infra red rear burner p N010-0527N-AU infra red rear burner n 84 N160-0015 clip, tank top p 85 N530-0047 regulator - NG n 86 N655-0094-GY1SG tank support p 87 N240-0030 rear burner electrode c/w pilot x 88 N200-0114 rear burner electrode cover x 89 N720-0073 pilot tube x 90 N455-0079 pilot orifice - LPG p N455-0080 pilot orifice - NG n N455-0077 rear burner orifice
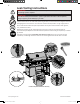
71 79 70 77 79 36 67 72 82 92 73 76 75 67 69 82 91 111 89 79 80 74 78 81 78 103 88 67 90 110 104 60 56 95 58 13 36 100 45 67 57 104 42 47 66 46 47 99 67 48 39 59 80 57 67 43 98 101 62 97 93 103 44 107 96 83 87 67 80 96 68 106 53 67 54 76 102 52 10 61 95 11 51 50 17 55 38 94 85 105 97 41 49 63 31 28 40 109 35 26 25 34 35 4 109 30 37 18 8 84 33 14 15 32 28 12 23 109 2 16 25 19 12 30 109 35 30 35 27 10
Napoleon products are protected by one or more U.S. and Canadian and/or foreign patents or patents pending. N415-0274-AU N415-0274-AU NOV3018.