PATIO HEATER -PTH38PSS-PTH38PCP-PTH38PGM- WARNING: For Outdoor Use Only. OFF GH HI FOR YOUR SAFETY If you smell gas: 1. Shut off gas to the appliance. 2. Extinguish any open flame. 3. if odor continues ,immediately call gas supplier. FOR YOUR SAFETY Do not store or use gasoline or other flammable vapors or liquids in the vicinity of this or any other appliance. CAUTION: Retain the instructions for future use.
TOOLS AND PARTS NEEDED FOR ASSEMBLY CARBON MONOXIDE HAZARD DANGER This appliance can produce carbon monoxide which has no odor. Using it in an enclosed space can kill you. Never use this appliance in an enclosed space such as a camper, tent, car or home. WARNING: Improper installation, adjustment, alteration, services or maintenance can cause injury, death or property damage. Read the installation, operating and maintenance instructions thoroughly before installing or servicing this equipment.
PARTS 1 1 Center Reflector Cap 2 4 Reflector Cap 3 1 Head Assembly 4 1 Gas Hose 5 1 Post 6 7 8 9 1 Cylinder Cover 3 Post Mounts 1 Cylinder Base 10 18 6mm Washers 11 6 5mm Washers 12 5 4mm Washers 13 5 M4 x 8 Bolts 14 6 M5 x 8 Bolts 15 12 M6 x 10 Bolts 16 3 M6 x70 double pointed bolts 17 1 Regulator 18 1 Cylinder (Not Supplied) 9 10 1 2 15 16 15 M6 Nuts 3 4 13 5 6 9 10 11 12 14 13 7 14 15 17 16 8 17 3
PRECAUTIONS NOTE: PLEASE READ THE FOLLOWING SAFETY RULES WARNING At least once a year, the unit should be inspected for the presence of spiders, spider webs or other insects. Check the heater immediately if any of the following exist: Read the instructions before use. This appliance must be installed in accordance with such regulations as are in force. 1. The smell of gas in conjunction with extreme yellow colored tips of the burner flames. This appliance must only be used outdoors.
ASSEMBLY FOR LIGHT SYSTEM WARNING: TO BE INSTALLED ONLY BY AN AUTHORISED PERSON Ignition button Instruction For Battery Installing Upon first time use of the product,please remove the ignition button and install an AAA battery as indicated.
ASSEMBLY NOTE: Assembly of this heater requires basic mechanical skills. Proper assembly is the responsibility of the installer. Step 1 5 Step 1 ---- Attach Post to Base Assembly Attach the post to the post mounts using M5 X 8 bolts (6 pcs) and 5mm washers (6 pcs) 11 14 7 Step 2 ---- Attach Cylinder Cover to Post Mounts Step 2 Attach the cylinder cover to the post mounts.
ASSEMBLY NOTE: Assembly of this heater requires basic mechanical skills. Proper assembly is the responsibility of the installer. Step 3 Step 3 ---- Attach Head Assembly to Post 3 Load head assembly by inserting gas hose into post. Insert head assembly into post. Tighten securely using M4 X 8 Bolts (5 pcs) and 4mm washers (5 pcs).
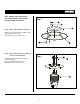
ASSEMBLY NOTE: Assembly of this heater requires basic mechanical skills. Proper assembly is the responsibility of the installer. Step 5 9 10 1 Step 5 ---- Attach Center Reflector to Reflector Attach center reflector to the top of reflector (4 pcs) by M6 X 10 mm screws (12 pcs) , 6mm washers (12 pcs) and nuts (12 pcs).
ASSEMBLY NOTE: Assembly of this heater requires basic mechanical skills. Proper assembly is the responsibility of the installer. Step 7 Step 7 ---- Connect Gas Line to Cylinder Attach Gas hose to regulator with 3/8 Inch Open End Wrench and Adjustable Wrench. Attach regulator to cylinder. Tighten securely. Move cylinder to the plate of base assembly.
ASSEMBLY WARNING : TO BE INSTALLED ONLY BY A COMPETENT PERSON Step 9 Step 9---- Lower Cylinder Cover onto Cylinder Base Lower the cylinder cover onto the cylinder base . 6 8 Step 10---- Disconnect Cylinder When Storing or Transporting Step 10 1).Turn off the heater; 2).Upper the cylinder cover onto the post mounts; 3).Turn off the valve of the cylinder; 4).Loosen the screw of cylinder and regulator; 5).Disconnect the cylinder from regulator.
OPERATION WARNING: DO NOT attempt to operate heater until you have read and understand all precautions. Failure to do so can result in serious personal injury, death or property damage. Before Turning Gas Supply ON Your heater was designed and approved for OUTDOOR USE ONLY. Do NOT use it inside a building ,or any other enclosed area. Make sure surrounding areas are free of combustible materials, gasoline and other flammable vapors or liquids. Ensure that there is no obstruction to air ventilation.
OPERATION CAUTION : Avoid inhaling fumes emitted from the heater's first use. Smoke and odor from the burning of oils used in manufacturing will appear. Both smoke and odor will dissipate after approximately 30 minutes. The heater should NOT produce thick black smoke. NOTE: OFF Pu o turn P IL O T sh t W GH LO The burner may be noisy when initially turned on. To eliminate excessive O W " position.
LOCATING HEADER FOR USE BE CAREFUL : WHEN CERTAIN MATERIALS OR ITEMS ARE LEFT, ABOVE, BESIDE OR UNDER THIS HEATER WHILE IN USE, THEY WILL BE SUBJECT TO RADIANT HEAT AND COULD BE SERIOUSLY DAMAGED. 36" This heater is primarily used for the heating of outdoor patios, decks, spas, pool and open working areas. Always make sure that adequate fresh air ventilation is provided. Follow the spacing tolerances shown in Figure 1. 24" The minimum clearances, shown in Figure 1, must be maintained at all times.
MAINTENANCE/STORAGE MAINTENANCE : To enjoy years of outstanding performance from your heater make sure you perform the following maintenance activities on a regular basis: Keep exterior surfaces clean. Use warm soapy water for cleaning. Never use flammable of corrosive cleaning agents. While washing your unit, be sure to keep the area around the burner and pilot assembly dry at all times. If the gas control is exposed to water in any way, do NOT try to use it. It must be replaced.
TROUBLESHOOTING PROBLEM PROBABLE CAUSE SOLUTION Pilot will not light Gas valve may be OFF Turn the gas valve ON Fuel Tank empty Refill LP gas tank Orifice blocked Clean or replace Orifice Air in supply system Purge air from lines No Battery Replace Battery Debris around pilot Clean dirty area Loose connection Tighten connection Thermocouple bad Replace Thermocouple Gas leak in line Check connections Lack of fuel pressure Fuel tank is near empty Pressure is low Fuel tank is near empt