© NAPCO 2020 OI400ALF draft .
INTRODUCTION The iSecure ISEC-WL-KEYPAD Wireless Battery-Powered Standard Keypad is a "smart", interactive, menu-driven keypad designed for your Napco iSecure system. The keypad has a digital LCD Window to show the status of your system. This booklet contains important information about the operation of your system with your keypad. Read it carefully and keep it handy for future reference. Check the Glossary for an explanation of terms that may be unfamiliar to you.
TABLE OF CONTENTS TABLE OF CONTENTS Section ................................................................................ Page KEYPAD CONTROLS & INDICATORS ................................................ 4 GO-ANYWHERE SMART HUB ICONS and LEDs ................................ 6 TO SILENCE AN ALARM: PRESS YOUR CODE AND PRESS [ENTER] FOR SERVICE, CALL: __________________ CENTRAL STATION: __________________ ARMING AWAY: SETTING THE ALARM WHEN LEAVING ................
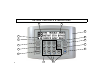
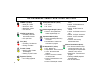
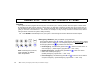
KEYPAD CONTROLS & INDICATORS 1 14 13 2 12 3 11 10 4 9 5 6 4 7 8
KEYPAD CONTROLS & INDICATORS 1. 2. 3. 4. 5. 6. 7. Window. Lights indicate system 8. Emergency Buttons. Used with the questions in the Window display. status messages; digit display AREA ( ) button to signal an audible 12. ENTER Button. Entry key. Causes indicates related zone, function or emergency, as follows: the entered code or selected function error message numbers. Note: to be executed. Press the 7 and the buttons for Fire "Lb" ("low battery") appears when keyEmergency.
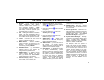
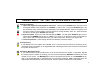
GO-ANYWHERE SMART HUB ICONS and LEDs "ARMED" Light (Red) Steady On: Armed Slow Flash: Alarm Rapid Flash: Instant Off: Disarmed "STATUS" Light (Green) On Steady: Disarmed and all zones secured Off: Open Zone "Fire" (Red) On Steady: Fire Silenced Pulsing: Fire Alarm "Trouble" (Yellow) Steady: System Trouble Acknowledged Flashing: System Trouble "Bypassed" (Yellow) On: Zone(s) Bypassed 6 "Go-Anywhere Hub AC" (Green) On: AC on Off: AC off "Cellular Signal Strength" (Green
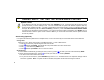
ARMING AWAY: SETTING THE ALARM WHEN LEAVING Arming the System 1. Check the keypad and Go-Anywhere Hub icons. The Hub green STATUS light must be on and the keypad Window must display the word READY in order to arm. If the green STATUS light is off, the number(s) of any unsecured zone(s) will display in the keypad Window. Refer to the pull-up zone list for the location of each problem zone and secure by closing windows, doors, etc. When all zones are secure, the Hub green STATUS light will light. 2.
ARMING AWAY: SETTING THE ALARM WHEN LEAVING System Trouble If you attempt to arm with the yellow Go-Anywhere Hub TROUBLE icon lit, a 3-second tone will sound and a voice prompt will inform you of the inability to arm. This icon indicates that the system has detected a problem that may prevent it from operating normally. A number corresponding to the trouble will then "scroll" in the Window display (for example, "E" followed by "02" for a 'E-02 Low Battery' indication).
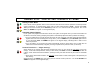
ARMING STAY: PROTECTING YOURSELF AT HOME Arming in STAY Mode Interior Zones, when bypassed, allow for free movement within the home while the protection of armed perimeter zones is maintained. To bypass Interior Zones, enter your User Code followed by STAY. The Hub green STATUS light will blink and the yellow BYPASS light will turn on to indicate zones are bypassed. The words STAY and ARMED will appear on the keypad display.
ARMING STAY: PROTECTING YOURSELF AT HOME Easy Exit Your system has been programmed for Easy Exit, which allows you to exit the premises while the system is armed STAY. By activating Easy Exit while the system is armed STAY, the Exit Delay countdown will take place, during which time you are permitted to leave through the exit door. The Easy Exit Delay time will be identical to the Exit Delay time the system gives you each time it is armed STAY.
TURNING OFF THE ALARM (DISARMING) WHEN RETURNING Disarming the System 1. Enter your premises through the entry/exit door. The keypad will sound a steady tone to remind you to disarm the system before your entry delay time expires. 2. Enter your User Code and press ENTER. The word "READY" will appear to indicate the system has been disarmed. If you enter an invalid User Code, the keypad will beep 4 times, signifying an error. Re-enter your User Code immediately.
FIRE PROTECTION (Applicable only where local ordinances permit use of this alarm system for fire protection). Fire-Zone Alarm 08 If a fire is detected, the Hub red FIRE light will flash, the ISEC-WL-KEYPAD will flash the word FIRE (along with the zone number) and the keypad sounder will pulse. If a fire is in progress, evacuate the premises immediately! If necessary, call the Fire Department from an outside telephone.
FIRE PROTECTION Preparing a Fire Escape Plan Even with the most advanced fire alarm system, adequate protection requires an escape plan. To prepare your plan, draw floor plans of your building. (Space is provided on the next page). Show two exits - a front or back door and a window from each room. (Make sure the window works. You may need a special fireescape ladder if the window is high up). Write down your outside meeting place. Family Rehearsal. Rehearse activities: each of the following 1.
FIRE PROTECTION Floorplan Draw a plan of your premises in the space provided below.
FIRE PROTECTION LIMITATIONS OF FIRE ALARM WARNING SYSTEM Although a fire alarm system may be of a reliable and state-of- the-art design, neither it nor its peripheral detection devices can offer guaranteed protection against fire. Any such equipment may fail to warn for a variety of reasons: Go-Anywhere Hubs (control panels), communicators, dialers, smoke detectors, and many other sensing devices will not work without power.
FUNCTION MENU The keypad can provide access to a wide assortment of utility functions. The functions are displayed in a prompting "YES/NO" format. 1. To enter the Function Menu, press MENU. In high-security installations, a valid User Code must first be entered followed by MENU. 2. To skip a function, answer "no" (AWAY or MENU). 3. To select and execute a function, answer "yes" (ENTER). Functions may be manually scrolled forward or backward using MENU and BYPASS, respectively.
CENTRAL STATION MONITORING Your alarm specialist may have programmed your system to be monitored by a central station. The GoAnywhere Hub has a built-in radio / Internet communicator that can transmit emergency signals and status reports to the central station 24 hours a day. Communicator Features Abort Delay. Ask your installer which of your zones have Abort Delay, a delay that enables you to reset the system before it communicates to the central station.
KEYPAD WINDOW BACKLIGHT Keypad Window Backlight The keypad face contains a Room Light Sensor that automatically measures the ambient light level to determine if the keypad Window backlight needs to be turned on for a few seconds after a keypad button press. A lit backlight ensures the Window contents are displayed clearly in a dark room. In a bright room, the backlight is not needed and thus remains off to save battery power (see page 5, "Window" and "Room Light Sensor").
GLOSSARY The following are brief descriptions of terms and features used in this guide that may be unfamiliar to you. Some of the features are programmable options that may or may not apply to your particular system. Abort Delay - A delay period that allows the Go-Anywhere Hub to be reset, thus aborting a report to a central station. Access Code - A User Code (up to 6 digits) used to remotely unlock a door.
GLOSSARY Panic Buttons - Buttons on the keypad (7F, 8A or 9P). If enabled, pressing together with 7F, 8A or 9P will alert the central station of a fire, auxiliary, or police emergency. All are audible within the premises when activated. Partitioned System - A system that has been subdivided into two independent subsystems (called "Areas"). Report - A transmission to a central station notifying of a change in the status of the system (alarm, trouble, low battery, etc.).
SYSTEM TROUBLE ERROR CODES Your iSecure Go-Anywhere Hub is capable of detecting a variety of troubles that may affect system performance. In the unlikely event that a problem should occur, the yellow Trouble light will turn on along with one or more of the following error codes. If the problem is related to a specific zone or device, the corresponding number will also be indicated. Below is a list of the most common troubles along with the necessary corrective action, if any.
SYSTEM TROUBLE ERROR CODES (cont'd) E04-(89-92) -- Wireless Siren Trouble Supervisory A problem has been detected with a wireless siren. Call installing company for service. E04-(93-96) -- Wireless Takeover Module Trouble Supervisory A problem has been detected with a takeover module. Call installing company for service.
SYSTEM TROUBLE ERROR CODES (cont'd) E17-NNN -- Receiver Tamper Condition Call installing company for service. E18-NNN -- Keyfob Transmitter Low Battery A keyfob transmitter has indicated its power cell(s) are weak and should be replaced. The 4-button ISECKEYFOB uses a 3V Lithium coin cell battery (replace with type CR2032 or Duracell DL2032 only). The 1-button ISEC-PANIC uses two Energizer 386 1.5V silver oxide cells (the unit will also flash its LED to warn of a lowbattery).
TROUBLESHOOTING What do I do if... For more info... I try to arm my system but the keypad just displays a P and beeps at me. If the green STATUS light is off, a zone is open. Refer to the pull up zone directory and find and secure the open window or door. See Page 7 I try to arm my system but the keypad displays a P and beeps at me. The yellow TROUBLE light is lit and numbers start scrolling in the Window display. A System Trouble has been detected.
KEYPAD BATTERY REPLACEMENT "Lb" appears in the keypad Window display to indicate a keypad " Low battery" . Replace the battery (or batteries) as soon as possible with a minimum of one Energizer 3V (size 123) lithium battery inserted into the left side battery holder. To extend the time interval between replacements, install a second battery of the same type into the right side battery holder.
NOTES 26
FCC STATEMENTS FCC EXPOSURE GUIDE The iSecure internal low power RF devices have been tested to FCC Section 15.247(i) and require a minimum spacing of 20cm from the user. Since the iSecure devices have internal antennas, this spacing will always be maintained and re-quires no special precautions to comply with both the Occupational/Controlled Exposure and the General Population/ Uncontrolled Exposure requirements of FCC Part 1.1310.
NAPCO LIMITED WARRANTY NAPCO SECURITY TECHNOLOGIES, INC. (NAPCO) warrants its products to be free from manufacturing defects in materials and workmanship for thirty-six months following the date of manufacture. NAPCO will, within said period, at its option, repair or replace any product failing to operate correctly without charge to the original purchaser or user.