
User's Manual

4 NAPCO iBridgeVideo ISV2-DOME-WIFI Installation Guide
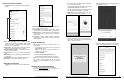
screen (below). Confirm your Time Zone (tap the
arrow to the right and select the from the pull-down
list). You can also enable Daylight Saving Time
(DST). To save these time settings in the app when
connecting to future cameras, enable Set to default
and tap Next.
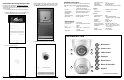
12. Live video feed will appear.
The circular buttons in the above image are:
Top row, left to right:
Snapshot - Saves a snapshot to your device.
Microphone - Enables 2-way communication.
Recording - Records live video to your device.
Bottom row, left to right:
Spot light - Enables camera spotlight for 30 seconds.
Siren - Triggers camera siren for 30 seconds.
9. Type the SSID password of the Wi-Fi network (tap the
"eye" icon to the right of the Password field to display
the characters). The app will remember this password
if Save password is checked. When finished, tap
Connect (the camera's LED will start to flash).
The password must be typed correctly or the camera
will not connect to the wireless network. To select an-
other network, tap Select other network.
10. Wait for the Wi-Fi connection process to complete. If
successful, the LED on the camera front will stop
flashing and will turn on solid green. Tap Yes in the
screen below (left) to continue. If unsuccessful, try
again by tapping Add Again (it may take up to a mi-
nute to connect).
If Camera Does Not Connect (LED keeps Flashing)
Check the Wi-Fi signal strength at the camera location
using the smart device to ensure there is sufficient signal
strength (3 bars or more is recommended). Also verify
the Wi-Fi network password. If needed, tap the Add
Again button to repeat steps 6-11.
11. A successful connection will display the confirmation
6D03F02YAZ612-0D8D
NAPCO iBridgeVideo ISV2-DOME-WIFI Installation Guide 5
At the top, tap the check mark to save. Tap the "<"
arrow to return to the Device Info screen.
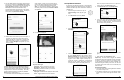
5. In the Device Info screen, tap Activity Zones.
6. In the video image (see example image below) "tap
and hold" to select the matrix boxes where you want
the camera to detect changes. The areas that will
detect motion activity will turn red.
To clear ALL red boxes, tap Clear Zone and start
again.
7. When finished, tap Create Zone to save.
Helpful Tip: To avoid nuisance triggers, the selected
red detection areas must be limited to areas of anticipat-
ed activity. Changes in pixels may be caused by blow-
ing tree branches, falling leaves, motion floodlights, sun
and shade changes caused by cloud cover, etc. Be sure
to exclude (clear) these areas from the selected (red)
detection areas.
Smart Detection Notes:
1. Covers the whole field of view regardless the selected
(red) motion activity zones.
2. The effective performance may yield different results
based on the camera view light and weather condi-
tions.
Set Up Motion Detection
By analyzing and detecting changes in pixel properties,
selecting Activity Zones allows the app to send push no-
tifications and video clips when movement is sensed in a
selected area.
1. While viewing the camera live, open the
Camera Settings screen (tap the "gear"
icon).
2. In the Device Info screen, tap Alarm.
3. Ensure Motion Detect is enabled, then tap Motion
Sensitivity:
4. Use the screen below to adjust the Motion Sensitiv-
ity of the Activity Zones to be selected in step 6
(Motion Sensitivity can be adjusted at any time).
The higher the sensitivity, the less motion needed to
trigger an event. Note: Higher sensitivity may in-
crease the number of notifications. Enable Smart
Detection to help reduce false alarms caused by
moving bushes, tree branches falling leaves, etc.
6D03F02YAZ612
6D03F02YAZ612