
User's Manual

6 NAPCO iBridgeVideo ISV2-DOME-WIFI Installation Guide
Smart Detection: Enable the smart motion detection fea-
ture to help reduce false alerts.
Alarm Schedule: Set a schedule to select when to allow
motion detection events (default setting is enabled 24/7)
Spotlight Trigger: Enable / disable camera spotlight trig-
gered upon a motion event (component of Active Deter-
rence feature).
Siren Trigger: Enable / disable 30-second 110dB siren
triggered upon a motion event (component of Active De-
terrence feature).
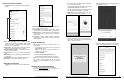
Format the SD Card
The SD card is used to store local video recordings. To
format the card:
1. In the Device "Home" screen, tap the "
>" icon to open
the Device Info screen.
Note: You can tap the ">" icon or anywhere on the
title bar to open this screen.
2. Tap Storage Status.
3. Tap the blue Format Storage Device button.
The SD card will be formatted within a few seconds.
Note: If the message "SD card not found" or "Device stor-
age is 'OFF'", ensure the Micro SD card is installed
properly and the ISV-DOME-WIFI is running the latest
firmware.
Reset to Factory Default Settings
The camera MUST be powered before proceeding.
Press and hold the Reset button for 12 seconds or until
you hear a beep, then release button.
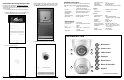
Device Info Screen Features
The Device Info screen includes the following additional
features:
General Record Schedule: Set a schedule for the inter-
nal SD card to continuously record video. When the SD
card is full, the video overwrites the old recorded video
to ensure continuous recording.
Storage Status: Check the status and remaining storage
space of the internal SD card and in the Cloud.
Customize Video Encryption: Customize the video re-
cording encryption settings.
Device Indicator: Turn on or turn off the camera status
LED.
Device Sharing: View / change users authorized to share
camera video.
Cloud Update: Allow software updates when available.
Wi-Fi Config: View / select a new Wi-Fi network.
Alarm Screen Features
The Alarm screen includes the following additional fea-
tures:
NAPCO iBridgeVideo ISV2-DOME-WIFI Installation Guide 3
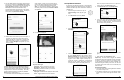
With Android devices, the screen below will appear.
Tap Connect to continue.
8. Select the 2.4GHz Wi-Fi network that you want the
camera to use. Note: 5GHz Wi-Fi is not supported.
6. The camera's green LED will be flashing, indicating it
is not connected to a network.
If using a hardwired connection without Wi-Fi, tap No,
I want wired connection (skip steps 7-10).
If using a Wi-Fi connection, in the screen below (left)
tap Yes, go to Wi-Fi settings, then tap Next.
Helpful hint: Have the password ready for the Wi-Fi
network that you want the camera to use.
7. The app will now prompt you to connect to the cam-
era's hotspot. With iOS devices, the screen below will
appear. Tap Join to continue.