
User's Manual


Trilogy Networx™ Wireless Setup & DL-Windows Configuration Instructions 5
START HERE (cont'd)
cause the software does not have to waste time re-
locating Gateways that have had their IP addresses
changed by DHCP;
● Static IP addresses allow operation across subnets in
large corporate networks (such as those that exist be-
tween buildings);
● Static IP addresses allow Emergency Commands (such
as "Emergency Lockdown") to be used (see Emer-
gency Commands on page 46);
Contact the Network Administrator
If you know that you will install your wireless Networx sys-
tem within a large corporate network that includes multi-
ple subnets, we recommend you start by contacting the
corporate network administrator and request the follow-
ing:
● IP Address - An address for each Alarm Lock Gateway
device
___________________________________________
● Subnet Mask - Filtering data (mask bits) as required by
the aforementioned IP Address
___________________________________________
● Default Gateway - The address of the physical device,
such as a router, for the current subnet to which DL-
Windows will be connected
___________________________________________
ASSIGNING STATIC IP ADDRESSES
TO GATEWAYS
DL-Windows can only Discover Gateways when the Gate-
ways are connected to the same subnet to which DL-
Windows is also connected. To allow DL-Windows resid-
ing on one subnet to communicate with Gateways located
on a second subnet (with both subnets located within a sin-
gle network) a typical installation strategy is:
1. Estimate the number of Gateways needed in the instal-
lation.
2. Install DL-Windows on a PC connected to the first sub-
net (for example, plug the PC into a wall network outlet
the network administrator confirms is wired to the first
subnet).
3. Open DL-Windows and create a new (or open an exist-
ing) Account.
4. Power up a Gateway and connect the Gateway to the
same (first) subnet to which DL-Windows is connected
(in the example above, "173.16.100.xxx"). This connec-
tion to the first subnet may be through a second net-
work socket in the wall, or to a router (or switch) con-
nected to the same network socket in the wall that the
DL-Windows PC is also connected.
5. In DL-Windows, discover the Gateway and Assign
the
Gateway to the selected DL-Windows Account.
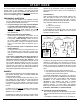
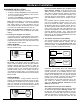
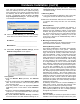
6. In the Gateway Configuration screen, click Tools,
Configure Network Settings. In the Network Con-
figuration screen, (shown below) uncheck Use DHCP,
and a warning popup appears:
Click Yes to close the warning popup. In the Network
Configuration screen, type the three addresses ob-
tained from your network administrator into the following
three fields:
● IP Address
● Subnet Mask
● Default Gateway
Click Save Configuration and send to Gateway.
7. Physically disconnect (unplug) the Gateway from the
first subnet, physically relocate and plug the Gateway
into the second subnet (in the example above, from
"173.16.100.xxx" to "173.16.200.xxx). Install the Gate-
ways in their final locations.
As stated previously, Emergency Commands require all
Gateways in the system use static IP addresses to
communicate with each other. Therefore, to ensure
Emergency Commands operate correctly, use the fol-
lowing menu item to manually distribute the static IP
addresses of each Gateway (listed within DL-Windows)
to all Gateways in the system.
Click the GW Confg button to open the Gateway Con-
figuration screen. Click Tools, Send IP Table to all
Gateways.
The remaining tasks are to install your locks on the
doors, and have DL-Windows Discover them (as out-
lined in the section CONFIGURING DL-WINDOWS
FOR WIRELESS LOCK USE):
8. Create a virtual lock "Profile" for each lock installed
9. Discover physical locks on the Gateway
10. Assign (add) discovered locks to the Gateway
11. Link lock to a Profile
12. Send Profile to lock.
WARNING POPUP
NETWORK CONFIGURATION SCREEN
Default