
User's Manual


Preliminary 01/02
C. OPERATING INSTRUCTIONS
UH-16 Handheld Microphone Transmitter
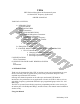
1. Powering the Transmitter
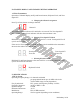
Slide open the BATTERY COMPARTMENT COVER (12) and remove, exposing the
BATTERY COMPARTMENT (14). Insert 2 fresh AA ALKALINE BATTERIES
(15), observing the correct polarity as marked, and slide the COVER back, closing the
BATTERY COMPARTMENT.
Two fresh alkaline AA Batteries can last up to 12 hours in use, but in order to ensure
optimum performance, it is recommended that you replace the batteries after every 8-10
hours of use.
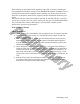
All controls are at the base of the microphone. Turn on the UH-16 by sliding the
OFF/STANDBY/ON SWITCH (15) to the STANDBY position (transmitter on, audio
muted) or the ON position (transmitter and audio both on). The BATTERY
INDICATOR LED (16) will give a single quick flash, indicating usable battery strength.
In the case of dead or low batteries, the LED will either not go on at all, or will stay on
continuously, indicating that the batteries should be replaced with fresh ones. To preserve
battery life, turn the transmitter off when not in use. The channel number on the
CHANNEL LED DISPLAY (18) will extinguish in 10 seconds. The activity indicator
“ “ or “ “ LED will remain on.
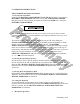
2. Selecting the Operating Frequency
In order for the system to operate properly the same channel (frequency of operation)
must be selected for the UH-16 transmitter as was chosen for the UHF-16 receiver. Press
either the UP or DOWN CHANNEL SELECT BUTTON (17) until the channel number
indicated on the 2-segment CHANNEL LED DISPLAY (18) matches that of the UHF-
16 receiver.
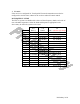
3. Selecting the Tone Squelch™ Mode
Hold both the UP and DOWN BUTTONS (17) at the same time for 1 second. The Tone
Squelch™ will cycle from On to Off. See the CHANNEL DISPLAY AND UP/DOWN
BUTTON OPERATION section below.
4. Locking the Keyboard
To avoid accidental reconfiguration of the Channel setting or Tone Squelch™, the
keyboard can be locked by holding both the UP and DOWN BUTTONS (17) at the same
time for 3 seconds. See the CHANNEL DISPLAY AND UP/DOWN BUTTON
OPERATION section below.
5. Microphone Operation
AA
AA