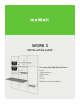
WORK 3 INSTALLATON GUIDE Recommended Additional Items: Level Tape measure Stud finder Drill Pencil Wall mounting hardware
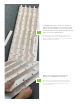
WORK 3 WARNING: Prior to mounting french cleat onto wall, check for proper mounting anchors to use.
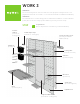
2 Lay myWall panels face down on a clean floor. Place both top and bottom sections next to each other. Top section has the cut-outs for the french cleat mounting at the top. The bottom panel has a lower open section at the bottom. (2 wooden blocks and 8 furniture screws are provided with each of your myWall panel sets) (Keep each box set together as a unit, don’t mix panel sets between boxes) Attach connector blocks to fasten top and bottom of your myWall panel together.
Locate metal or wood stud locations on wall for mounting. 4 (Recommended use of a stud finder) WARNING: Check for plumbing or electrical locations within wall. Mark location for French Cleat. French cleat height from floor to base of cleat can depend on use of panels. 5 Recommended height is 83.5 inches from floor to bottom of french cleat.
8 Attach safety locking plate to left or right side of mywall panel. (Locking plate is only needed on one side of the panel) Attach end-caps to each outer edge side of your myWall panel set. 9 (2 screws are supplied for each side) (The end-caps are used to hide the view of the hanging cleat hardware) 10 Attach your accessories to the panel and ENJOY.
RENEWABLE RESOURCES The myWall system uses rubber wood, a renewable and sustainable byproduct of the latex industry. Reduce: We work with our manufacturing partners to ensure we are leaving as small a carbon footprint as possible. Re-use: Our products are durable and designed to last, cutting down the need to discard our products and purchase new ones. Recycle: Our products and components use recycleable materials. myWall is a registered trademark and patented product of Thinkterior Co. Ltd, Thailand.