
UF-7 Instruction Manual Rev E

www.MyTrickRC.com 4
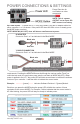
POWER CONNECTIONS & SETTINGS
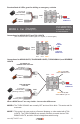
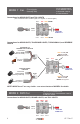
9V Power Option – To power the UF-7 using a 9V battery, plug the 9V Adapter cable into
either connector 1 or 2 as shown. If the power LED does not blink or turn on steady, press
the MODE button one time.
NOTE: MODE #0 (ALL OFF) does still draw a small amount to power.
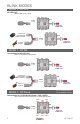
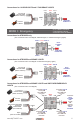
The UF-7 has many different pre-programmed output MODES to fi t multiple lighting
requirements. Pressing the MODE button scrolls through the various modes. Once you
reach the last mode, the next button press sets the unit back to MODE #0 (OFF). When
power is applied to the UF-7 the power LED will blink several times to indicate the software
revision of your controller. It will then blink to indicate the current mode.
Example: — • • • • • [pause] • • • • indicates Software Revision 1.5 [pause] Mode 4.
Each time you press the MODE button the power LED will blink the number of times
equivalent to the current MODE. For Example, 5 blinks indicates that the current mode is
#5. After blinking, the power LED will stay on steady to indicate power.
LEDs LEGEND
Power Pass thru for
roof fl ashers or other
accessories.
NOTE: This is a power
OUTPUT not an input. DO
NOT connect to a battery.
9V ADAPTER
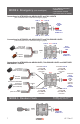
Connect to Port 1 or 2 as indicated in the Blink MODE
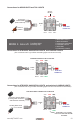
Y CABLE CONNECTION
Connect to Port 1 or 2 as indicated in the Blink MODE
Black wire
Red wire
Black wire
NOTE: Some modes require two ‘Y’ cables, not all packages
have two. You may require the deluxe version.