
User Guide

PG 3
MyTana ACB18 MONITOR / CONTROL BOX User Manual
Operating the System
BASICS
We strongly recommend doing a test recording BEFORE you
perform your rst inspection in the eld.
Keep the shipping caps that are on the ends of the camera
head and the push rod. Use them to protect these connections
whenever you remove the camera head in the future.
Files
In this manual, the term
“Files” refers to your
recordings, whether video
(.mp4) or snapshots (.jpg)
File Naming – by default, les are
named with the date (YYYYMMDD) and
a numbering sequence (-XX)
ex: 20180205-02.mp4 – would be the
third video recorded on Feb. 5, 2018
the first will be “20180205-00”,
the second “20180205-01”, etc.
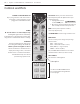
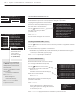
Startup
– Push
POWER
button. Blue light around switch will glow.
Wait about 30 seconds for MyTana logo to appear.
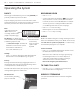
Battery
Recharge the internal battery by plugging the unit in to a
standard wall outlet. Store the unit with half charge and in
cool temperatures to extend battery life.
Transmit mode drains battery more quickly, use this only when
locating 512Hz signal from camera head.
Ground Screw
Can be used for grounding
purposes if needed.
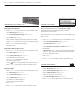
RECORDING VIDEO
– Push
REC/PAUSE
– Use the Control Panel arrow buttons
to choose the
drive you want to record to: Internal, External or Both.
If external, be sure to insert USB (ash) drive in USB port.
You can copy or move recordings to a dierent drive later.
(see File Management menu selections next pages)
– Push
MENU/OK
to start recording.
Red dot appears on screen and timer will start.
– Push
STOP/BACK
to stop recording.
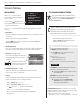
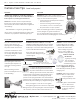
AUDIO
MUTE is the default setting for recording, meaning NO sound
will be recorded (MUTE is ON if you see “MUTE” on the screen).
NG2 units have no speaker for playback, so sound can only
be heard when playing back on a computer.
To Record Sound
– Push
UNMUTE
and “MUTE” will disappear from the screen,
the built-in microphone is now active.
Make sure cover is removed, see image opposite page.
If a wiFi dongle/router is in one of the USB ports, it
could cause sound interference while recording to
either the Internal or an external USB drive.
Remove the dongle to prevent interference
TO TAKE STILL SHOTS
– Press the
SCREEN SHOT
button if you want still shots,
(not available while recording video)
WIRELESS STREAMING
See separate Viewer APP instruction sheet for using WiFi
operations.
You can customize
the names of les
in the Overlay
menu, see pgs 6-7
requires a USB
keyboard