
Installation Guide

Step 1: In the device menu, navigate to;
“Other Settings” > “Advanced” > “System” > “Tamper Detection”
Step 2: Look for the words “Hardware Fitted”. This means the tamper
has been detected by the
.
Step 3: If you see the words “Hardware Not Fitted”, see Troubleshooting before contacting our
Technical Support.
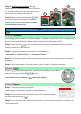
5. Check Tamper
TAMPER DETECTION
Hardware Fitted
Status: Lid Closed
Last Event:
26/09/22 11:19:21
Ptr: 00000
--/--/-- ––:––:––
Once tamper board is fitted, a firmware update is required to make this device compliant with
the UK Government’s Electric Vehicle (Smart Charge Points) Regulations 2021.
Step 1: Power up the
as you usually would, following the Installation Manual. This must
include connection to the internet.
Step 2: Update the firmware on the device by navigating to:
“Main Menu” > “Other Settings” > “Download Firmware”
Step 3: The available update of the latest firmware will show on the display. Select to start the
download.
Step 4: Once downloaded, in the same menu, select “Install” to install the firmware.
3.
Update firmware
Step 3: Holding it by the edges, take the
Tamper Board (1) and insert onto the CPU board
(2), located on the back of the enclosure cover,
as shown on the image to the right (3).
Step 4: Now, continue installing the
as
you usually would, following the Installation
Manual, ensuring the front cover is securely
in place before powering up.
NOTICE
requires an internet connection for next steps.
1
2
3
4. Setup
Refer to Installation Manual for instructions on setting up your device
and pairing to any existing
devices.
Scan the QR Code to view the Installation Manual.