
Instruction manual

8.0 Maintenance Guide
DO NOT set the clamp pressure below 400 psi. Severe lacerations or
dismemberment could result! The knife and clamp system loses sequence at settings below 400 psi
and the knife could come down before the clamp.
8.4.4.1 Optional Electronic Clamp Pressure Control Adjustment
The electronic clamping control option allows the convenience of changing the clamp pressure at the
control console. The pressure is controlled by use of the up and down arrow keys, 0 being the
lowest - 15 the highest; and is indicated in the upper right hand corner of the display.
Note: To turn the electronic clamp control option on or off, enter the Maintenance Mode and choose
Diagnostic. Then choose Electric Clamp and select “ON” or “OFF”.
To adjust the actual clamp pressure maximum and minimum, first make sure the Electric Clamp
option is set to “ON” (see above paragraph). Enter the Maintenance Mode and choose Diagnostic.
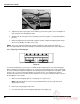
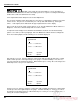
Then choose Clamp Adjust, and the following screen should be displayed:
5.000
Set Maximum
>
Press /\ to Increase
Press \/ to Decrease
A) Main C) Send
B) Job
D) Exit
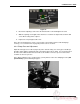
Now perform a cut cycle. After the clamp has contacted the table and while the knife bar is coming
down, read the pressure on the right hand pressure gauge. It should read 800 psi. If it does not,
correct by using the up and down arrow keys. When finished, press soft-key “D” to exit and go to the
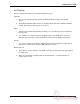
minimum pressure set up screen shown below:
5.000
Set Minumum
>
Press /\ to Increase
Press \/ to Decrease
A) Main C) Send
B) Job
D) Exit
Perform a cut cycle. After the clamp has contacted the table and while the knife bar is coming down,
read the pressure on the right hand pressure gauge. It should read 400 p.s.i. If it does not, correct
by using the up and down arrow keys. When finished, press soft-key “C” to return to Send Mode, or
soft-key “D” to return to Diagnostics.
48