My First Lab® DUO SCOPE™ USER MANUAL Model MFL-06 This microscope is intended for use by ages 9 and older. Parents are reminded this is a scientific tool and contains glass microscope slides and sharp instruments. Proper handling and parental supervision is required. Always follow the appropriate safety procedures.
With the My First Lab® DUO SCOPE™ you have the ability to observe both microscope slides and solid objects, such as plants, coins and insects. The key is in the dual, cool LED illumination that provides both sub-stage and overhead lighting. Battery power eliminates the need for electricity or power cords and allows for portable use “in the field”. The My First Lab® DUO SCOPE™ combines two separate applications into one fantastic package that promises hours of fun and learning.
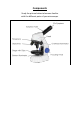
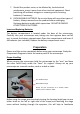
Components Study the picture below to become familiar with the different parts of your microscope.
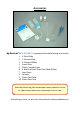
Accessories My First Lab® DUO SCOPE™ is equipped with the following accessories: 1. 2. 3. 4. 5. 6. 7. 8. 9. 10. 5 Plain Slides 1 Concave Slide 4 Prepared Slides Cover Glass Plastic Transfer Pipet 2 Bottles of Non-Toxic Stain (Red & Blue) Lens Paper Forceps Plastic Test Tube Plastic Petri Dish Save the plastic bag the microscope comes packed in to use as a dust cover when your microscope is not in use.
Maintenance To prolong the life of your batteries, turn off the power immediately when not in use (be sure all lights are off—switch in the center position.) Dust the unit with a soft dry cloth or soft brush. Fingerprints and debris may be removed with a damp cloth. If glass lens require cleaning, try a cotton swab very slightly moistened with alcohol. Dry with a clean swab or lens paper. Store your microscope in a cool dry place. Always cover or return to the box when not in use.
. Should this product cause, or be affected by, local electrical interference, move it away from other electrical equipment. Reset (switching off and back on again or removing and re-inserting batteries) if necessary. 8. RECHARGEABLE BATTERIES: Do not mix these with any other types of battery. Always remove from the product before recharging. Recharge batteries under adult supervision. DO NOT RECHARGE OTHER TYPES OF BATTERIES.
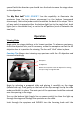
yourself with the direction you should turn the knob to move the stage closer to the objectives. The My First Lab® DUO SCOPE™ has the capability to illuminate the specimen from the top (stereo microscope) or the bottom (compound microscope). Notice the power switch located on the back of the scope. This is a 3 way switch to operate either the bottom light (set to the single line), both lights (set to the double line), or set to the off position (circle in between the two lines).
image of the specimen becomes clear. Be careful not to let the slide touch the lens. Focusing Tip While focusing, if the stage stops moving, DO NOT FORCE IT. You may damage the microscope. The disc diaphragm, located directly below the stage, has six different apertures (openings), which allow various amounts of light to pass through. Rotating this disc allows you to modify the amount of light that is transmitted. Try experimenting with various settings to get the most effective view.
Viewing 3D Objects As with viewing slides with the microscope, always begin your observation with the 4X objective and increase magnification accordingly. Remember to turn on the overhead illuminator. Focusing Tip Only the 4X and 10X objectives may be used when viewing 3D objects. The 40X objective is not suitable for use with the upper lighting due to the focusing distance required.
Ideas for Observation Children: Always get an adult’s permission before trying any experiments! 1. Crystals: Place a few grains of dry salt or sugar on a slide to observe. Mix salt with a spoonful of warm water in the test tube and then use the plastic transfer pipet to place a couple drops on a plain slide. Let it dry and observe the re-crystallized salt/sugar. 2. Shake some grains of pollen from a flower onto a plain slide. Now observe! 3.
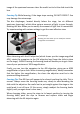
Insect Observation Below are some screen shots to compare the wings of several different insects. Notice the difference in the shape and structure. Use your microscope to compare other similar common household items. Honeybee Wing (40X Magnification) Fly Wing (40X Magnification) Mosquito Wing (40X Magnification) Mold Growth Observation 1. Get some water, a paper plate and one piece of bread. 2. Place the bread on the plate and drop a little water on the bread to make it damp (not soaked). 3.
Mitosis in Onion Cells Mitosis is part of the cell cycle when replicated chromosomes are separated into two new nuclei. Observation Steps 1. With an adult’s supervision, cut a small piece of an onion (approximately ¼ - ½ inch). 2. Using the forceps, peel off the membrane from the underside (the rough side). 3. Place the membrane flat on the surface of a microscope slide. 4. Add 1-2 drops of the non-toxic stain. Please wait for 2 to 3 minutes for the onion to absorb the stain.
Notes
LIMITED ONE YEAR WARRANTY The manufacturer warrants this instrument to be free from defects in material and workmanship under normal use for one year from the date of purchase. It does not cover damage resulting from abuse or misuse, repairs or alterations performed by other than authorized repair technicians, or damage occurring in transit. For warranty service, microscope should be well packed to avoid damage in transit, preferably in original box and packing.