
Instruction manual

27
Creating a Cutting Program (Correct) Operation Procedures
3-6 Creating a Cutting Program (Correct)
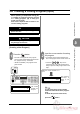
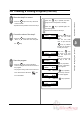
Show the step 3 to correct.
- Press the key for the step 1 which will
not be corrected.
- Repeat the same procedure and move to step 3.
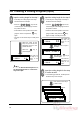
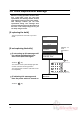
Correct the value of the step 3.
- Press the key to cleat the old value
“249.5”, input the new value “250” and press
the key.
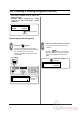
Save the program.
- Press the key on the confirmation
screen to the right and finish the correction of
the program.
- The program cutting mode of the course num-
ber 5 starts and the LED of the but-
ton is illuminated.
En
t
C
En
t
En
t
4 /10
4:270.03:250.0
11/10
11:010:130.0
3 /10
3:249.52:260.0
COURSE
:
5
COURSE
:
5
COURSE
:
5
1/10
2:260.0
1:420.0
COURSE
:
5
EXIT?
MEMORIZE?
Y
:
"Ent" N
:
"C"
Y
:
"Ent" N
:
"C"
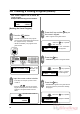
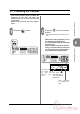
When the key is pressed, the back-
gauge moves to the position of the step.
When the key is pressed again, the
next step appears.
Repeat this and move to the step 3.
En
t
En
t
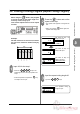
Press the key and
clear the old value
“249.5.”
After the new value
“250” is input and the
key is pressed,
the value for the step 4
is ready to be input.
C
En
t
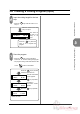
Press the key
and move to the next
step, and repeat this
procedure.
En
t
When “0” is input in the
last step 11 and the
key is pressed,
En
t
The program of the course
number 5 starts.
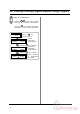
The exit confirmation
screen appears.
The memory confirma-
tion screen appears.
When the key is pressed,
En
t
When the key is pressed,
En
t