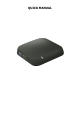
QUICK MANUAL
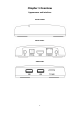
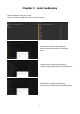
Chapter 1 Overview Appearance and interface FRONT PANEL REAR PANEL SIDE PANEL 2
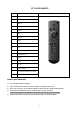
BT VOICE REMOTE NO.
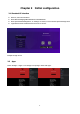
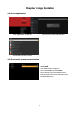
Chapter 2 Initial configuration 2.1 Standard UI interface Power on, enter into main menu. Click ”Welcome/language/Resolution/Screen Zoom/Network. Click ”Open Android Setting Menu”, or “Settings” on remote, to access the Set-top box Settings menu. Login with Username and Password to access the TV service. Example of Login screen 2.2 Apps Select ”Settings”->”Apps”->”See all apps” for opening or delete other apps.
Chapter 3 Local media play Select “File Browser” from apps->”Open”. Select “Local Disk” or “USB” driver, press ”OK” button to enter. Click the video, an option menu will pop up. Select your favorite video player to start playing video. Click the music, an option menu will pop up. Select your favorite music player to start playing music. Click the photo, an option menu will pop up. Select your favorite photo player to start playing photo.
Chapter 4 App Installer 4.2 About AppInstaller Click “AppInstaller” in apps list. Select the driver whose APK allocated. Click the APK you want to install. 4.3 About multi-screen communication 4.3.1 DLNA - Click “Media Center” in Apps list. - Turn on DLNA DMP” and “DLNA DMR”. - Turn on DLNA in your android mobile device. - Start playing the video, music and photo in your android mobile device.
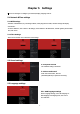
Chapter 5 Settings You can use setting to re-configure your network, display, language and etc. 5.1 Network &Time settings 5.1.1Wifi Settings - Network-> Wi-Fi/Ethernet, by “IP settings: DHCP”, when plug ethernet cable, ethernet settings will display “Connected”. - If select “Static IP”, click “static” in IP settings, revise address in IP address bar, network gateway bar and DNS bar, click “Save”. 5.1.2Time Settings -Select ”time and date” and ”Time Zone from Settings. 5.2 Sound settings 5.2.
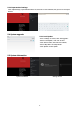
5.3.2 Input method settings Click “Input Settings”, input method from the list, click “OK” to save and back, then you can use new input method. 5.4 System upgrade 5.4.1 Local Update - Press “Settings” at remote, click ”OTA Upgrade”. - Select “Local Update”, click ”OK” to enter. - Click “Select” button, select the new software, - Select “Wipe Data” and “Wipe Media”. - Click ”Update” to start update. 5.
FCC WARNING § 15.19 Labeling requirements. This device complies with part 15 of the FCC Rules. Operation is subject to the following two conditions: (1) This device may not cause harmful interference, and (2) this device must accept any interference received, including interference that may cause undesired operation. § 15.21 Information to user. Any Changes or modifications not expressly approved by the party responsible for compliance could void the user's authority to operate the equipment. § 15.
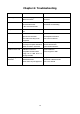
Chapter 6: Troubleshooting Problem Possible cause What to do Power light not lit Mains lead unplugged Check mains lead Mains fuse blown Check fuse Network cable not connected Connect/replace network cable or bad network cable Check Wi-Fi account/setting Network doesn't work Wi-Fi not connected wifi No picture or sound HDMI/AV is not selected on your Reduce to another channel TV No sound distort Volume off Adjust the voice volume Speaker not connected Check Speaker connection The audio c
Chapter 7 Specification CPU AMLOGIC S905X2 QUAD-CORE 64-BIT CORTEX-A53 UP TO 1.8GHz GPU ARM Mali-G31 MEMORY 2G DDRIII 8G EMMC FLASH OS ANDROID 9.0 DECODER VIDEO DECODER 4K2160P 60FPS H.265,MP@L4.0,Main10@L5.1 AUDIO DECODER MP3,AAC,HE-AAC,WMA,RM,FLAC,Ogg PHOTO DECODER JPG,JPEG,MJPEG,PNG VIDEO FORMATS MPEG2,MPEG4,H.264(AVC),H.265(HEVC),VC1,WMV,VP9,MKV ,MPG,MPEG,DAT,AVI,MOV,ISO,MP4,RM,JPG CONNECTION MAIN POWER CABLE FIXED TYPE DATA PORT USB 2.0*1/USB3.