Owner’s Manual MD3183 Inflatable PFD Hydrostatic Inflation Model - Manual with Automatic Backup Recreational: USCG Approved Type II Uninspected Commercial Vessels: USCG Approved Type V MD3184 Inflatable PFD Hydrostatic Inflation Model - Manual with Automatic Backup with Harness Recreational: USCG Approved Type V DO NOT REMOVE PRIOR TO SALE
CONTENTS Page 1 Approval Conditions and Carriage Requirements 2 Note to Uninspected Commercial Vessel Operators 2 Why are PFDs Required Safety Equipment? 2 What is an Inflatable PFD? 3 Instructions for Use 4 Uninspected Commercial Vessel Use 4 Component Inspection Instructions 4 Readiness Checklist 5 Sizing and Fit 5 Donning Instructions 5 Inflating Your Inflatable PFD 7 Special Considerations for Inflatable Devices 7 Deflating the Inflatable PFD 8 Usage Below Freezing 9 Re-arming Your PFD 13 Repacking 16 S
APPROVAL CONDITIONS AND CARRIAGE REQUIREMENTS Approved for recreational use by the U.S. Coast Guard (USCG) as a Type II (Model MD3183), or Type V (Model MD3184) Personal Flotation Device (PFD). Neither are approved for water skiing or other high impact, high-speed activities. Model MD3184 has Type II performance but is approved as a Type V PFD because it has a built-in sailing harness that can cause injury if not properly used. A separate section titled “SAILING HARNESS” (p.
less restrictive to wear than inherently buoyant PFDs. When worn, used and serviced according to this owner’s manual, this PFD can greatly increase your chances of survival in the water. Not recommended for non-swimmers or weak swimmers. Users of inflatable PFDs must be at least 16 years old. NOTE TO UNINSPECTED COMMERCIAL VESSEL OPERATORS The operator of the vessel is required to provide the following user information to each person on board.
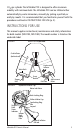
CO2 gas cylinder. The Inflatable PFD is designed to offer maximum mobility with minimum bulk. The Inflatable PFD can be inflated either automatically by water immersion, manually by jerking a pull-tab, or orally by mouth. It is recommended that you familiarize yourself with the procedures outlined in INSTRUCTIONS FOR USE (p. 3). INSTRUCTIONS FOR USE This manual supplies instructional, maintenance and safety information for both models (MD3183, MD3184). The model number is listed on the underside label.
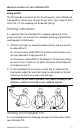
Uninspected Commercial Vessel Use This Inflatable PFD is not approved for “hot work” and care must be taken to avoid damage from abrasion and sharp objects. Component Inspection Instructions 1) Examine the single point status indicator through the window panel (Fig. 1). Ensure the indicator is green. If the indicator is red, the mechanism has been fired or is incorrectly fitted (see Re-arming Your PFD, p. 9). NOTE: The single point status indicator must be green before proceeding.
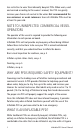
about the readiness of your Inflatable PFD. Sizing and Fit This PFD provides a minimum of 33.7 lbs of buoyancy when inflated and is designed for wearers over 16 years of age, with a chest range of 30-52 inches (76-112 cm) weighing over 80 pounds (36 kg). Donning Instructions It is important that the Inflatable PFD is properly adjusted to fit the person wearing it. An incorrect fit or improper fastening of attachments could impede its effectiveness.
1) Manual Inflation Activate the inflation system by jerking firmly downward on the pulltab (Fig. 4). The Inflatable PFD should fully inflate within 5 seconds. FIGURE 4 Automatic Inflator 2) Automatic Backup Inflation When the inflator is lowered more than about 4 inches in the water, then the hydrostatic valve opens and lets the water meet the water sensitive element that in turn releases a stainless steel coil spring.
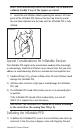
NOTE: Oral inflation may cause the Inflatable PFD to break-out suddenly (loudly) if any of the zippers are closed. ii. Locate the oral inflation tube by opening the wearer’s left front panel of the Inflatable PFD. Remove the dust cap from the end of the oral tube and blow into the tube until the Inflatable PFD is fully inflated. FIGURE 5 Special Considerations for Inflatable Devices The Inflatable PFD might not be armed when needed, either knowingly or unknowingly.
cap will not lock in the deflate position so it is necessary to hold it in place (Fig. 5). 2) Gently squeeze the Inflatable PFD until all air or gas has been expelled. To avoid damage; do not wring or twist the Inflatable PFD. Put the inflation tube dust cap back in its stowed position on the oral inflation tube (Fig. 6). IMPORTANT: Ensure all air has been removed from the PFD. 3) Examine the single point status indicator (Fig. 1).
Re-arming Your PFD NOTE: A valid re-arm kit (MA7214) is required for this procedure. 1) Place the Inflatable PFD (Personal Flotation Device) on a smooth, flat surface and wipe off any water. Access the inflator by reaching under the cover and pull it toward you, turning the cell and cover insideout to fully expose the inflator for re-arming. Hold the CO2 cylinder through the fabric, using one hand (Fig. 8). FIGURE 8 2) Insert the metal key between the black locking ring and labeled yellow cap.
FIGURE 10 Cap 4) Squeeze the sealing ring to elongate and remove the inflator body through the sealing ring (Fig. 11). FIGURE 11 Red Indicator Inflator Body Sealing Ring 5) Dispose of the used inflator body. FIGURE 12 Red Indicator Trash 6) Check that the inflator body indicator is green. Insert the new inflator body with CO2 cylinder pointing upward inside the Inflatable PFD (Fig.13). Let the sealing ring rest on the adapter around the four lugs.
FIGURE 13 Green Indicator Caution: Do not turn the center shaft 7) Now check the new manual/automatic cap as follows (Fig. 14): 1. Is the single point status indicator showing green? 2. Is the expiry day OK? If YES is the answer to both questions, then proceed as follows. If the answer is NO to either question, get a new cap. FIGURE 14 Single Point Indicator Water Inlet Valve 8) Hold the CO2 cylinder through the fabric of the Inflatable PFD (Fig. 15).
FIGURE 15 FIGURE 16 9) While pressing FIRMLY onto the inflator body, turn the BLACK locking ring clockwise into the locked position (Fig. 17). Pull on the cap to make sure it has locked onto the inflator body. FIGURE 17 Black Locking Ring 10) Check: To see that the single point status indicator on the cap is green; the pull to inflate lanyard is present and that the locking ring is locked. 11) Refold the Inflatable PFD in accordance with the Repacking section (p. 13).
Repacking If your Inflatable PFD has been used and/or the hydrostatic inflator replaced, always inflate through the oral tube and check that it stays inflated at least overnight. With the dust cap in the top of the oral tube, gently squeeze the Inflatable PFD until all air or gas has been expelled (Fig. 6). Do not wring or twist the Inflatable PFD. Put the oral tube dust cap back in its stowed position on the oral tube (Fig. 7). Let the life jacket dry before packing.
FIGURE 22 FIGURE 21 C D 4) Fold over the top side (E) and cover (F). FIGURE 24 FIGURE 23 E F 5) Mustang Survival uses advanced 2-step zippers. ZIP 1 - Reset the zipper by pulling the slider (G) around the top to the Velcro™ tab (H). ZIP 2 - Close by pulling the slider (G) in the opposite direction to the end the zipper (Fig. 26). Ensure that the Inflatable cell does not get caught by the zipper when closing.
6) Fasten the Velcro™ tab (H) to keep zipper closed. FIGURE 27 H 7) ZIP 1 - Reset the 2-step zipper by pulling the slider (I) to the Velcro™ tab (H). ZIP 2 - Close by pulling slider (I) in the opposite direction to the end the zipper (Fig. 29). Ensure that the Inflatable cell does not get caught by the zipper when closing. FIGURE 29 FIGURE 28 H H I I 8) Use a finger to push the zipper ends into the openings at the bottom of the the packed Inflatable PFD (Fig. 30).
9) Ensure the pull-tab (J) is on the outside of the folded Inflatable PFD. Fig. 30 depicts a correctly folded Inflatable PFD. FIGURE 31 J Sailing Harness CAUTION: Use only as a sailing harness. Models with a sailing harness (MD3184) are designed to prevent the user from falling overboard when used with a tether with an under-load quick-release hook and have been designed and tested in accordance with Offshore Racing Council (ORC) requirements.
quick-release under-load hardware. This harness has not been designed for fall arrest, lifting or climbing and should not be relied upon in any of these instances. US Coast Guard approval does not apply to this harness and the potential for injury has not been assessed.
1) Before Each Use: i) Examine the single point status indicator through the window panel, ensuring it is green. If the indicator is red, the mechanism requires service. See Re-arming Your PFD, p. 9. ii) Ensure the manual pull-tab is accessible. iii) Visually examine your Inflatable PFD for damage or excessive abrasion, wear, tear or contamination. Particular attention must be paid to the stitching, straps and hardware. If in doubt, send it to your Mustang dealer for evaluation and/or servicing.
ii) Visually examine your Inflatable PFD for damage or excessive abrasion, wear, tear or contamination. Particular attention must be paid to the stitching, straps and hardware. If in doubt, send it to your Mustang dealer for evaluation and/or servicing. iii) Perform the Oral Inflation Valve Test: See the Oral Inflation Valve Test in the Every Two (2) Months Care and Maintenance Instructions section. iv) Perform the Leak Test.
• Adequately for expected wave conditions (body shapes/ densities affect performance) · Make sure it works: • A flow of bubbles should not appear (see CARE AND MAINTENANCE INSTRUCTIONS for leak tests p. 17). It should inflate quick and easily. · Learn how it works by: • Activating the CO2 inflation system • Re-arming the CO2 inflation system • Using the oral inflator tube HOW DO YOU TEST YOUR PFD USING THE AUTOMATIC INFLATOR? The U.S.
HOW DO YOU TEST YOUR PFD USING THE MANUAL INFLATOR? The U.S.Coast Guard recommends that you purchase at least one spare re-arming kit (MA7214). 1) To test your Inflatable PFD, you will need your fully armed Inflatable PFD, and re-arming kit approved for your Inflatable PFD: MA7214. 2) Put on the Inflatable PFD. 3) Actuate the inflation system by jerking firmly downward on the pull-tab. The Inflatable PFD should fully inflate within 5 seconds.
3) Get into shallow water, just deep enough that you can stand with your head above the surface. 4) If you are a weak swimmer or non-swimmer, inflate the Inflatable PFD partially so that you are supported well enough to be able to complete inflation without touching bottom, either orally or manually. Note this level of inflation because it is the minimum needed for you to safely use this Inflatable PFD. 5) Fully inflate the Inflatable PFD using the oral inflator.
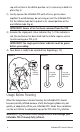
How hypothermia affects most adults Water Temperature ˚C (˚F) 0.3 0.3–4 4–10 10–16 16–21 21–27 over 27 (32.5) (32.5–40) (40–50) (50–60) (60–70) (70–80) (over 80) Exhaustion or Unconsciousness Expected Time of Survival Under 15 min. 15–30 min. 30–60 min. 1–2 hrs. 2–7 hrs. 2–12 hrs. Indefinite Under 15–45 min. 30–90 min. 1–3 hrs 1–6 hrs. 2–40 hrs. 3 hrs.
reduce the rate of heat loss and thus increase the survival time. FIGURE 33 HELP Position EACH OF THESE DEVICES IS INTENDED TO HELP YOU SAVE YOUR OWN LIFE For your Inflatable PFD to function properly, follow these suggestions to verify that it fits, floats, and remains in good condition. 1) Check the single point status indicator before each use. 2) Get in the habit of re-arming the inflation mechanism right after each inflation.
Inflatable PFD Safety Accessories MA7214 Re-arm Kit contains 33-gram replacement CO2 cylinder inflator. ADDITIONAL INFORMATION If you need more information about PFDs and safe recreational boating, contact your state boating authority, U.S. Coast Guard Auxiliary, U.S. Power Squadron, Red Cross, or your nearest unit of the U.S. Coast Guard; or call the CG Customer InfoLine at 1-800-368-5647 or the free boating course number 1-800-336-BOAT (in VA, 1-800-245-BOAT).
WE SAVE LIVES FOR A LIVING www.mustangsurvival.com 3870 Mustang Way Bellingham, WA USA 98226 TOLL FREE EMAIL 1.800.526.0532 mustangusa@mustangsurvival.com Mustang Survival and seahorse design is a registered trademark of Mustang Survival Corp. Our commitment to quality has earned our Richmond facilities ISO 9001 registration, the highest of all international standards. This is our guarantee you’re receiving the ultimate in design and manufacturing.