
Owners manual


9
NOTE: A re-arm kit (MA2014) is required for this
procedure.
IMPORTANT: Follow instructions in the exact sequence
below.
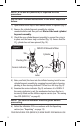
1) Open inflator cover flap so that manual inflator is exposed (Fig. 7).
2) Remove the cylinder/bayonet assembly by rotating
counterclockwise and then pull out. Discard the used cylinder/
bayonet assembly.
3) Check the new cylinder/bayonet assembly to ensure the o-ring is
in place and the sensor ring is attached (Fig. 10). Ensure that the
CO
2
cylinder has not been pierced (Fig. 10).
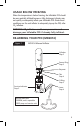
Tab
Piercing Pin
Cylinder
Lever
Service Indicator
MD2014 Manual Inflator
1/8 Turn
Figure 8
4) Raise, and hold, the lever into the inflator housing. Install a new
cylinder/bayonet assembly by engaging bayonet tabs in housing,
pushing in then turning clockwise 1/8 turn to a full stop (Fig. 8).
5) Examine the service indicator (Fig. 8) and ensure it is GREEN. If
the service indicator is red, the mechanism has been fired or is
incorrectly fitted and the inflator requires service (see "Re-arming
Your PFD (MD2014)" on page 8).
NOTE: The service indicator must be green before
proceeding.
6) Refold the Inflatable PFD in accordance with the Repacking
section (see "Repacking" on page 13)
YOUR INFLATABLE PFD (MD2014) IS NOW READY FOR MANUAL USE