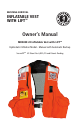
MUSTANG SURVIVAL INFLATABLE VEST TM WITH LIFT � Owner’s Manual TM MD0450 22 Inflatable Vest with LIFT Hydrostatic Inflation Model - Manual with Automatic Backup TM SecureZIP US Patent No.
CONTENTS Page 1 Introduction 1 Why are PFDs Required Safety Equipment? 2 What is an Inflatable PFD? 3 Instructions for Use 3 Component Inspection Instructions 4 Readiness Checklist 5 Donning Instructions 6 Inflation 8 In-water Adjustments 9 Special Considerations for Automatic Devices 10 Deflation 10 Usage Below Freezing 11 Re-arming Your PFD 15 Auto/Manual Conversion Cap (MA7219) Instructions 15 Conversion Instructions 17 Repacking 23 Is Your PFD in Good and Serviceable Condition? 24 Care and Maintenance I
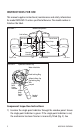
INTRODUCTION The MD0450 22 requires user involvement to ensure a level of safety equal to other inflatable PFDs. Knowledgeable users increase their safety significantly by wearing and using these PFDs as prescribed in this owner’s manual. General - This Inflatable PFD will turn most wearers from a face down to a face up position and provide support suitable for offshore conditions. See page 11 for re-arming instructions.
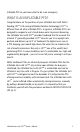
Inflatable PFD so you know what to do in an emergency. WHAT IS AN INFLATABLE PFD? Congratulations on the purchase of your Inflatable Vest with Patent Pending LIFTTM [Life-saving Inflatable Flotation Technology]. LIFTTM is different from all other inflatable PFD’s. In general, inflatable PFD’s are designed to suspend a user’s head above water to prevent drowning. The Inflatable Vest with LIFTTM provides freeboard that far exceeds the minimal 3” generally provided.
INSTRUCTIONS FOR USE This manual supplies instructional, maintenance and safety information for model MD0450 22 unless specified otherwise. The model number is listed on the label.
RE-ARMING YOUR PFD (p. 11). NOTE: The single point indicator must be green before proceeding. 2) Open the cover at wearer’s right-hand side of the chest and lay the device flat. 3) Ensure the oral-inflation dust cap is in the stowed position (Fig. 22). 4) Ensure the single point indicator is green and the beaded handle is attached to it’s Velcro tab; secure the zippers on the Inflatable Vest with LIFTTM (see Repacking, p. 17). 5) Ensure the date on the inflator is not five years or older (Fig. 2).
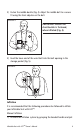
Donning Instructions It is important that the PFD is properly adjusted to fit the person wearing it. An incorrect fit or improper fastening of attachments could reduce its effectiveness. 1) Put the Inflatable Vest with LIFTTM on just like a jacket (Fig. 3). If the Inflatable Vest with LIFTTM is already inflated prior to donning, it may be excessively tight while donning.
3) Fasten the middle buckle (Fig. 4). Adjust the middle belt to a secure fit using the front adjuster on the belt. FIGURE 4 IMPORTANT: Ensure the chest buckle is fastened, when inflated (Fig. 4). 4) Feed the loose end of the waist belt into the belt opening in the storage pocket (Fig. 5). FIGURE 5 Inflation It is recommended that the following procedures be followed to inflate your Inflatable Vest with LIFTTM.
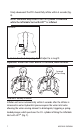
firmly downward. The PFD should fully inflate within 5 seconds (Fig. 6). NOTE: Deflation may occur if the CO2 cylinder is removed while the Inflatable Vest with LIFTTM is inflated. FIGURE 6 2) Fasten the chest straps (Fig. 7) and adjust to a snug fit. Important: Ensure the chest buckle is fastened, when inflated. FIGURE 7 Fastened Chest Strap Automatic Backup Inflation Inflation will occur automatically within 5 seconds after the inflator is immersed in water.
NOTE: Hydrostatic inflator must be submerged in at least 4 inches of water to activate the inflator. NOTE: When inflated, the carbon dioxide (CO2 gas) used to inflate PFDs will slowly escape through the cell over time. A slight reduction of pressure will be observed after several hours of inflation. Topping up by oral inflation may be required in the event of prolonged immersion.
In-water Adjustments Follow these instructions to adjust the waist belt, when wearing the Inflatable Vest with LIFTTM in the water. To tighten: a. Grasp the loose end with the left hand. Pull the webbing to your right side (away from the buckle) (Fig. 9). b. Simultaneously grasp the waist belt along the body with the right hand (approximately 6 inches to the right of the buckle), and feed the webbing into the buckle. FIGURE 9 To loosen: a.
Special Considerations for Automatic Devices The PFD might not be armed when needed, either knowingly or unknowingly. Premature automatic inflation causes several risks that you must address to avoid drowning. Much less common but also important are: 1) Double inflation (CO2 cylinder inflation after full oral inflation) could damage the PFD, 2) Inflation when stored in a tight space could damage the PFD, and 3) The PFD could inflate when you are in an awkward place or position.
Usage Below Freezing When the temperature is below freezing, a fully discharged cylinder may not adequately inflate your Inflatable Vest with LIFTTM Under these conditions use the oral inflator to top-up the Inflatable Vest with LIFTTM It may be neccessary to manually release the VelcroTM tabs, located at the bottom of the left and right panel covers, for full inflation because oral inflation may not provide sufficient pressure to open the tabs.
2) Insert the metal key between the black locking ring and labeled yellow cap. Turn the key counter-clockwise (Fig. 13). FIGURE 13 Locking Ring Key 3) Turn the black locking ring counter-clockwise and lift off the cap (yellow inflator operating head Fig. 14). Dispose of the used cap. FIGURE 14 Cap 4) Squeeze the sealing ring to elongate and remove the inflator body (Fig. 15).
FIGURE 15 Red Indicator Inflator Body Sealing Ring 5) Dispose of the used inflator body. FIGURE 16 Red Indicator Trash 6) Check that the new inflator body indicator is green. Insert the new inflator body with CO2 cylinder pointing upward inside the Inflatable PFD (Fig. 17). Let the sealing ring rest on the adapter around the four lugs.
7) Now check the new manual/automatic cap as follows (Fig. 18): 1. Is the single point status indicator showing green? 2. Is the expiry day OK? If YES is the answer to both questions, then proceed as follows. If the answer is NO to either question, get a new cap. FIGURE 18 Single Point Indicator Water Inlet Valve Expiry 8) Hold the CO2 cylinder through the fabric of the Inflatable Vest with LIFTTM (Fig. 19).
9) While pressing FIRMLY onto the inflator body, turn the BLACK locking ring clockwise into the locked position (Fig. 21). Pull on the cap to make sure it has locked onto the inflator body. FIGURE 21 Lanyard Black Locking Ring 10) Check: To see that the single point status indicator on the cap is green; the pull to inflate lanyard is present and that the locking ring is locked. 11) Ensure the beaded handle is fed through the pocket opening and fastened to the Velcro tab (Fig. 39).
2) Fasten, by tying, the conversion cap lanyard to the loop in the pocket immediately in front of the inflator after passing it through the opening in the cover (Fig.22). FIGURE 22 Opening FOLD #1 Lanyard FOLD #3 FOLD #2 Right Lobe Conversion Cap 3) Position the conversion cap over the inflator’s hydrostatic valve opening. The conversion cap’s metal clip should be placed along the top of the inflator’s hydrostatic valve (Fig.23).
CONVERSION CAP REMOVAL Once the conversion cap is removed, the MD3196 becomes an automatic inflation device. Firmly pull the conversion cap lanyard to remove the conversion cap (Fig.25). NOTE:Do not pull inflation lanyard when removing conversion cap FIGURE 25 To remove the conversion cap when packed, pull the conversion cap lanyard out from the opening of the cover of the LP’s right lobe. Visually confirm the conversion cap has been removed from the valve opening.
1) Before repacking: Completely deflate the Inflatable Vest with LIFTTM (see Deflation p. 10). NOTE: Before following the repacking sequence, be sure to properly re-arm your Inflatable Vest with LIFTTM See Re-arming Your PFD (p.11). 2) Ensure the oral-inflation dust cap is fitted in the stowed position (Fig. 26). FIGURE 26 Dust cap in stowed position Dust cap position for deflation 3) Open both front panel covers.
4) Lay out flat the right lobe (as it is worn). Shift the left lobe (as it is worn) on the waist belt to fully extend the right lobe for folding. NOTE: The numbered fold lines, on the diagram, are provided to assist with packing. Make each fold towards yourself. 5) Fold the right lobe (as it is worn) over on the Fold #1 dashed line (Fig. 28). Note that the right lobe has the inflator with cylinder.
7) Fold the bottom portion of the lobe over (Fig. 30). a. Position the lobe so it does not cover the inflator (Point A). b. Put the inflator beaded handle through the opening in the cover (Point B) and attach to the Velcro tab. c. Position the chest buckle under the cover (Point C). FIGURE 30 C B A 8) Fold the lobe over on the Fold #3 dashed line (Fig. 31). a. Position the folded lobe so it does not cover the inflator (Point A). FIGURE 31 A 9) Fold the cover panel down so that it covers the lobe (Fig.
FIGURE 32 VelcroTM Tab TM 10) Mustang Survival uses advanced 2-step zippers - SecureZIP . Find the right zipper tail on the right lobe and ZIP 1 - Reset the 2-step zipper by pulling the slider to the Velcro™ tab (Figs. 33 and 34). NOTE: Fasten the Velcro™ tab to prevent the zipper from reopening. ZIP 2 - Close by pulling slider in the opposite direction to the end the zipper (Fig. 34). Ensure that the Inflatable cell does not get caught by the zipper when closing.
NOTE: Fasten the Velcro™ tab to prevent the zipper from reopening. ZIP 2 - Close by pulling slider in the opposite direction to the end the zipper (Fig. 36). Ensure that the Inflatable cell does not get caught by the zipper when closing. \FIGURE 35 FIGURE 36 12) Tuck in the zipper tail, so it is not exposed (Fig. 37). FIGURE 37 Zipper Tail 13) The right lobe should now be fastened closed and the inflator should be visible through the clear window.
lobe, it should sit under the cover. 14) Repeat steps 3-12 for the left lobe (as it is worn). Note that the left lobe does not have an inflator or indicator window. 15) Turn over the Inflatable Vest with LIFTTM and fold the back flap up and fasten the three (3) VelcroTM tabs (Fig. 38). FIGURE 38 Right Lobe 16) Use the adjustable waist belt to size to fit. When complete, the garment should appear as shown (Fig. 39) and be secure for use or storage.
IS YOUR PFD IN GOOD AND SERVICEABLE CONDITION? Check your PFD between outings to be sure that it is properly armed, as shown by green single point indicator; that it is free of rips, tears or holes; that all seams are securely sewn; and that the fabric, straps and hardware are still strong. Inspect the inflatable portion of the PFD in accordance with the CARE AND MAINTENANCE INSTRUCTIONS (p. 24).
until firm and let stand 2 hours. A leaking Inflatable Vest with LIFTTM will not hold its firmness and should be replaced. If your Inflatable Vest with LIFTTM leaks, take it to your Mustang dealer for evaluation and/or servicing. Repack the Inflatable Vest with LIFTTM as outlined in the Repacking section (p. 17). ii) Oral Inflation Valve Test: To check the oral inflation valve, fully inflate the Inflatable Vest with LIFTTM using the oral inflator and hold valve under water.
v) Ensure the current date is not past the date on the inflator. If it is, replace the inflator (see Re-arming Your PFD, p. 11). vi) Ensure the single point status indicator is green (Fig. 2). Repack the Inflatable PFD as outlined in the Repacking section (p. 17).
• Activating the CO2 inflation system • Re-arming the CO2 inflation system • Using the oral inflator tube HOW DO YOU TEST YOUR PFD USING THE AUTOMATIC INFLATOR? 1) To test your Inflatable Vest with LIFTTM, you will need your fully armed Inflatable Vest with LIFTTM, and re-arming kit (MA7218-22) approved for your Inflatable Vest with LIFTTM. 2) Put on the Inflatable Vest with LIFTTM. 3) Get into shallow water, just deep enough that you can stand with your head above the surface.
3) Actuate the inflation system by jerking firmly downward on the beaded handle. The Inflatable Vest with LIFTTM should fully inflate within 5 seconds. 4) Get into shallow water, just deep enough that you can stand with your head above the surface. 5) See if the Inflatable Vest with LIFTTM will float you on your back or just slightly back of vertical. In a relaxed floating position, verify that your mouth is well above the water’s surface. Note the effect of where you hold your legs and how you float.
be able to complete inflation without touching bottom, either orally or manually. Note this level of inflation because it is the minimum needed for you to safely use this Inflatable Vest with LIFTTM. 5) Fully inflate the Inflatable Vest with LIFTTM using the oral inflator. It may be neccessary to manually release the VelcroTM tabs for full inflation because oral inflation may not provide sufficient pressure to open the tabs.
HYPOTHERMIA Prolonged exposure to cold water causes a condition known as hypothermia – a substantial loss of body heat, which leads to exhaustion and unconsciousness. Most drowning victims first suffer from hypothermia. The following chart shows the effects of hypothermia: how hypothermia affects most adults. How hypothermia affects most adults Water Temperature ˚C (˚F) 0.3 0.
lessen heat loss and increase your survival time. 3) Use the standard H.E.L.P. position when wearing an inflatable PFD, drawing the legs up to a seated position, because doing so will help you conserve body heat (Fig. 36). 4) Keep a positive attitude about your survival and rescue. This will improve your chances of extending your survival time until rescued. Your will-to-live does make a difference! 5) If there is more than one person in the water, huddling is recommended while waiting to be rescued.
7) If your PFD is wet, allow it to dry thoroughly before storing it. Store it in a well-ventilated area. 8) Do not dry your PFD in front of a radiator or other source of direct heat. SAFETY ACCESSORIES For the MD0450 22 use a MA7218-22 Re-arm Kit, which includes a 38gram CO2 replacement cylinder, inflator body and beaded handle. DO NOT ATTACH PFD’S TO YOUR BOAT Each PFD has straps, hooks, buckles, or other means for securing the device in place on the wearer.
� WE SAVE LIVES FOR A LIVING www.mustangsurvival.com 3870 Mustang Way Bellingham, WA USA 98226 TOLL FREE EMAIL WEB 1.800.526.0532 mustangusa@mustangsurvival.com www.mustangsurvival.com Mustang Survival and seahorse design are registered trademarks of Mustang Survival Corp. Our commitment to quality has earned our Richmond facilities ISO 9001 registration, the highest of all international standards. This is our guarantee you’re receiving the ultimate in design and manufacturing.