
Installation Instructions


BOUND
MUSSEL
™
ADHESIVE TILE MAT
BROCHURE/INSTALLATION INSTRUCTIONS
6
www.musselbound.com
2. SET
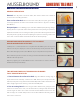
Clean tile:
Most tiles retain residue from the manufacturing process. Clean the back of each tile
with a damp sponge and dry thoroughly. Also, clean and dry each tile following the
use of a tile wet saw.
Install tile:
Support the bottom row of tile with molding, tub edge, countertop, metal strip, tile
spacer or similar edge. When placing tile around an outlet, be sure the outlet cover
hides the tile edges.
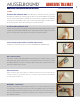
OPTIONAL - Tile spacers:
If not using self-spacing tiles, place minimum 1/8” (3.175mm) tile spacers at top
corners of tiles to ensure the following row of tiles is square and evenly spaced.
OPTIONAL - Dissimilar thickness tiles:
If tiles are not of similar thickness and you wish to make the nished surface even,
MusselBound may be layered to bring the thinner tiles level with the thicker tiles.
Gently press in place:
Set tiles into desired layout by GENTLY pressing tiles onto MusselBound to ensure
repositioning is possible if needed.
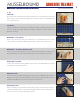
Reposition tiles:
If needed, remove tile with your ngertips or, if necessary, carefully pry up tile with a
at-tipped screwdriver or putty knife. Protect adjacent tile with a at, sturdy object if
required. MusselBound is still active and will re-bond to the tile.
Firmly press tiles:
When completely satised with tile layout, rm pressure will secure tiles into place.
Follow immediately with 5-second press with grout oat to activate lasting adhesive
bond. Leave spacers in place until ready to grout.