RECEPTOR Version 2.0.1 Software Update for Receptor 2 Products Operating Manual V1.0 February 20, 2014 www.museresearch.
Table Of Contents Welcome.......................................................................................................................3 Downloading, Installing, and Registering your Update.........................................................4 Getting Familiar - OVERVIEW...........................................................................................6 RECEPTOR Front panel New Button Layout.........................................................................7 New Terminology of V2.
RECEPTOR Version 2.0.1 Software Update Manual Introduction First off, thanks for being a RECEPTOR 2 owner. Whether you play for fun,gig at a local club or Church, or tour the world performing for huge crowds, you understand how important it is to have a stable, high-performance instrument with which to run your favorite virtual instruments and effects. Two years ago we released an entirely new version of our user-interface that employed an entirely new paradigm of a virtual rack.
Getting Started: Downloading your update The Receptor 2.0.1 update is a paid update. Yeah, we know, every update up to now has been free, but the fact is this update includes OVER $900 of SOFTWARE and with tons of new features, if anything, its a bargain. We think you will agree once you start using it. Please note that if you already own V2.
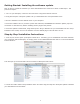
Getting Started: Installing the software update Now its time to install the software you have downloaded but it needs to be done in TWO steps. The process is simple: 1. Turn on your Receptor, connect to the hard drive using Muse Remote Control. 2. Drag and drop the "Receptor-update" file you downloaded into "Drop Installers Here". 3. Run the installer from the SETUP menu in your Receptor. 4.
Getting Started: Completing installation and registering 3. Now it's time to install the software by opening up the GUI and going to the SETUP page and selecting "INSTALL 1 Files" from the INSTALL section of the Setup page. The system will report its progress as it installs the software and reboot when it is finished installing the software.
B. If an LCD is not available, connect a USB or PS2 keyboard for "blind" activation (Not recommended, but possible) If you do not have a mouse, monitor and keyboard attached, you can still authorize the software using just a keyboard connected to the Receptor. This is done "blind" since you can't verify the authorization code as you enter it (which is why we don't recommend this method).
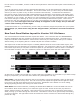
Getting Familiar with the V2.0.1 Terminology and Operation Now that your software is now installed and registered, so its time to become acquainted with the many new features and benefits availble in the V2.0.1 software release! FIRST... some definitions PLAY: The PLAY mode is the super simple default mode that happens when the RECEPTOR powers up. You can tell you are in PLAY mode because the PLAY button on the top left side of the button field is lit. PLAY mode is the easiest way to operate your RECEPTOR.
What's great about PLAY mode is that it makes it really easy to utlilize all the functionality of your RECEPTOR without having to spend a bunch of time creating sounds. With SoundFinder in the PLAY mode, even someone completely unfamiliar with software instruments and effects can use RECEPTOR. As you become more comfortable with your RECEPTOR, you'll find it valuable to know how the different sounds and effects are organized so you can quickly find the preset you are looking for.
The Different Types of Presets in your RECEPTOR It is important to realize that there are not only different types of Tags for different purposes, but there are also different "levels" of presets in your RECEPTOR. The PLAY level has presets that control every aspect of your RECEPTOR. These presets control RECEPTOR as a whole.
Using PRESETs in the "PLAY" mode Now that you have an overview of the different SoundFinder TAGs and what they provide, let's move ahead and select a couple of presets. RECEPTOR as a Synthesizer/Sound Module 1. Connect your keyboard to the MIDI input on the back of the unit, and connect the line outputs to a stereo mixer, keyboard amplifier, or a pair of amplified speakers. 2. Power up RECEPTOR (if it is not already on). If not already lit, press the PLAY button. 3.
4. Play your guitar and adjust the Input 1 GAIN control on the AudioBox 1818 so that the red clip light on the interface does not illuminate, even when playing loud. 5. Play your guitar and enjoy the incredibly realistic amp modeling provided by RECEPTOR. Feel free to browse the other Guitar Effect presets; especially in some of the other TAGs since there are many different sounds available to you.
Selecting Individual Synth Presets PLAY mode lets you instantly select factory presets using SoundFinder, making RECEPTOR incredibly simple to use. But what if you want to layer two sounds together, or make your own custom preset consisting of different effects on different inputs? Well you can make your own preset easily based on the presets that are in RECEPTOR right from the front panel.
3. Now let's select a preset for this synth channel. Turn the bottom knob to find the sound you want. For example, let's choose an Electric Piano patch from the "TAG: Electric Pianos." Press the knob to load it 3. Now we'll layer that with another sound—say a pad synthesizer. To do this, we press the CHANNEL + button, and then the bottom encoder switch to add a new channel to what we already have loaded. 4. Select the TAG and preset of interest, say "Airy Pad" from the "TAG:Synth Pads" category.
Selecting Individual Audio Input Effect Presets Now let's make your own custom preset consisting of different effects on different audio inputs. Say, for example we wanted to play acoustic guitar and have some chorus on the guitar sound, and sing with a some processing on our vocal microphone. 1. First, press the "PLAY" button.
3. Turn the gain control to minimum on the front panel input and plug in your acoustic guitar. Turn the bottom encoder to select "TAG FX Acous Gtr" and then turn the top knob to select the preset "007 AcstcGuitarChannel" Press the encoder button to load the patch. Of course if there is a different preset you'd like to use on the guitar, feel free to select it now. 4.
The MIX Button and Adjusting Levels The MIX section allows you to adjust the volume and panning of the main outputs, adjust the channel volume on any of the synth or effect slots, as well as configuring insert or send effects using their factory presets.This is done by pressing the MIX button on the front panel. When you are in PLAY mode, pressing the MIX button lets you adjust or see the following: Master Volume: Adjust the main output mixer volume.
Here are the parameters for the effects you can control in the MIX section: Effect 1 Tag: Select the effects preset category of Effect 1. Effect 1 Preset: Select the Preset within the current Tag for Effect 1. Effect 1 DRY/WET amount: Adjust overall Effect 1 amount. Effect 1 Mode (either INSERT or SEND): Change signal path of Effect 1. Effect 1 Output Select (must be in SEND mode to enable individual outputs) Effect 2 Tag: Select the effects preset category of Effect 2.
Saving the Presets You’ve Created Any new preset you create, as well as any modifications to the factory presets can quickly be saved from the front panel. Always be sure to save any changes you make as they are NOT retained when you turn off the power! To save a preset, simply PRESS and HOLD the EDIT button. You have the option to "save over" an existing preset, or create a NEW one (labeled as USER-X, where X is the last saved user preset number plus one).
Editing Virtual Instruments or Effects The virtual instruments and effects in RECEPTOR are intended to be edited from their Graphical User Interfaces which you can see when you connect an LCD monitor to your RECEPTOR, or when you use the RECEPTOR Remote software with your Mac or PC through a network. However, you can edit some of the key parameters on a plugin from the front panel by pressing the EDIT button.
Using the RECEPTOR Graphical User Interface The RECEPTOR Graphical User Interface (GUI), lets you see what is happening inside your RECEPTOR, as well as letting you use a keyboard and mouse to make edit the factory presets or make new ones. To view the RECEPTOR GUI, simply connect a standard computer VGA or HDMI monitor to the VGA or HDMI jack on the rear of the unit, and a USB mouse and QWERTY keyboard to the USB Ports.
Exploring the GUI: Tags/Presets List Area ("SoundFinder") List On the left hand side of the screen you'll see a column with the heading Tags/Presets. This is the GUI's representation of the front panel SOUNDFINDER feature, and works the same way - select a Tag (by clicking on the little triangle) and load a preset (by clicking on it).
Exploring the GUI: Loading Synth and Audio Effect Presets In the center of the GUI is a large area that constitutes a virtual "rack" for running your virtual instruments and effects. At the top of the rack area is the name of the preset and tag that is currently loaded. There can be up to 16 total "synth" or "effect" channels. There are several ways to load presets into the rack area, including creating a preset from scratch. 1.
Synth Channel Control Functions 1. Channel Solo Switch: Solos this channel and mutes all others when pressed / lit. 2. Synth Graphical Editor: Shows a small picture of the synth loaded into that channel. Click on the picture to open up the graphical editor for that synth for programming using your mouse. 3. Preset selector: Opens up the preset selection window for that particular plugin. 4.
Audio Input Channel Controls 1. Channel Solo Switch: Solos this channel and mutes all others when pressed / lit. 2. Effect Graphical Editor: Click on the icon of the effect and the GUI of the effect itself will appear. You can then edit the effect's individual interface using your mouse. 3. Preset Selector: Opens up the preset selection window for that particular plug-in. 4.
Exploring the GUI: The Mixer Section Controls Now that you know how to select different synths, effects and their presets, it is time to craft the overall sound using the MIX section. The MIX section consists of two slots for additional effects, as well as the master volume and pan controls. These slots operate just like the audio input slots; simply drag the effect of interest into the slot to activate it, or select a preset by clicking on the on the preset bar that says (Empty).
Using the Direct Outputs on a Synth Channel All of the virtual instruments and effects running in your RECEPTOR feed the master stereo mix bus, and the resultant stereo mix signal shows up on Outputs 1 and 2 of the AudioBox. You can alter the routing of any of the audio signals in your RECEPTOR by using the INPUT and OUTPUT selector buttons found in various places on the Graphical User Interface.
Configuring The Master Mix Bus Effects, Stereo Mix, and Headphone Outputs: In addition to configuring any of the individual channels to send their outputs directly to the phyiscal outputs of your RECEPTOR, most of the time you will want to mix all of the synth and audio channels together and send the results out the Line outputs and then on to a keyboard amplifier or mixer. NOTE: the Master Mix bus is assigned to Line Out L+R, ADAT 1+2, and S/PDIF output by default.
Exploring the GUI: The Setup Menu Tab Your RECEPTOR has several system level settings that go beyond what was possible in the Mixer Mode. These are all found in the SETUP tab on the Graphical User Interface. Setup: Software Manager / System Tab The Software Manager window is the "command central" area for managing the operating system and plugin software on your RECEPTOR. When you open up the window, you'll see Tabs across the top: SYSTEM, PLUGINS, and LICENSES.
The Plug-ins Tab: Installing Plug-ins and their patches If you have installed a fixer that includes plug-in software, you can now install that software by clicking on the PLUGINS tab. This will open up a different window that lists all of the plug-ins that are installed on your system, as well as giving you the opportunity to install plug-ins or their patches by pressing the corresponding button on the bottom left.
Setup: The "Audio..." settings menu The Current Audio Device is always the Built-in audio, which gives you two analog inputs, two analog outputs, stereo S/PDIF inputs, stereo S/PDIF outputs, and an ADAT digital audio optical output. System Latency refers to how many buffers of audio you are employing to perform all of the various calculations necessary to turn digital "bits" into music.
Setup: MIDI settings The new V2.0.1 software release lets you change some of the MIDI characteristics of your RECEPTOR by selecting the MIDI SETUP menu in the main SETUP menu. The MIDI SETUP menu lets you set the internal MIDI clock rate which will provide tempo information to any synth or effect that uses MIDI clock to set tempos for things like LFOs, delays, and drum patterns.
Setup: Change Resolution Your 2.0.1 software update gives you the ability to support many different monitor resolutions for viewing the GUI by directly attaching a computer LCD monitor display to the back of the unit. There are different resolutions for the monitor output of your system, so you might need to experiment to find the best resolution that allows you to view the entire graphical user interface on your particular monitor.
Customers who are familiar with RECEPTOR 2 programming will obviously be very comfortable in the "Mixer-style" interface, but as the "Rack-style" interface gains more and more new features, you will likely find yourself spending more and more time in this exciting new interface. MIXER MODE INTERFACE For more information about how to utilize the features found in MIXER mode, please consult the RECEPTOR manual that came with your unit and is avaialble on www.museresearch.com.
Important Features in V2.0.1: LIVE MODE RECEPTOR features an breakthrough technology that makes it possible to instantly switch from one preset to the next, just like in a hardware keyboard. This exclusive, proprietary technology is called LIVE MODE and it lets you pre-load the presets of a particular TAG into RAM. The result is instantaneous switching from one preset to the next using MIDI program changes or using the LIVE mode screen.
Managing your Presets in LIVE MODE Once the TAG has the presets you want in it, you'll want to make sure they are in the order in which you think you will perform them before entering LIVE mode because you cannot reorder your presets in LIVE mode. LIVE MODE works by loading the first presets in a TAG, and then loading the presets sequentially from that point.
Important features in V2.0.1: Mini Strips and Moving Synths One of the most convenient features of the Rack Mode interface is being able to see your various plugins stacked on top of each other on the virtual rack. However, as you add more and more plugins, the rack grows in size, requiring you to use the scroll bars to get to various plugins that you have in the rack. That's why we created "Mini-Strips".
Back up and Restore Operation First off, its important to understand that Backup/Restore is a mode that you must enter and leave from the front panel. This is the only way to backup the entire drive. IMPORTANT NOTES ON SELECTING A SUITABLE BACKUP DRIVE: Please note that there are certain requirements for backup drives to be used to back up your Receptor.
Backing Up Your Main Drive The good news is that once the Initial Backup is created, your system able to boot and run off the backup drive (assuming it is high performance - see "Important Notes On Selecting a Suitable Backup Drive"). Additinoally, it can utilized to create "incremental" ("normal") backups, saving your work as you go along. Normal backups (backing up just the things that have changed since the last backup) is usualy very fast.
Once you've created your initial backup disk, you don't need to do it again unless you want to create another entire backup of your drive. Usually, you'll just want to backup whenever you've done a lot of work to save the changes you've made since the last backup.
Restoring Your Main Drive From Your Backup Now that you have attached your back up drive to your Receptor, (and have disabled QuickBoot if you own a Rev G model) you are now ready to boot from the extrernal Backup drive, and then restore the Backup image to your Main drive. To enable the boot menu do one of the following depending on your particular model: 1. Receptor 2 / Receptor 2+: Hold down F11 when you boot the unit.
Restoring Your Main Drive From Your Backup, continued... Once you determine that you want to restore the entire drive, or simply restore what has changed since you last backed up, you will be asked whether that is really what you want to do: NOTE: This is particularly critical to make sure you really want to Restore your Main drive from your Backuo.
END-USER SOFTWARE LICENSE AGREEMENT By opening the seal of this product and operating it, you are agreeing to the following end-user licensing agreements for the software that runs on RECEPTOR. If you do not agree to the terms set forth herewith, return the unit to your retailer in the same condition as it was purchased for a full refund.
Acknowledgements RECEPTOR was created by a dedicated group of individuals at Muse Research & Development. Special thanks go to the following individuals for turning this concept into a reality: Executive Producer: Matt Christiano. Software Engineering and System Design: Michael Ost and Louis Gorenfeld. Product Concept and GUI Design: Michael Ost, Bryan Lanser, Louis Gorenfeld, Axel Hartmann (DesignBox). Software Testing: Kevin Bryson, Chris Ryan, Robert Bance, Kevin Looney.
Additional Resources for Learning More about RECEPTOR Below is a list of additional resources where you can learn more about your RECEPTOR, Virtual Instruments in general, and how to get the most from your system. http://www.museresearch.com Basic support information, tutorial videos, and software updates http://www.plugorama.com Advanced support information including a comprehensive FAQ database, help desk for submitting specific questions, and installer files for installing new plug-ins to your system.