Receptor v1.7 Release Notes This document includes all release notes for Receptor versions 1.1 through 1.7 Muse Research, Inc. 970 O’Brien Drive Menlo Park, CA 94025 USA Tech Support: (650) 326-6180 Main Office: (650) 326-5400 May 14, 2008 Copyright 2004-2008 Muse Research, Inc. All Rights Reserved. 1 Muse Research, Inc.
Muse Research, Inc.
Receptor v1.7 Release Notes This section discusses the most significant of Receptor’s v1.7 improvements, new features, and bug fixes. Features described in this section supersede any descriptions in your Receptor v1.2 owner’s manual or in previous Release Notes. IMPORTANT: Receptor v1.7 requires both Receptor Remote Control v1.2 (or higher) and UniWire v1.2 (or higher). Receptor Remote Control and UniWire are now bundled together in a single download, called “Receptor Tools.
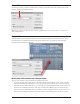
Connect To Use this area to select, by name, which Receptor you wish to control. If you have only one Receptor, it will obviously appear as the default selection. TIP: You can rename your Receptor using either its graphical user interface (Setup View), or from the front panel (SETUP button). Receptor Viewer Click this button to open a window in which you’ll see Receptor’s graphical user interface.
Receptor Drive Click this button to open (mount) Receptor’s internal hard drive on your computer’s desktop, where you can navigate it just like any other storage volume on your computer—you can even drag and drop files between it and your computer’s drives. NOTE: Computer specialists and network administrator types might be interested in knowing that Receptor’s Hard Drive is accessed using the SMB protocol. Receptor v1.7 Release Notes 5 Muse Research, Inc.
Direct Install Click this button to open a Direct Install window on your desktop. Direct Install is a new method (discussed, in detail, later in this v1.7 supplement), which allows you to install plugins on Receptor using their native Windows installers. IMPORTANT: As of this initial release, Direct Install supports only Native Instruments’ Komplete 5, and any of the plugins contained within that package.
Options There are various options associated with Receptor Remote Control. Editor Opens (Windows Only) This option determines how the Receptor Viewer’s graphics look when you resize its window. Specifically: • Full Size: If you choose this option, the Receptor Viewer will open full size (1024x768). If you re-size the window, the graphics will remain full-size and scroll bars will appear.
New Feature: Refresh Plugins Whenever you add new plugins to Receptor, it needs to “learn” about their existence so it can display them in either the Source or FX lists. This is called “refreshing plugins.” Whenever you install a plugin using the new Direct Install feature (discussed in the next section), the Refresh Plugins Utility runs automatically. There may be times, however, when you wish to manually refresh plugins.
4 The utility begins to run and a status bar monitors the progress. 5 When the Refresh Plugins Utility has finished, click Done. 6 Your Receptor User Interface will re-appear. New Feature: Direct Install Direct Install is a powerful new feature that will, over time, allow you to install many more plugins on your Receptor. Prior to Direct Install, there were three ways to install plugins on Receptor: • Premium Plugins: These plugins can be purchased and downloaded from Plugorama.com.
Muse Research will maintain a Plug-in Compatibility database of all the plugins that will work with Direct Install. IMPORTANT: As of this initial release, Direct Install supports only Native Instruments’ Komplete 5, and any of the plugins contained within that package. In the future, additional plugins from numerous developers will be supported by the Direct Install technology. NOTE: Direct Install requires that Receptor and your host computer be connected to a network with internet access.
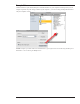
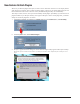
Navigation Buttons Search Field Bookmarks Help Tabs Information As you can see in the previous illustration, the Direct Install window contains several elements, which are discussed in the following sections. Search Field Begin typing the name of your plugin into the search field to find it in Receptor’s Plugin Compatibility Database. For example, if you type “absy” into the Search Field, you’ll see a drop down list containing all the developers and plugin names that contain this text string.
• Receptor Serial: Displays the serial number of your Receptor. If you have multiple Receptors, click the reset button next to the serial number and select the serial number of the Receptor on which you’re installing software. • Receptor OS: Displays the system software version currently installed in your Receptor. • Latest Receptor OS: Displays the most recent Receptor system software version.
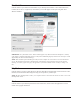
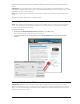
4 Click the name (or icon) of the plugin you wish to install. The Plugin’s Direct Install Status window appears. As you can see in the previous illustration, the Status window contains several tabs: • Summary: Click this tab to display all information about the chosen plugin. • Install Plug-in: Click this tab if you’re installing a full plugin, and not merely an update to an existing plugin. • Install Latest Update: Click this tab if you’re installing an update to a previously installed plugin.
Receptor v1.6 Release Notes This section discusses the most significant of Receptor’s v1.6 improvements, new features, and bug fixes. Features described in this section supersede any descriptions in your Receptor v1.2 owner’s manual or in previous Release Notes. New Feature: Automatic UniWire Enabling Previously, if you wanted to use Receptor with UniWire, you would need to go to Setup view and manually turn on the Enable UniWire option. Now, with the release of Receptor v1.6, you do not need to do this.
Prior to v1.6, if you told Receptor to use a specific MIDI channel for all its program change messages, it would simply “drop” the MIDI program change messages it received on the other channels. Now, if you check the Route All Other Channels to the Source Plugin option, Receptor does exactly that: It takes any Program Change message received on all MIDI channels not being used by Receptor’s own program change channel, and routes them directly to the Source plugin of the corresponding patch channel.
5 Using Kontakt 2’s own Load/Save menu, select New instrument bank from list > 05 - Organs and Harpsichord > All Organs and Harpsichord.nkb. This loads a bank full of Organ and Harpsichord patches into Kontakt. 6 Make sure Kontakt is responding to some MIDI channel other than 16. Remember, in Step 2 you told Receptor to use Ch 16 for its own internal program changes, so this channel is reserved for sending program change messages to Receptor’s Mixer.
Modified Feature: “File Sharing” and “Mac OS 9 Sharing” In Setup view, two networking options have been renamed. Specifically: • The option previously called AppleTalk has been renamed Mac OS 9 File Sharing. • The option previously called Windows Networking has been renamed File Sharing. Functionally, these options still perform the functions discussed under their old names your Receptor Manual.
Modified Feature: Run Utility Button In the “third time’s a charm” category comes the Run Utility button that, in v1.5 was renamed the Plugin Tools button that, in v1.3 was introduced as the Register Plugins button. The Run Utility button performs all the same functions previously described in v1.3 and v1.5. The name change reflects the more generalized nature of the mini-applications you will be able to launch from this button in a future release. Modified Feature: ZLoad is now OFF by Default As of v1.
If you haven’t already done so, you should get in the habit of creating Snapshot banks rather than Performance Multis (since support for Performance Multis has been removed and superseded by Snapshots). Instructions for creating and using Snapshot Banks are in the v1.5 release notes. If you already have a number of Performance Multi Banks, here’s how to convert them to Snapshot Banks: 1 From Receptor’s Multi slot, select a Performance Multi Bank and load the first Performance Multi Patch from that bank.
Receptor v1.5 Release Notes This section discusses the most significant of Receptor’s v1.5 improvements, new features, and bug fixes. Features described in this section supersede any descriptions in your Receptor v1.2 owner’s manual or in previous Release Notes. New Feature: UniWire™ UniWire™ is a new way to connect one or more Receptors to a computer-based digital audio workstation using only Ethernet cables—no audio or midi cables are needed.
Snapshot Patch 1 Plugin Patch Plugin Patch Plugin Patch Snapshot Patch 2 Plugin Patch Plugin Patch Plugin Patch Plugin Patch Plugin Patch Plugin Patch Snapshot Patch 3 Plugin Patch Plugin Patch Plugin Patch Plugin Patch Plugin Patch Plugin Patch Plugin Patch Plugin Patch Plugin Patch MIX Parameters MIX Parameters MIX Parameters MIX Parameters MIX Parameters MIX Parameters MIX Parameters MIX Parameters MIX Parameters (Volume, Pan, Mute, Solo, Bypass, Send Levels, Pre/Post, MIDI Filt
3 Click the BANK tab (if it’s not already selected). At the bottom of the panel, you’ll see a newly designed New button, which contains a left half and a right half. 4 Click the right half of the New button (the part that reads “snapshot”). The entire button will turn blue. Note that clicking the left half of the New button lights only that half and, as such, creates a standard Multi Bank, rather than a Snapshot Bank. 5 Type the desired Snapshot Bank name and click OK.
Similarly, if you edit any plugin’s patch data and save the changes, that data is written to the parent file, meaning it affects all snapshots within that Snapshot Bank. If you edit a plugin’s patch data and don’t save the edited plugin assignments, those edits will affect any snapshot you recall from within that Snapshot Bank until such time as you recall a patch from outside that bank.
• With snapshots you can load sample data into a sampler on a bypassed channel and prepare it for later use while you are playing another channel. Assume, for example, that you are setting up a snapshot bank using channel bypass as described previously. B4 is on CH 1, snapshot 1. Kompakt is on CH 2, snapshot 2. Kompakt is left in its default state, loading no sample data. Now, load snapshot 1 so Kompakt is bypassed and you’re playing B4.
• Singles Receptor sends incoming Program Change messages to the Single Patch Bank on the Receptor channel that corresponds numerically to the incoming MIDI channel. If you have the Program Change Channel parameter set to ALL, then you can target different Receptor Instrument channels by changing the MIDI channel on which you send the Program Change message.
New Feature: Last Program Change Receptor now displays the last Bank Select and Program Change messages it received, and the MIDI channel on which those messages appeared. This is particularly useful when you’re setting up a MIDI keyboard controller for Receptor and are trying to figure out what Bank and Program change messages the controller is sending, and on which channel it’s sending them.
Modified Feature: Route MIDI CCs to Source Plugin In previous versions, when you enabled this option, Receptor would automatically take all 128 incoming MIDI˛CC messages and route them to the plugin assigned to the Source slot. This has been changed as follows: • If the Program Changes parameter is set to Use Bank Select, then Bank Select messages (CC˛00 and CC˛32) are not routed to the Source plugin and, instead, are used by Receptor as Bank Select messages.
Receptor v1.4 Release Notes This section discusses the most significant of Receptor’s v1.4 improvements, new features, and bug fixes. Features described in this section supersede any descriptions in your Receptor v1.2 owner’s manual or in previous Release Notes. New Feature: Scribble Strip (User-Definable Channel Names) Receptor now lets you create your own name for each channel. To name a channel: 1 Double-click the big Channel Select button. A name field appears.
This functionality still exists, but is now one of two options for specifying how Receptor routes incoming MIDI CC data. The new option is called “Route MIDI CC’s to Source Plugin” and is located in the MIDI section of Receptor’s Setup View. This is the new “Route MIDI CCs to Soure Plugins” option. On the front panel, you can get to this option by pressing the SETUP button and scrolling to the parameter called “MIDI CCs to Source”.
• Average Meter: Because the amount of CPU usage can vary signifantly from buffer to buffer, use the average meter to see the average amount of CPU usage that your plugins are currently consuming. This is a more real-world example of how your Receptor’s processor is handling all the data you’re throwing at it. By keeping one eye on the average usage and another on the peak usage, you should be able to maximize Receptor’s CPU usage.
New Plugins Support for numerous new and updated plugins has been added since the release of Receptor software version˛1.3. Some plugins install using the new “User Installable” method, and some install using the good old “built-in and iLok’d” method. The following sections list all the new and updated plugins. New User Installable Plugins Since the release of Receptor v1.
• Sonalksis SV-315 Stereo Compressor • Sonalksis SV-217 Stereo EQ In addition, Cycling 74 has graciously allowed registered Receptor owners to authorize the following Receptorized plugin for free: • Cycling 74 Pluggo Jr. Updated “Built-in” Plugins The following “built-in” plugins have been updated since v1.3. Visit www.plugorama.com to download the latest versions: • DiscoDSP Discovery v2.4 • ReFX Slayer v2.0 • ReFX Vanguard v1.
Receptor v1.4 Release Notes 34 Muse Research, Inc.
Receptor v1.3 Release Notes This section discusses the most significant of Receptor’s v1.3 improvements, new features, and bug fixes. Features described in this section supersede any descriptions in your Receptor v1.2 owner’s manual or in previous Release Notes. NEW FEATURE: Support for Plugins with Multiple Outputs Some multitimbral plugins feature the ability to assign their different sounds to different output channels. Receptor now supports plugins with multiple outputs.
• Plugin Sources - all of Receptor’s built-in VSTi plugins are listed next. Any built-in VSTi can be used as a sound source for a Receptor instrument channel. VSTi sources appear in black text. • Plugin Audio Feeds -- any currently instantiated plugin can be used as a sound source for another channel. If a plugin offers multiple outputs, then selecting it from the Plugin Audio Feeds section will let you select which of that plugin’s outputs you want to route into the channel.
6 Select Kompakt - Ch 1 under the PLUGIN AUDIO FEEDS heading. Receptor displays a pop-up sub-menu of all the outputs offered by that plugin. 7 Select Kompakt 3/4 from the pop-up sub-menu. Receptor routes output pair 3-4 from the Kompakt plugin instantiated on Ch 1 into Instrument Ch 2 on Receptor. Receptor v1.3 Release Notes 37 Muse Research, Inc.
8 Now, configure Kompakt to send one sound to outputs 1-2 and another sound to outputs 3-4. In this example, a bass sound is routed to output pair 1-2 and a piano sound to output pair 3-4. Receptor will process the bass sound through Instrument Ch 1 and the piano sound through Instrument Ch 2. In this way, a multitimbral plugin instantiated on a single channel can supply different audio streams to different Receptor channels, for independent processing and mixing.
Note that this will automatically replace any source assignments on subsequent Instrument channels after first confirming that you want this to happen. This provides a quick way to auto-assign all plugin outputs to Receptor Instrument channels. Button Labels Notice, if you assign a Plugin Audio Feed to a channel, it appears in blue text on the Channel Select button.
Receptor Ch 6 would display “Kompakt - Ch 3”, because the Kompakt that’s instantiated on Ch 3 is the source of the audio feeding Ch 6. The bottom line displays the output (as named by the plugin, itself) that’s feeding audio to the channel. Using Multiple Output Plugins with the Front Panel As with the Plugin Select panel in the graphical user interface, the front panel now displays group headings for source plugins. Specifically, 1 Press the SOURCE button on Receptor’s front panel.
Assigning an output from an instantiated plugin to feed audio into a channel You can instantiate a multi-out plugin on one channel, then use its different outputs to feed audio into additional Receptor channels. The following example discusses how to do this for Kompakt, though any multi-out plugin will work identically. First, instantiate a multi-out plugin on a Receptor channel: 1 Press the top display knob and rotate it to select Receptor CH 1. 2 Press the SOURCE button on Receptor’s front panel.
NEW FEATURE: Support for developer-specific challenge/response registration It’s now possible to use some developers’ own challenge/response applications to register Receptor plugins, authorizing them for use on Receptor. Although a special Receptorized installer must still be downloaded from www.plugorama.com, Receptor’s native iLok authorization is not involved and no Receptor cross-grade is required -- rather, registration and authorization is performed using the developer’s own copy protection method.
2 Click the plugin you would like to register and authorize. A Serial Number panel appears. 3 Enter your serial number as provided by the developer, then click OKAY. The Registration/authorization application appears. 4 In the “Registration” section, click “Save Registration File.” A Save File dialog appears. 5 In the Save File dialog, navigate to C/My Documents and save the registration file there. You can choose another location if you wish, but this one is very convenient to access.
METHOD 2: Text-File Authorization -- With this method, you create a .txt file on your Mac or PC that contains the authorization key, copy it to Receptor, and open it from within the registration/authorization window. Specifically: 1 On your Mac or PC, launch a text editing application, create a new file and copy the authorization key (and only the authorization key) to that file. 2 Name it something like “ColossusAuth.txt” and save it to your Mac or PC’s hard disk. 3 Copy that .
Locking/Unlocking Banks using the Graphical User Interface To unlock a bank using the Graphical User Interface: 1 Click the Save/File button for the bank type you wish to unlock. A Bank/Patch panel opens. For example, if you wanted to unlock a Multi Patch bank, click the Save/File button in the Multi Patch slot. 2 Click the Bank Tab to make sure the Bank list is visible. 3 Click the name of the Bank you wish to unlock. Banks that are currently locked have around their name.
5 Click OK. The Bank list is refreshed, the Bank is unlocked, and its name is no longer displayed in . The process is identical for locking a bank, except that the button names change to guide you through the process. Specifically: 1 Click the Save/File button for the bank type you wish to lock. A Bank/Patch panel opens. For example, if you wanted to lock a Multi Patch bank, click the Save/File button in the Multi Patch slot. 2 Click the Bank Tab to make sure the Bank list is visible.
5 The Bank name is flashing. Push the bottom display knob to apply your selection. The display shows the selected bank in the top line and lets you choose whether or not to lock or unlock that bank. 6 MU L o c k : D emo III III L o c k e d Mu l t i s < Rotate the bottom display knob counterclockwise to select “Unlocked” or clockwise to select “Locked.” You do not need to press the bottom display knob -- your change takes place immediately.
NEW FEATURE: MIDI CC Display for Plugins Receptor has always featured extensive MIDI control capabilities, in which plugin parameters can be controlled either with dedicated NRPNs or with a system of dynamic MIDI CC assignments. While Receptor previously displayed dedicated NRPN values in its graphical user interface, users were forced to consult the manual to see MIDI CC assignments for plugins (unless they memorized them).
If you open the Parameter Order panel for Classic Phaser when it’s assigned to CH2, FXB, it looks like this: Note that the parameter orders are the same, but the MIDI CC values are different because (as discussed in your Receptor manual), MIDI CC assignments are slot-dependent. NOTE: Only MIDI “course” controls are shown in the Parameter Order panel. MIDI fine control is also possible. See your Receptor manual for more information.
BUG FIXES Many minor issues, annoyances, obscurities, and minutia have been addressed. In addition, the following are some of the more obvious bug-fixes included with v1.3: • Samples larger than 1 GB will now load. Previously, users with over than 1 GB of RAM were not able to load samples larger than 1 GB. This limit has now been removed. • Plugin Overview icons for the Master channel now appear. Previously, the little FXA, B, and C icons did not appear in the Master channel.
Oddity from GForce (GMedia/Ohm Force) Another Ohm Force / GMedia teaming has created the VSTi equivalent of the classic ARP Odyssey – called The Oddity. This stunningly realistic emulation perfectly captures the searing, aggressive and funky tones of the original instrument, while adding several enhancements such as the ability to ‘Morph’ between Presets and a unique ‘Flying Fader’ feature that allows you to “throw sliders around” at different speeds.
Vector Sector from General Vibe Vector Sector is an authentic recreation of Sequential Circuits esteemed Prophet VS synthesizer from the mid-eighties. It provides you with complete control over four independent waveforms that make up a single voice, including the ability to traverse from one waveform to another in real time using the joystick control or envelope generators.
Stylus RMX from Spectrasonics Stylus RMX now works via Receptor’s “unsupported plugins” feature. Although this may sound like an oxymoron, “unsupported plugins” refers to plugins that are neither distrubuted nor sold by Muse Research and are thus installed and authorized using a different method than the iLok-protected plugins purchased from plugoramama.com. Owners of Stylus RMX who wish to use this plugin on Receptor may now download a special free Receptor installation preparation package from www.
Receptor v1.3 Release Notes 54 Muse Research, Inc.
Receptor v1.2 Release Notes This section discusses the most significant of Receptor’s v1.2 improvements, new features, and bug fixes. Features described in this section supersede any descriptions in your Receptor v1.0 owner’s manual, and are integrated into the most recent Receptor owner’s manual. You may now route each Receptor channel to a specific output Each Receptor channel has a new Output assignment button at the bottom of the mixer strip.
Faster plugin instantiation with new Zload™ feature Zload™, when enabled, can dramatically improve the speed at which plugins instantiate. When plugins instantiate faster, Receptor is more responsive to patch change requests. Multi patches, in particular, will load dramatically faster. Zload works as follows: When you first instantiate a plugin, it takes the normal amount of time to load (equivalent to the amount of time it takes to instantiate on a Mac or PC).
Tempo Source parameter now saved Globally In previous versions, Receptor would save its Tempo Source as part of a Multi patch, which could result in confusing results when changing between Multi patches. As of v1.2, Receptor now saves the Tempo Source globally, and the parameter setting does not change when new Multi patches are recalled. Receptor v1.2 Release Notes 57 Muse Research, Inc.
Receptor v1.2 Release Notes 58 Muse Research, Inc.
Receptor v1.1 Release Notes This section discusses the most significant of Receptor’s v1.1 improvements, new features, and bug fixes. Features described in this section supersede any descriptions in your Receptor v1.0 owner’s manual, and are integrated into the most recent Receptor owner’s manual. Improvements Multi and Single patches load up to four times faster Depending on the state of your mixer and the nature of your multi or single patch, you will see up to 4x improvement in patch load times.
Select MULTI Banks without sending an MSB (CC00) message It is now possible to select patches in MULTI banks without sending an MSB (CC00) Bank Select message. Simply send the desired LSB (CC32) Bank Select message followed by a program change and Receptor will load the corresponding Multi patch. When Receptor receives an LSB message without a corresponding MSB message, it now assumes that you want to select a patch from the Multi bank.
Bug Fixes • Kompakt DFD state is now saved In Receptor 1.0, Kompakt was unable to save its DFD state. This has been fixed in 1.1 -- any changes you make to Kompakt’s DFD settings can now be saved. Note that DFD settings are saved within the Kompakt plugin and are thus global to all instances of Kompakt. DFD settings are not saved as part of a Receptor Multi patch. • Found and fixed rare noise problems Under certain obscure conditions version 1.0 could emit unexpected noises. Version 1.
Receptor v1.1 Release Notes 62 Muse Research, Inc.